IBM 86884RX Maintenance Manual - Page 33
Parity, Utility, Configuration, Settings
 |
View all IBM 86884RX manuals
Add to My Manuals
Save this manual to your list of manuals |
Page 33 highlights
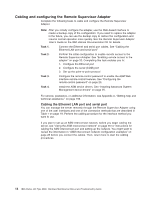
during POST. The port is returned to the operating system after POST completes. You can view the port using the operating system or any application. The Remote Supervisor Adapter takes over the port from the operating system only when information about a critical event is received. The Remote Supervisor Adapter dials out and transmits an alert and keeps the port dedicated until the server is restarted. The port is no longer available to the operating system or applications. Parity The default setting is None. Stop Bits The default is 1. Note: The data bits value is preset to 8 and cannot be changed. For detailed information about the serial port and modem settings, see the Remote Supervisor Adapter User's Guide on the IBM xSeries Documentation CD. 6. If you made changes to the serial port settings, press F6 to apply the change. 7. Press Esc to return to the Configuration Settings window. If you need to set up point-to-point protocol, go to "Setting up point-to-point protocol." 8. Press Esc to return to the Remote Supervisor Adapter Utility main window. 9. Use the arrow keys to select Exit Utility from the menu, or press Esc to close the Remote Supervisor Adapter Utility program. 10. Remove the CD from the drive. The Remote Supervisor Adapter restarts automatically. 11. Continue with "Setting up point-to-point protocol." Setting up point-to-point protocol: The Remote Supervisor Adapter serial port supports PPP. PPP enables TCP/IP communication over the serial port, which enables Web-based management and TELNET sessions over a modem. To set up PPP, complete the following steps. If you completed the procedure for configuring the serial port and the Configuration Settings window is open, go to step 4. 1. With the server turned off, insert the CD containing the EFI Remote Supervisor Utility program into the drive, and turn on the server. 2. The utility starts automatically, displaying the Remote Supervisor Utility window. 3. Use the Up Arrow and Down Arrow keys (↑ and ↓) to select Configuration Settings; then, press Enter. The Configuration Settings window opens. 4. Use the arrow keys to select PPP Settings, and press Enter. The PPP Settings window opens. Chapter 2. Configuring the server 23
-
 1
1 -
2
-
3
-
4
-
5
-
6
-
7
-
8
-
9
-
10
-
11
-
12
-
13
-
14
-
15
-
16
-
17
-
18
-
19
-
20
-
21
-
22
-
23
-
24
-
25
-
26
-
27
-
 28
28 -
 29
29 -
 30
30 -
 31
31 -
 32
32 -
 33
33 -
 34
34 -
 35
35 -
 36
36 -
 37
37 -
 38
38 -
39
-
40
-
41
-
42
-
43
-
44
-
45
-
46
-
47
-
48
-
49
-
50
-
51
-
52
-
53
-
54
-
55
-
56
-
57
-
58
-
59
-
60
-
61
-
62
-
63
-
64
-
65
-
66
-
67
-
68
-
69
-
70
-
71
-
72
-
73
-
74
-
75
-
76
-
77
-
78
-
79
-
80
-
81
-
82
-
83
-
84
-
85
-
86
-
87
-
88
-
89
-
90
-
91
-
92
-
93
-
94
-
95
-
96
-
97
-
98
-
99
-
100
-
101
-
102
-
103
-
104
-
105
-
106
-
107
-
108
-
109
-
110
-
111
-
112
-
113
-
114
-
115
-
116
-
117
-
118
-
119
-
120
-
121
-
122
-
123
-
124
-
125
-
126
-
127
-
128
-
129
-
130
-
131
-
132
-
133
-
134
-
135
-
136
-
137
-
138
-
139
-
140
-
141
-
142
-
143
-
144
-
145
-
146
-
147
-
148
-
149
-
150
-
151
-
152
-
153
-
154
-
155
-
156
-
157
-
158
-
159
-
160
-
161
-
162
-
163
-
164
-
165
-
166
-
167
-
168
-
169
-
170
-
171
-
172
-
173
-
174
-
175
-
176
-
177
-
178
-
179
-
180
-
181
-
182
-
183
-
184
-
185
-
186
-
187
-
188
-
189
-
190
-
191
-
192
-
193
-
194
-
195
-
196
-
197
-
198
-
199
-
200
-
201
-
202
-
203
-
204
-
205
-
206
-
207
-
208
-
209
-
210
-
211
-
212
-
213
-
214
-
215
-
216
-
217
-
218
-
219
-
220
-
221
-
222
-
223
-
224
-
225
-
226
-
227
-
228
-
229
-
230
-
231
-
232
-
233
-
234
-
235
-
236
-
237
-
238
-
239
-
240
-
241
-
242
-
243
-
244
-
245
-
246
-
247
-
248
-
249
-
250
-
251
-
252
-
253
-
254
-
255
-
256
-
257
-
258
-
259
-
260
-
261
-
262
 |
 |
