Intel SE7501HG2 Product Guide - Page 113
More Problem Solving Procedures, Preparing the System for Diagnostic Testing, Monitoring POST - 6 beeps
 |
View all Intel SE7501HG2 manuals
Add to My Manuals
Save this manual to your list of manuals |
Page 113 highlights
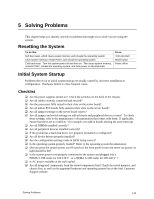
More Problem Solving Procedures This section provides a more detailed approach to identifying a problem and locating its source. Preparing the System for Diagnostic Testing CAUTION Turn off devices before disconnecting cables: Before disconnecting any peripheral cables from the system, turn off the system and any external peripheral devices. Failure to do so can cause permanent damage to the system and/or the peripheral devices. 1. Turn off the system and all external peripheral devices. Disconnect all of them from the system, except the keyboard and video monitor. 2. Make sure the system power cord is plugged into a properly grounded AC outlet. 3. Make sure your video display monitor and keyboard are correctly connected to the system. Turn on the video monitor. Set its brightness and contrast controls to at least two thirds of their maximum ranges (see the documentation supplied with your video display monitor). 4. If the operating system normally loads from the hard disk drive, make sure there is no diskette in drive A. Otherwise, place a diskette containing the operating system files in drive A. 5. Turn on the system. If the power LED does not light, see "Power Light Does Not Light" on page 114. Monitoring POST The server may start to beep while booting. These beeps identify system events. The following gives a description of possible beep codes. Table 32. Beep Codes Beep Code Description 1 One short beep before boot (this is normal, not an error) 1-2 Search for option ROMs. One long, two short beeps on checksum failure 1-2-2-3 BIOS ROM checksum 1-3-1-1 Test DRAM refresh 1-3-1-3 Test 8742 Keyboard Controller 1-3-3-1 Auto size DRAM, system BIOS stops execution here if the BIOS does not detect any usable memory DIMMs 1-3-4-1 Base RAM failure; BIOS stops execution here if entire memory is bad 2-1-2-3 Check ROM copyright notice 2-2-3-1 Test for unexpected interrupts For additional information regarding monitoring POST, see Chapter 3. Solving Problems 113
-
 1
1 -
2
-
3
-
4
-
5
-
6
-
7
-
8
-
9
-
10
-
11
-
12
-
13
-
14
-
15
-
16
-
17
-
18
-
19
-
20
-
21
-
22
-
23
-
24
-
25
-
26
-
27
-
28
-
29
-
30
-
31
-
32
-
33
-
34
-
35
-
36
-
37
-
38
-
39
-
40
-
41
-
42
-
43
-
44
-
45
-
46
-
47
-
48
-
49
-
50
-
51
-
52
-
53
-
54
-
55
-
56
-
57
-
58
-
59
-
60
-
61
-
62
-
63
-
64
-
65
-
66
-
67
-
68
-
69
-
70
-
71
-
72
-
73
-
74
-
75
-
76
-
77
-
78
-
79
-
80
-
81
-
82
-
83
-
84
-
85
-
86
-
87
-
88
-
89
-
90
-
91
-
92
-
93
-
94
-
95
-
96
-
97
-
98
-
99
-
100
-
101
-
102
-
103
-
104
-
105
-
106
-
107
-
 108
108 -
 109
109 -
 110
110 -
 111
111 -
 112
112 -
 113
113 -
 114
114 -
 115
115 -
 116
116 -
 117
117 -
 118
118 -
119
-
120
-
121
-
122
-
123
-
124
-
125
-
126
-
127
-
128
-
129
-
130
-
131
-
132
-
133
-
134
-
135
-
136
-
137
-
138
-
139
-
140
 |
 |