Intel SE7501HG2 Product Guide - Page 119
Recovering the BIOS
 |
View all Intel SE7501HG2 manuals
Add to My Manuals
Save this manual to your list of manuals |
Page 119 highlights
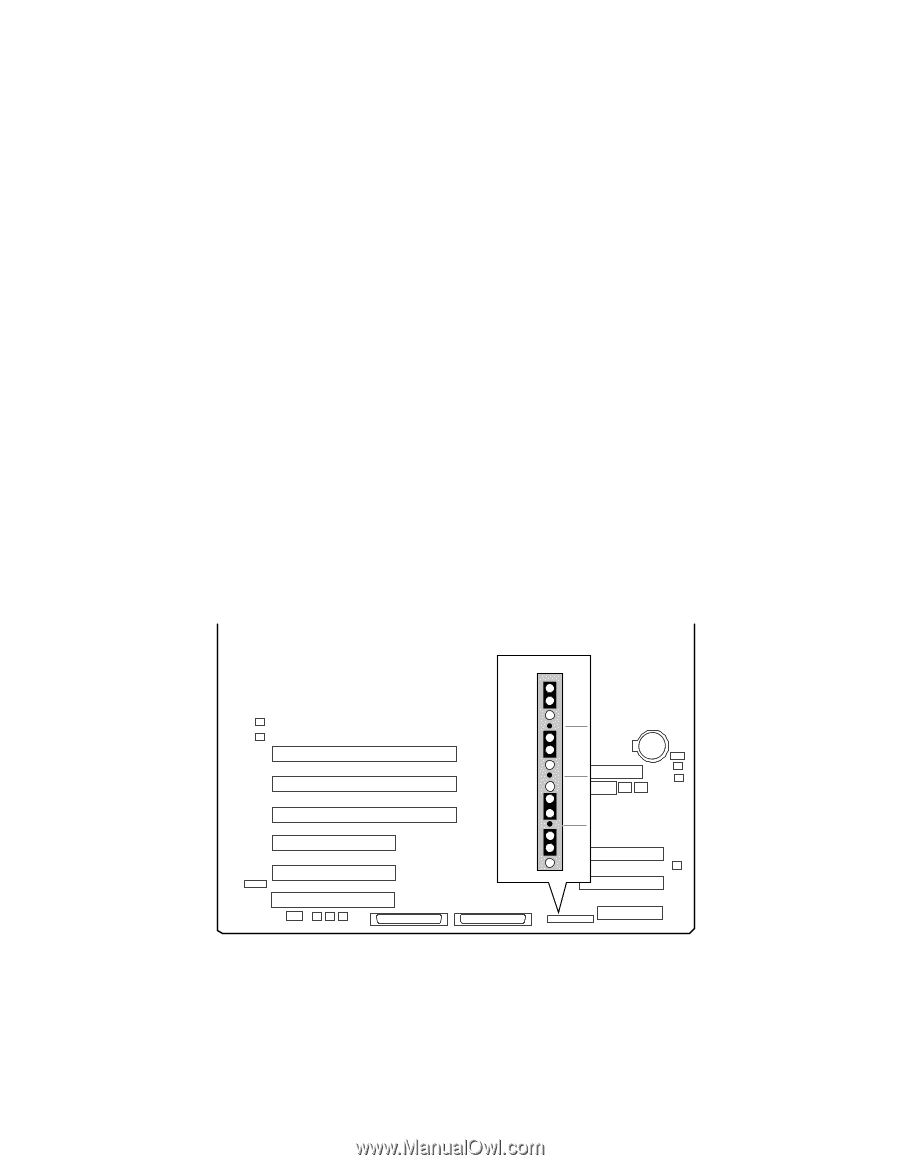
Recovering the BIOS In the rare event that the BIOS becomes damaged a recovery process needs to be followed to return the system to serviceability. The steps below explain the BIOS recovery procedure. ✏ NOTE This is the mode of last resort, used only when the main system BIOS will not come up. Recovery mode requires at least 4 MB of RAM, and drive A: must be configured to support and boot from a 3.5" 1.44 MB floppy drive. Because of the small amount of code available in the non-erasable boot block area, there is no video support; you will not see anything on the screen during the procedure. Monitor the procedure by listening to the speaker. One high-pitched beep announces the start of the recovery process. The entire process takes two to four minutes. A successful update ends with two high-pitched beeps. Failure is indicated by a long series of short beeps. If the recovery disk is not bootable or if you do not insert the recovery disk, you will hear three beeps, after which the system will halt. 1. Create a bootable diskette that contains the BIOS update file and the iFLASH.EXE utility. This is available from: http://support.intel.com/support/motherboards/server/SE7501HG2 2. Turn off the system power and disconnect the AC power. 3. Place a jumper onto J1H1 pins 9-10 (BIOS recovery) as shown in the figure below J1H1 1 2 3 5 6 7 9 10 11 J1J1 1 2 3 Figure 32. BIOS Recovery Jumper TP00034 Solving Problems 119
-
 1
1 -
2
-
3
-
4
-
5
-
6
-
7
-
8
-
9
-
10
-
11
-
12
-
13
-
14
-
15
-
16
-
17
-
18
-
19
-
20
-
21
-
22
-
23
-
24
-
25
-
26
-
27
-
28
-
29
-
30
-
31
-
32
-
33
-
34
-
35
-
36
-
37
-
38
-
39
-
40
-
41
-
42
-
43
-
44
-
45
-
46
-
47
-
48
-
49
-
50
-
51
-
52
-
53
-
54
-
55
-
56
-
57
-
58
-
59
-
60
-
61
-
62
-
63
-
64
-
65
-
66
-
67
-
68
-
69
-
70
-
71
-
72
-
73
-
74
-
75
-
76
-
77
-
78
-
79
-
80
-
81
-
82
-
83
-
84
-
85
-
86
-
87
-
88
-
89
-
90
-
91
-
92
-
93
-
94
-
95
-
96
-
97
-
98
-
99
-
100
-
101
-
102
-
103
-
104
-
105
-
106
-
107
-
108
-
109
-
110
-
111
-
112
-
113
-
 114
114 -
 115
115 -
 116
116 -
 117
117 -
 118
118 -
 119
119 -
 120
120 -
 121
121 -
 122
122 -
 123
123 -
 124
124 -
125
-
126
-
127
-
128
-
129
-
130
-
131
-
132
-
133
-
134
-
135
-
136
-
137
-
138
-
139
-
140
 |
 |