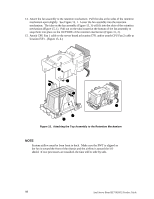
Intel SE7501HG2 Product Guide - Page 43
Attaching the Heat Sink Fan to the Top of the PWT
 |
View all Intel SE7501HG2 manuals
Add to My Manuals
Save this manual to your list of manuals |
Page 43 highlights
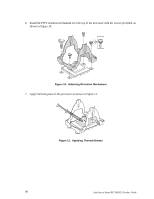
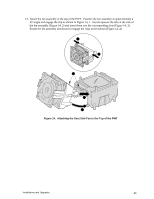
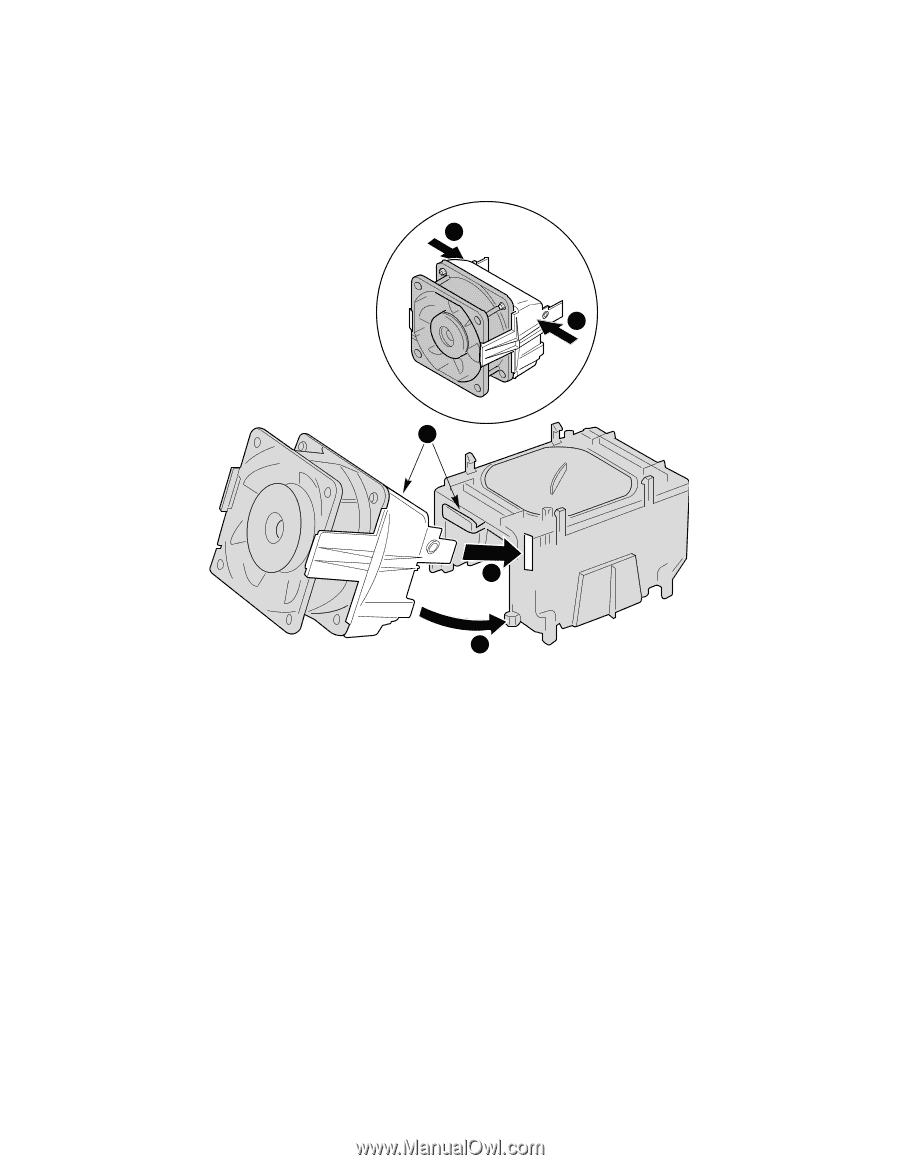
13. Attach the fan assembly to the top of the PWT. Position the fan assembly at approximately a 45o angle and engage the clip as shown in Figure 14, 1. Gently squeeze the tabs at the side of the fan assembly (Figure 14, 2) and insert them into the corresponding slots (Figure 14, 3). Rotate the fan assembly downward to engage the clips at the bottom (Figure 14, 4). 2 2 1 3 4 OM15044 Figure 14. Attaching the Heat Sink Fan to the Top of the PWT Installations and Upgrades 43
-
 1
1 -
2
-
3
-
4
-
5
-
6
-
7
-
8
-
9
-
10
-
11
-
12
-
13
-
14
-
15
-
16
-
17
-
18
-
19
-
20
-
21
-
22
-
23
-
24
-
25
-
26
-
27
-
28
-
29
-
30
-
31
-
32
-
33
-
34
-
35
-
36
-
37
-
 38
38 -
 39
39 -
 40
40 -
 41
41 -
 42
42 -
 43
43 -
 44
44 -
 45
45 -
 46
46 -
 47
47 -
 48
48 -
49
-
50
-
51
-
52
-
53
-
54
-
55
-
56
-
57
-
58
-
59
-
60
-
61
-
62
-
63
-
64
-
65
-
66
-
67
-
68
-
69
-
70
-
71
-
72
-
73
-
74
-
75
-
76
-
77
-
78
-
79
-
80
-
81
-
82
-
83
-
84
-
85
-
86
-
87
-
88
-
89
-
90
-
91
-
92
-
93
-
94
-
95
-
96
-
97
-
98
-
99
-
100
-
101
-
102
-
103
-
104
-
105
-
106
-
107
-
108
-
109
-
110
-
111
-
112
-
113
-
114
-
115
-
116
-
117
-
118
-
119
-
120
-
121
-
122
-
123
-
124
-
125
-
126
-
127
-
128
-
129
-
130
-
131
-
132
-
133
-
134
-
135
-
136
-
137
-
138
-
139
-
140
 |
 |
Installations and Upgrades
43
13. Attach the fan assembly to the top of the PWT.
Position the fan assembly at approximately a
45
o
angle and engage the clip as shown in Figure 14, 1.
Gently squeeze the tabs at the side of
the fan assembly (Figure 14, 2) and insert them into the corresponding slots (Figure 14, 3).
Rotate the fan assembly downward to engage the clips at the bottom (Figure 14, 4).
OM15044
1
3
4
2
2
Figure 14.
Attaching the Heat Sink Fan to the Top of the PWT