Intel SE7501HG2 Product Guide - Page 58
Replacing the Back up Battery, Remove the new lithium battery from its package,
 |
View all Intel SE7501HG2 manuals
Add to My Manuals
Save this manual to your list of manuals |
Page 58 highlights
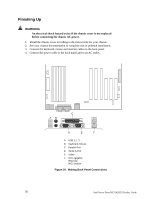
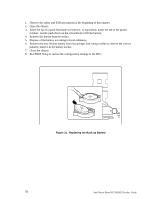
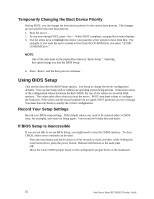
1. Observe the safety and ESD precautions at the beginning of this chapter. 2. Open the chassis. 3. Insert the tip of a small flat-blade screwdriver, or equivalent, under the tab in the plastic retainer. Gently push down on the screwdriver to lift the battery. 4. Remove the battery from its socket. 5. Dispose of the battery according to local ordinance. 6. Remove the new lithium battery from its package, and, being careful to observe the correct polarity, insert it in the battery socket. 7. Close the chassis. 8. Run BIOS Setup to restore the configuration settings to the RTC. Figure 31. Replacing the Back up Battery TP00036 58 Intel Server Board SE7501HG2 Product Guide
-
 1
1 -
2
-
3
-
4
-
5
-
6
-
7
-
8
-
9
-
10
-
11
-
12
-
13
-
14
-
15
-
16
-
17
-
18
-
19
-
20
-
21
-
22
-
23
-
24
-
25
-
26
-
27
-
28
-
29
-
30
-
31
-
32
-
33
-
34
-
35
-
36
-
37
-
38
-
39
-
40
-
41
-
42
-
43
-
44
-
45
-
46
-
47
-
48
-
49
-
50
-
51
-
52
-
 53
53 -
 54
54 -
 55
55 -
 56
56 -
 57
57 -
 58
58 -
 59
59 -
 60
60 -
 61
61 -
 62
62 -
 63
63 -
64
-
65
-
66
-
67
-
68
-
69
-
70
-
71
-
72
-
73
-
74
-
75
-
76
-
77
-
78
-
79
-
80
-
81
-
82
-
83
-
84
-
85
-
86
-
87
-
88
-
89
-
90
-
91
-
92
-
93
-
94
-
95
-
96
-
97
-
98
-
99
-
100
-
101
-
102
-
103
-
104
-
105
-
106
-
107
-
108
-
109
-
110
-
111
-
112
-
113
-
114
-
115
-
116
-
117
-
118
-
119
-
120
-
121
-
122
-
123
-
124
-
125
-
126
-
127
-
128
-
129
-
130
-
131
-
132
-
133
-
134
-
135
-
136
-
137
-
138
-
139
-
140
 |
 |
Intel Server Board SE7501HG2 Product Guide
58
1.
Observe the safety and ESD precautions at the beginning of this chapter.
2. Open the chassis.
3.
Insert the tip of a small flat-blade screwdriver, or equivalent, under the tab in the plastic
retainer.
Gently push down on the screwdriver to lift the battery.
4.
Remove the battery from its socket.
5.
Dispose of the battery according to local ordinance.
6.
Remove the new lithium battery from its package, and, being careful to observe the correct
polarity, insert it in the battery socket.
7. Close the chassis.
8.
Run BIOS Setup to restore the configuration settings to the RTC.
TP00036
Figure 31.
Replacing the Back up Battery