Intel SE7501HG2 Product Guide - Page 51
Installing Memory, See - cpu support
 |
View all Intel SE7501HG2 manuals
Add to My Manuals
Save this manual to your list of manuals |
Page 51 highlights
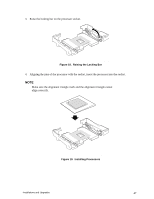
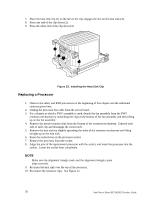
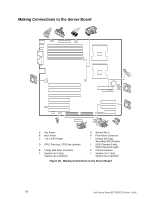
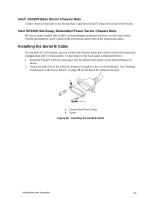
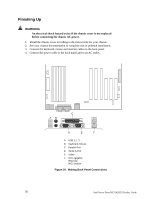
✏ NOTE When the SC5200 Hot Swap Redundant Chassis is used, disregard steps 11 and 12. 11. For chassis that require the PWT assembly (SC5200 Base chassis and reference chassis), reattach the fan assembly to the retention mechanism. Pull the tabs at the sides of the retention mechanism apart slightly. See Figure 15, 1. Lower the fan assembly into the retention mechanism. The tabs on the fan assembly (Figure 15, 3) will fit into the slots of the retention mechanism. (Figure 15, 1). Pull out on the tabs located at the bottom of the fan assembly to snap them into place on the retention mechanism. 12. For chassis that require the PWT assembly, reattach the CPU fan. Installing Memory The server board supports only DDR266-compliant DIMMs.2 Install from 256 MB to 12 GB of memory, using up to six DIMMs. DIMMs must be installed in pairs. DIMM1, Bank 1 (the furthest DIMM pair from the MCH) must be populated first. No DIMM mixing is allowed within a bank. Between banks only the DIMM size may be different. All DIMMs must be the same speed and architecture. For a list of supported memory, visit the Intel Support website: http://support.intel.com/support/motherboards/server/SE7501HG2 1. Open both DIMM socket levers. 2. Insert the DIMM, making sure the notches in connector edge of the DIMM align correctly with the key in the slot. 3. Push down on the top edge of the DIMM until the socket levers snap into place. 4. Check that socket levers are securely latched. 2 DDR200 compliant registered ECC DIMMs can be used only if 400 MHz processors are installed. Installations and Upgrades 51
-
 1
1 -
2
-
3
-
4
-
5
-
6
-
7
-
8
-
9
-
10
-
11
-
12
-
13
-
14
-
15
-
16
-
17
-
18
-
19
-
20
-
21
-
22
-
23
-
24
-
25
-
26
-
27
-
28
-
29
-
30
-
31
-
32
-
33
-
34
-
35
-
36
-
37
-
38
-
39
-
40
-
41
-
42
-
43
-
44
-
45
-
 46
46 -
 47
47 -
 48
48 -
 49
49 -
 50
50 -
 51
51 -
 52
52 -
 53
53 -
 54
54 -
 55
55 -
 56
56 -
57
-
58
-
59
-
60
-
61
-
62
-
63
-
64
-
65
-
66
-
67
-
68
-
69
-
70
-
71
-
72
-
73
-
74
-
75
-
76
-
77
-
78
-
79
-
80
-
81
-
82
-
83
-
84
-
85
-
86
-
87
-
88
-
89
-
90
-
91
-
92
-
93
-
94
-
95
-
96
-
97
-
98
-
99
-
100
-
101
-
102
-
103
-
104
-
105
-
106
-
107
-
108
-
109
-
110
-
111
-
112
-
113
-
114
-
115
-
116
-
117
-
118
-
119
-
120
-
121
-
122
-
123
-
124
-
125
-
126
-
127
-
128
-
129
-
130
-
131
-
132
-
133
-
134
-
135
-
136
-
137
-
138
-
139
-
140
 |
 |