Intel SE7501HG2 Product Guide - Page 6

Regulatory and Integration Information, Equipment Log Worksheet, Index, s - processors

Page 6 highlights

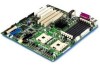
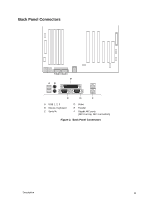
8 Regulatory and Integration Information 129 Product Regulatory Compliance 129 Product Safety Compliance 129 Product EMC Compliance 129 Product Regulatory Compliance Markings 130 Electromagnetic Compatibility Notices 131 FCC (USA) ...131 Industry Canada (ICES-003 132 Europe (CE Declaration of Conformity 132 Taiwan Declaration of Conformity 132 Korean RRL Compliance 132 Australia / New Zealand 132 9 Equipment Log Worksheet 133 Equipment Log ...133 Index ...135 Figures Figure 1. Server Board Connector and Component Locations 10 Figure 2. Back Panel Connectors 11 Figure 3. Attaching the Gasket to the I/O Shield 33 Figure 4. Attaching the Label to the I/O Shield 34 Figure 5. Installing the I/O Shield 34 Figure 6. Configuring Chassis Standoffs 35 Figure 7. Installing Rubber Bumper 36 Figure 8. Placing the Server Board in the Chassis 37 Figure 9. Making Connections to the Server Board 54 Figure 10. Routing Cables...52 Figure 11. Routing the Floppy and Front Panel Cables 53 Figure 12. Routing the Floppy and ICMB Cables 53 Figure 13. Installing the Serial B Cable 55 Figure 14. Installing Memory 52 Figure 15. Opening Socket Lever and Attaching Processor 39 Figure 16. Attaching Retention Mechanism 40 Figure 17. Applying Thermal Grease 40 Figure 18. Attaching the Heat Sink and Retention Clip 41 Figure 19. Attaching the Wind Tunnel Fan 42 Figure 20. Attaching the Heat Sink Fan to the Top of the PWT 43 Figure 21. Attaching the Top Assembly to the Retention Mechanism 44 Figure 22. Processor and Wind Tunnel Installed 45 Figure 23. Installing the Processor Retention Brackets 46 Figure 24. Raising the Locking Bar 47 Figure 25. Installing Processors 47 Figure 26. Lower Locking Bar 48 Figure 27. Applying Thermal Grease 48 6 Intel Server Board SE7501HG2 Product Guide

  • 1
  • 2
  • 3
  • 4
  • 5
  • 6
  • 7
  • 8
  • 9
  • 10
  • 11
  • 12
  • 13
  • 14
  • 15
  • 16
  • 17
  • 18
  • 19
  • 20
  • 21
  • 22
  • 23
  • 24
  • 25
  • 26
  • 27
  • 28
  • 29
  • 30
  • 31
  • 32
  • 33
  • 34
  • 35
  • 36
  • 37
  • 38
  • 39
  • 40
  • 41
  • 42
  • 43
  • 44
  • 45
  • 46
  • 47
  • 48
  • 49
  • 50
  • 51
  • 52
  • 53
  • 54
  • 55
  • 56
  • 57
  • 58
  • 59
  • 60
  • 61
  • 62
  • 63
  • 64
  • 65
  • 66
  • 67
  • 68
  • 69
  • 70
  • 71
  • 72
  • 73
  • 74
  • 75
  • 76
  • 77
  • 78
  • 79
  • 80
  • 81
  • 82
  • 83
  • 84
  • 85
  • 86
  • 87
  • 88
  • 89
  • 90
  • 91
  • 92
  • 93
  • 94
  • 95
  • 96
  • 97
  • 98
  • 99
  • 100
  • 101
  • 102
  • 103
  • 104
  • 105
  • 106
  • 107
  • 108
  • 109
  • 110
  • 111
  • 112
  • 113
  • 114
  • 115
  • 116
  • 117
  • 118
  • 119
  • 120
  • 121
  • 122
  • 123
  • 124
  • 125
  • 126
  • 127
  • 128
  • 129
  • 130
  • 131
  • 132
  • 133
  • 134
  • 135
  • 136
  • 137
  • 138
  • 139
  • 140

Intel Server Board SE7501HG2 Product Guide
6
8
Regulatory and Integration Information
....................................................
129
Product Regulatory Compliance
........................................................................................
129
Product Safety Compliance
......................................................................................
129
Product EMC Compliance
........................................................................................
129
Product Regulatory Compliance Markings
................................................................
130
Electromagnetic Compatibility Notices
..............................................................................
131
FCC (USA)
...............................................................................................................
131
Industry Canada (ICES-003)
.....................................................................................
132
Europe (CE Declaration of Conformity)
.....................................................................
132
Taiwan Declaration of Conformity
.............................................................................
132
Korean RRL Compliance
..........................................................................................
132
Australia / New Zealand
............................................................................................
132
9
Equipment Log Worksheet
.........................................................................
133
Equipment Log
..................................................................................................................
133
Index
..................................................................................................................
135
Figures
Figure 1.
Server Board Connector and Component Locations
................................................
10
Figure 2.
Back Panel Connectors
...........................................................................................
11
Figure 3.
Attaching the Gasket to the I/O Shield
.....................................................................
33
Figure 4.
Attaching the Label to the I/O Shield
.......................................................................
34
Figure 5.
Installing the I/O Shield
............................................................................................
34
Figure 6.
Configuring Chassis Standoffs
................................................................................
35
Figure 7.
Installing Rubber Bumper
........................................................................................
36
Figure 8. Placing the Server Board in the Chassis
..................................................................
37
Figure 9.
Making Connections to the Server Board
................................................................
54
Figure 10.
Routing Cables
......................................................................................................
52
Figure 11.
Routing the Floppy and Front Panel Cables
..........................................................
53
Figure 12.
Routing the Floppy and ICMB Cables
....................................................................
53
Figure 13.
Installing the Serial B Cable
...................................................................................
55
Figure 14.
Installing Memory
..................................................................................................
52
Figure 15.
Opening Socket Lever and Attaching Processor
....................................................
39
Figure 16.
Attaching Retention Mechanism
............................................................................
40
Figure 17.
Applying Thermal Grease
......................................................................................
40
Figure 18.
Attaching the Heat Sink and Retention Clip
...........................................................
41
Figure 19.
Attaching the Wind Tunnel Fan
.............................................................................
42
Figure 20.
Attaching the Heat Sink Fan to the Top of the PWT
..............................................
43
Figure 21.
Attaching the Top Assembly to the Retention Mechanism
.....................................
44
Figure 22.
Processor and Wind Tunnel Installed
....................................................................
45
Figure 23.
Installing the Processor Retention Brackets
..........................................................
46
Figure 24.
Raising the Locking Bar
.........................................................................................
47
Figure 25.
Installing Processors
.............................................................................................
47
Figure 26.
Lower Locking Bar
.................................................................................................
48
Figure 27.
Applying Thermal Grease
......................................................................................
48