Lexmark 4079 colorjet printer plus Service Manual - Page 104
Priinter, 3utton, E;eiect, RIA.IVI, EllIv1IN/1
 |
View all Lexmark 4079 colorjet printer plus manuals
Add to My Manuals
Save this manual to your list of manuals |
Page 104 highlights
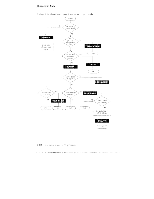
Diagnostic Aids Priinter Wrap Test This tests the serial4arallei comirnunittations interface and displays a message on the display. To perform the wrap test: 1 . Turn the printer o:f. 2. Disconr ect 0 parallel or serial interface cable. 3. Install the wrap 4. Pree3 and hold th, ?. Menu and Print I3uffer buttons whi e y.pu rn on the printer , 5. Select. Wrap f rcrn the menu. The test runs contind,:iusly until you press the Menu buttcr.. message is display:cc ludicatine if the test passed or failed. 1.3utton Test E;eiect Button Test from the menu. When any button except tie Menu button is pressed, the display indicates `Closed." The (HE play indicates "Open' ii button is pressed or it the butt in it not operating correctly. Press Menu to return to The mer u. LED Test Select LED Test from the menu. The Ready LED is orr an f a cursor is displayed. Each time List is pressed, the c,rtrent LED is turned off and another LED is, ed on, Press Menu ti:: return to the mem_ LC:D Test Select LOD Test Ircrn the menu. Each pel of the disp ay i turned on Press the List+ bur:cn to display a different diagnostic vrtern. Press Menu to return tc the menu. RIA.IVI Test Select RAM Test from tie mem, to verify the DRAM c n the controller board. Erre display slcws the amount of memory in eact SWIM, or shows a failure of the EllIv1IN/1 in either slot 1 or slot 2. 2-841 1,i:;A•I C;a..or n ei F'S 7"..:1 ...I*.ily .,Ij.Nl kl,k llIc lIIIIUINIIIIIIIIII INIINN1IIIlNI1lI, IION, bill lel IN ION.I. !SINN, 1.1 I Nami.g.04 ,s Y.
-
 1
1 -
2
-
3
-
4
-
5
-
6
-
7
-
8
-
9
-
10
-
11
-
12
-
13
-
14
-
15
-
16
-
17
-
18
-
19
-
20
-
21
-
22
-
23
-
24
-
25
-
26
-
27
-
28
-
29
-
30
-
31
-
32
-
33
-
34
-
35
-
36
-
37
-
38
-
39
-
40
-
41
-
42
-
43
-
44
-
45
-
46
-
47
-
48
-
49
-
50
-
51
-
52
-
53
-
54
-
55
-
56
-
57
-
58
-
59
-
60
-
61
-
62
-
63
-
64
-
65
-
66
-
67
-
68
-
69
-
70
-
71
-
72
-
73
-
74
-
75
-
76
-
77
-
78
-
79
-
80
-
81
-
82
-
83
-
84
-
85
-
86
-
87
-
88
-
89
-
90
-
91
-
92
-
93
-
94
-
95
-
96
-
97
-
98
-
 99
99 -
 100
100 -
 101
101 -
 102
102 -
 103
103 -
 104
104 -
 105
105 -
 106
106 -
 107
107 -
 108
108 -
 109
109 -
110
-
111
-
112
-
113
-
114
-
115
-
116
-
117
-
118
-
119
-
120
-
121
-
122
-
123
-
124
-
125
-
126
-
127
-
128
-
129
-
130
-
131
-
132
-
133
-
134
-
135
-
136
-
137
-
138
-
139
-
140
-
141
-
142
-
143
-
144
-
145
-
146
-
147
-
148
-
149
-
150
-
151
-
152
-
153
-
154
-
155
-
156
-
157
-
158
-
159
-
160
-
161
-
162
-
163
-
164
-
165
-
166
-
167
-
168
-
169
-
170
-
171
-
172
-
173
-
174
-
175
-
176
-
177
-
178
-
179
-
180
-
181
-
182
-
183
-
184
-
185
-
186
-
187
-
188
-
189
-
190
-
191
-
192
-
193
-
194
-
195
-
196
-
197
-
198
-
199
-
200
-
201
-
202
-
203
-
204
-
205
-
206
-
207
-
208
-
209
-
210
-
211
-
212
-
213
-
214
-
215
-
216
-
217
-
218
-
219
-
220
-
221
-
222
-
223
-
224
-
225
-
226
-
227
-
228
-
229
-
230
-
231
-
232
 |
 |
