Lexmark 4079 colorjet printer plus Service Manual - Page 121
STOCK, CLAvl, Manual, Print, Capping, Disabled, Machine
 |
View all Lexmark 4079 colorjet printer plus manuals
Add to My Manuals
Save this manual to your list of manuals |
Page 121 highlights
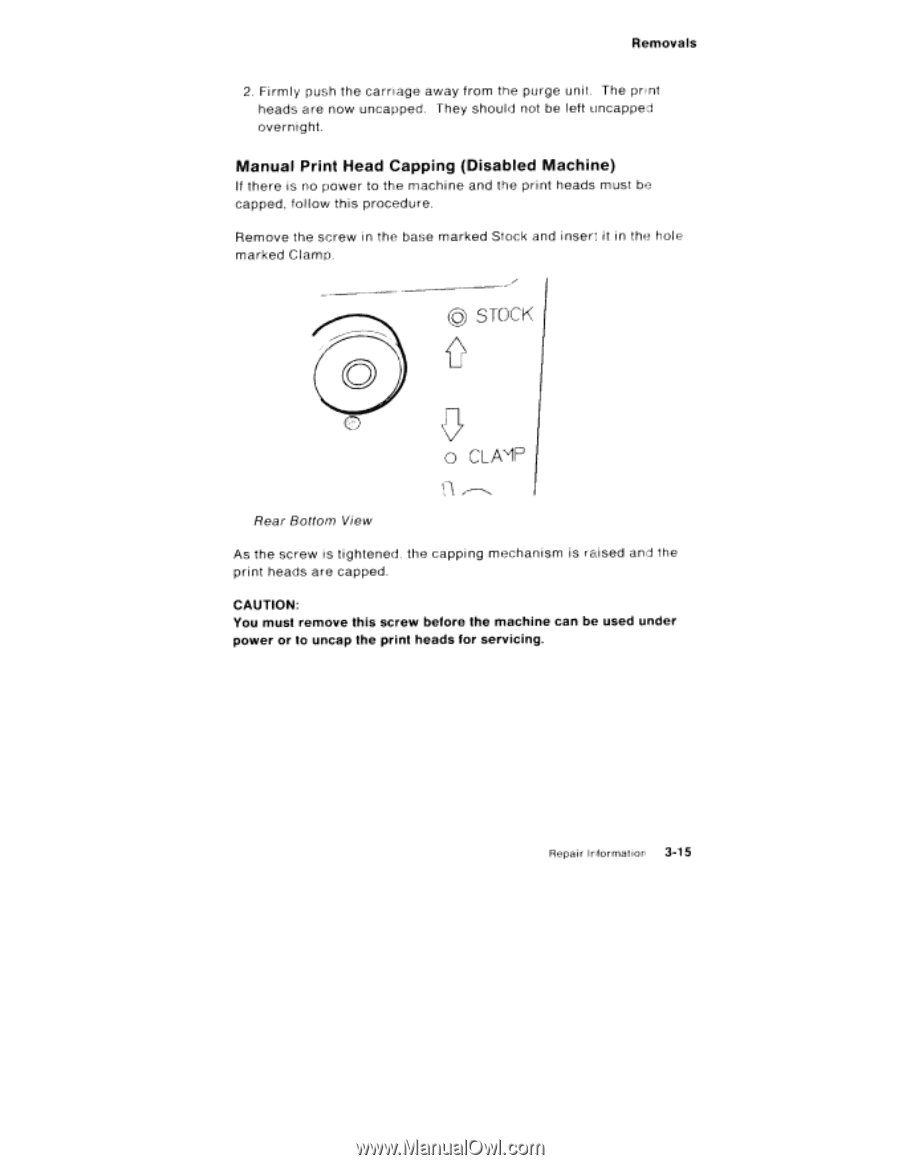
Removals 2. Firmly push the carriage away from the purge unit. The print heads are now uncapped. They should not be left uncapped overnight. Manual Print Head Capping (Disabled Machine) If there is no power to the machine and the print heads must be capped, follow this procedure. Remove the screw in the base marked Stock and insert it in the hole marked Clamp. C) STOCK 0 a CLAvl Rear Bottom View As the screw is tightened, the capping mechanism is raised and the print heads are capped. CAUTION: You must remove this screw before the machine can be used under power or to uncap the print heads for servicing. Repair Information 3-15
-
 1
1 -
2
-
3
-
4
-
5
-
6
-
7
-
8
-
9
-
10
-
11
-
12
-
13
-
14
-
15
-
16
-
17
-
18
-
19
-
20
-
21
-
22
-
23
-
24
-
25
-
26
-
27
-
28
-
29
-
30
-
31
-
32
-
33
-
34
-
35
-
36
-
37
-
38
-
39
-
40
-
41
-
42
-
43
-
44
-
45
-
46
-
47
-
48
-
49
-
50
-
51
-
52
-
53
-
54
-
55
-
56
-
57
-
58
-
59
-
60
-
61
-
62
-
63
-
64
-
65
-
66
-
67
-
68
-
69
-
70
-
71
-
72
-
73
-
74
-
75
-
76
-
77
-
78
-
79
-
80
-
81
-
82
-
83
-
84
-
85
-
86
-
87
-
88
-
89
-
90
-
91
-
92
-
93
-
94
-
95
-
96
-
97
-
98
-
99
-
100
-
101
-
102
-
103
-
104
-
105
-
106
-
107
-
108
-
109
-
110
-
111
-
112
-
113
-
114
-
115
-
 116
116 -
 117
117 -
 118
118 -
 119
119 -
 120
120 -
 121
121 -
 122
122 -
 123
123 -
 124
124 -
 125
125 -
 126
126 -
127
-
128
-
129
-
130
-
131
-
132
-
133
-
134
-
135
-
136
-
137
-
138
-
139
-
140
-
141
-
142
-
143
-
144
-
145
-
146
-
147
-
148
-
149
-
150
-
151
-
152
-
153
-
154
-
155
-
156
-
157
-
158
-
159
-
160
-
161
-
162
-
163
-
164
-
165
-
166
-
167
-
168
-
169
-
170
-
171
-
172
-
173
-
174
-
175
-
176
-
177
-
178
-
179
-
180
-
181
-
182
-
183
-
184
-
185
-
186
-
187
-
188
-
189
-
190
-
191
-
192
-
193
-
194
-
195
-
196
-
197
-
198
-
199
-
200
-
201
-
202
-
203
-
204
-
205
-
206
-
207
-
208
-
209
-
210
-
211
-
212
-
213
-
214
-
215
-
216
-
217
-
218
-
219
-
220
-
221
-
222
-
223
-
224
-
225
-
226
-
227
-
228
-
229
-
230
-
231
-
232
 |
 |
Removals
2.
Firmly
push
the
carriage
away
from
the
purge
unit.
The
print
heads
are
now
uncapped.
They
should
not
be
left
uncapped
overnight.
Manual
Print
Head
Capping
(Disabled
Machine)
If
there
is
no
power
to
the
machine
and
the
print
heads
must
be
capped,
fol
low
this
procedure.
Remove
the
screw
in
the
base
marked
Stock
and
insert
it
in
the
hole
marked
Clamp.
C)
STOCK
0
a
CLAvl
Rear
Bottom
View
As
the
screw
is
tightened,
the
capping
mechanism
is
raised
and
the
print
heads
are
capped.
CAUTION:
You
must
remove
this
screw
before
the
machine
can
be
used
under
power
or
to
uncap
the
print
heads
for
servicing.
Repair
Information
3-15