Lexmark 4079 colorjet printer plus Service Manual - Page 135
Carriage, Ribbon, Cables, orange/brown
 |
View all Lexmark 4079 colorjet printer plus manuals
Add to My Manuals
Save this manual to your list of manuals |
Page 135 highlights
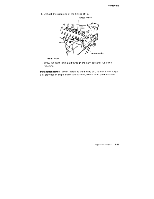
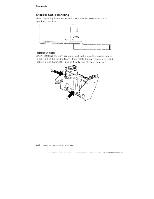
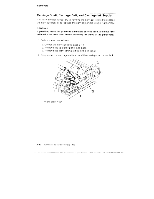
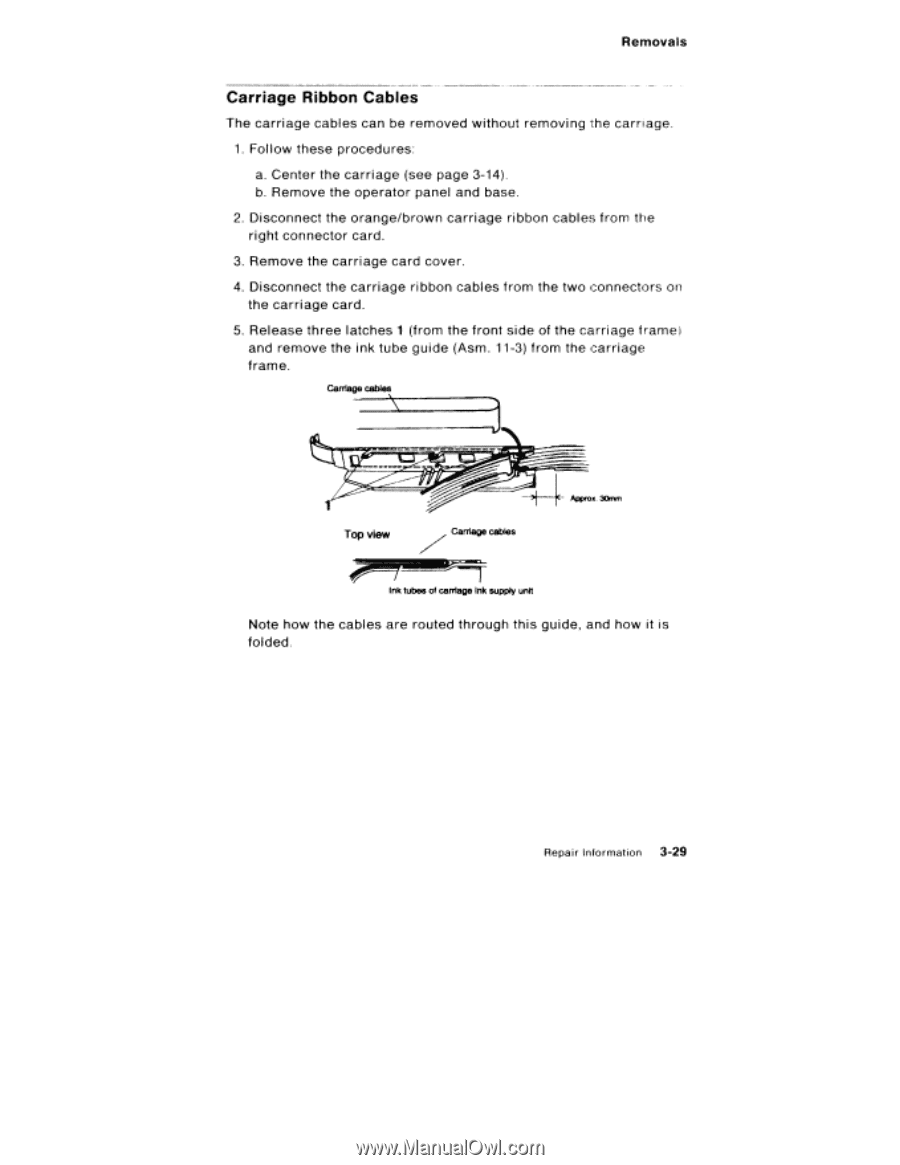
Removals Carriage Ribbon Cables The carriage cables can be removed without removing the carriage. 1. Follow these procedures: a. Center the carriage (see page 3-14). b. Remove the operator panel and base. 2. Disconnect the orange/brown carriage ribbon cables from the right connector card. 3. Remove the carriage card cover. 4. Disconnect the carriage ribbon cables from the two connectors on the carriage card. 5. Release three latches 1 (from the front side of the carriage frame) and remove the ink tube guide (Asm. 11-3) from the carriage frame. Carriage cables 1 Top view Carriage cables 1r Approx. 30mm Ink tubes of carriage Ink supply unit Note how the cables are routed through this guide, and how it is folded. Repair Information 3-29
-
 1
1 -
2
-
3
-
4
-
5
-
6
-
7
-
8
-
9
-
10
-
11
-
12
-
13
-
14
-
15
-
16
-
17
-
18
-
19
-
20
-
21
-
22
-
23
-
24
-
25
-
26
-
27
-
28
-
29
-
30
-
31
-
32
-
33
-
34
-
35
-
36
-
37
-
38
-
39
-
40
-
41
-
42
-
43
-
44
-
45
-
46
-
47
-
48
-
49
-
50
-
51
-
52
-
53
-
54
-
55
-
56
-
57
-
58
-
59
-
60
-
61
-
62
-
63
-
64
-
65
-
66
-
67
-
68
-
69
-
70
-
71
-
72
-
73
-
74
-
75
-
76
-
77
-
78
-
79
-
80
-
81
-
82
-
83
-
84
-
85
-
86
-
87
-
88
-
89
-
90
-
91
-
92
-
93
-
94
-
95
-
96
-
97
-
98
-
99
-
100
-
101
-
102
-
103
-
104
-
105
-
106
-
107
-
108
-
109
-
110
-
111
-
112
-
113
-
114
-
115
-
116
-
117
-
118
-
119
-
120
-
121
-
122
-
123
-
124
-
125
-
126
-
127
-
128
-
129
-
 130
130 -
 131
131 -
 132
132 -
 133
133 -
 134
134 -
 135
135 -
 136
136 -
 137
137 -
 138
138 -
 139
139 -
 140
140 -
141
-
142
-
143
-
144
-
145
-
146
-
147
-
148
-
149
-
150
-
151
-
152
-
153
-
154
-
155
-
156
-
157
-
158
-
159
-
160
-
161
-
162
-
163
-
164
-
165
-
166
-
167
-
168
-
169
-
170
-
171
-
172
-
173
-
174
-
175
-
176
-
177
-
178
-
179
-
180
-
181
-
182
-
183
-
184
-
185
-
186
-
187
-
188
-
189
-
190
-
191
-
192
-
193
-
194
-
195
-
196
-
197
-
198
-
199
-
200
-
201
-
202
-
203
-
204
-
205
-
206
-
207
-
208
-
209
-
210
-
211
-
212
-
213
-
214
-
215
-
216
-
217
-
218
-
219
-
220
-
221
-
222
-
223
-
224
-
225
-
226
-
227
-
228
-
229
-
230
-
231
-
232
 |
 |
Removals
Carriage
Ribbon
Cables
The
carriage
cables
can
be
removed
without
removing
the
carriage.
1.
Follow
these
procedures:
a.
Center
the
carriage
(see
page
3-14).
b.
Remove the
operator
panel
and
base.
2.
Disconnect
the
orange/brown
carriage
ribbon
cables
from
the
right
connector
card.
3.
Remove the
carriage
card
cover.
4.
Disconnect
the
carriage
ribbon
cables
from
the
two
connectors
on
the
carriage
card.
5.
Release
three
latches
1
(from
the
front
side
of
the
carriage
frame)
and
remove
the
ink
tube
guide
(Asm.
11-3)
from
the
carriage
frame.
Carriage
cables
1
Top
view
Carriage
cables
Ink
tubes
of
carriage
Ink
supply
unit
1
r
Approx.
30mm
Note how
the
cables
are
routed
through
this
guide,
and
how
it
is
folded.
Repair
Information
3-29