Lexmark 4079 colorjet printer plus Service Manual - Page 127
Carriage, Holder, Cover, Installation
 |
View all Lexmark 4079 colorjet printer plus manuals
Add to My Manuals
Save this manual to your list of manuals |
Page 127 highlights
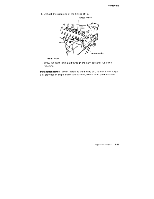
Removals Installation Notes: When installing the print heads, be sure to push each print head into the correct slot. The color letters are on the carriage card holder cover. Carriage Card, Carriage Card Holder Cover 1. Center the carriage (see page 3-14). 2. Remove the print heads. 3. Remove the carriage card holder cover: a. Carefully push the small latches 1 on both sides. b. Lift off the carriage card holder cover 2. 2 Rear View Repair Information 3-21
-
 1
1 -
2
-
3
-
4
-
5
-
6
-
7
-
8
-
9
-
10
-
11
-
12
-
13
-
14
-
15
-
16
-
17
-
18
-
19
-
20
-
21
-
22
-
23
-
24
-
25
-
26
-
27
-
28
-
29
-
30
-
31
-
32
-
33
-
34
-
35
-
36
-
37
-
38
-
39
-
40
-
41
-
42
-
43
-
44
-
45
-
46
-
47
-
48
-
49
-
50
-
51
-
52
-
53
-
54
-
55
-
56
-
57
-
58
-
59
-
60
-
61
-
62
-
63
-
64
-
65
-
66
-
67
-
68
-
69
-
70
-
71
-
72
-
73
-
74
-
75
-
76
-
77
-
78
-
79
-
80
-
81
-
82
-
83
-
84
-
85
-
86
-
87
-
88
-
89
-
90
-
91
-
92
-
93
-
94
-
95
-
96
-
97
-
98
-
99
-
100
-
101
-
102
-
103
-
104
-
105
-
106
-
107
-
108
-
109
-
110
-
111
-
112
-
113
-
114
-
115
-
116
-
117
-
118
-
119
-
120
-
121
-
 122
122 -
 123
123 -
 124
124 -
 125
125 -
 126
126 -
 127
127 -
 128
128 -
 129
129 -
 130
130 -
 131
131 -
 132
132 -
133
-
134
-
135
-
136
-
137
-
138
-
139
-
140
-
141
-
142
-
143
-
144
-
145
-
146
-
147
-
148
-
149
-
150
-
151
-
152
-
153
-
154
-
155
-
156
-
157
-
158
-
159
-
160
-
161
-
162
-
163
-
164
-
165
-
166
-
167
-
168
-
169
-
170
-
171
-
172
-
173
-
174
-
175
-
176
-
177
-
178
-
179
-
180
-
181
-
182
-
183
-
184
-
185
-
186
-
187
-
188
-
189
-
190
-
191
-
192
-
193
-
194
-
195
-
196
-
197
-
198
-
199
-
200
-
201
-
202
-
203
-
204
-
205
-
206
-
207
-
208
-
209
-
210
-
211
-
212
-
213
-
214
-
215
-
216
-
217
-
218
-
219
-
220
-
221
-
222
-
223
-
224
-
225
-
226
-
227
-
228
-
229
-
230
-
231
-
232
 |
 |

Removals
Installation
Notes:
When
installing
the
print
heads,
be
sure
to
push
each
print
head
into
the
correct
slot.
The
color
letters
are
on
the
carriage
card
holder
cover.
Carriage
Card,
Carriage
Card
Holder
Cover
1.
Center
the
carriage
(see
page
3-14).
2.
Remove
the
print
heads.
3.
Remove
the
carriage
card
holder
cover:
a.
Carefully
push
the
small
latches
1
on
both
sides.
b.
Lift
off
the
carriage
card
holder
cover
2.
2
Rear
View
Repair
Information
3-21