Netgear AC2300 User Manual - Page 141
Add a Port Triggering Service, Customize Internet Traffic Rules for Ports
 |
View all Netgear AC2300 manuals
Add to My Manuals
Save this manual to your list of manuals |
Page 141 highlights
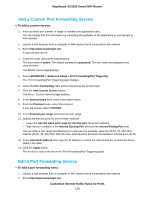
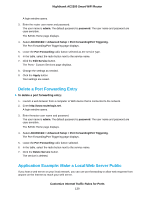
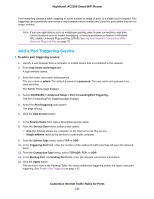
Nighthawk AC2300 Smart WiFi Router Port forwarding creates a static mapping of a port number or range of ports to a single local computer. Port triggering can dynamically open ports to any computer when needed and close the ports when they are no longer needed. Note If you use applications such as multiplayer gaming, peer-to-peer connections, real-time communications such as instant messaging, or remote assistance (a feature in Windows XP), enable Universal Plug and Play (UPnP). See Improve Network Connections With Universal Plug and Play on page 75. Add a Port Triggering Service To add a port triggering service: 1. Launch a web browser from a computer or mobile device that is connected to the network. 2. Enter http://www.routerlogin.net. A login window opens. 3. Enter the router user name and password. The user name is admin. The default password is password. The user name and password are case-sensitive. The BASIC Home page displays. 4. Select ADVANCED > Advanced Setup > Port Forwarding/Port Triggering. The Port Forwarding/Port Triggering page displays. 5. Select the Port Triggering radio button. The page adjusts. 6. Click the Add Service button. 7. In the Service Name field, type a descriptive service name. 8. From the Service User menu, select a user option: • Any (the default) allows any computer on the Internet to use this service. • Single address restricts the service to a particular computer. 9. From the Service Type menu, select TCP or UDP. 10. In the Triggering Port field, enter the number of the outbound traffic port that will open the inbound ports. 11. From the Connection Type menu, select TCP/UDP, TCP, or UDP. 12. In the Starting Port, and Ending Port fields, enter the inbound connection information. 13. Click the Apply button. The service is now in the Portmap Table. You must enable port triggering before the router uses port triggering. See Enable Port Triggering on page 142. Customize Internet Traffic Rules for Ports 141
-
 1
1 -
2
-
3
-
4
-
5
-
6
-
7
-
8
-
9
-
10
-
11
-
12
-
13
-
14
-
15
-
16
-
17
-
18
-
19
-
20
-
21
-
22
-
23
-
24
-
25
-
26
-
27
-
28
-
29
-
30
-
31
-
32
-
33
-
34
-
35
-
36
-
37
-
38
-
39
-
40
-
41
-
42
-
43
-
44
-
45
-
46
-
47
-
48
-
49
-
50
-
51
-
52
-
53
-
54
-
55
-
56
-
57
-
58
-
59
-
60
-
61
-
62
-
63
-
64
-
65
-
66
-
67
-
68
-
69
-
70
-
71
-
72
-
73
-
74
-
75
-
76
-
77
-
78
-
79
-
80
-
81
-
82
-
83
-
84
-
85
-
86
-
87
-
88
-
89
-
90
-
91
-
92
-
93
-
94
-
95
-
96
-
97
-
98
-
99
-
100
-
101
-
102
-
103
-
104
-
105
-
106
-
107
-
108
-
109
-
110
-
111
-
112
-
113
-
114
-
115
-
116
-
117
-
118
-
119
-
120
-
121
-
122
-
123
-
124
-
125
-
126
-
127
-
128
-
129
-
130
-
131
-
132
-
133
-
134
-
135
-
 136
136 -
 137
137 -
 138
138 -
 139
139 -
 140
140 -
 141
141 -
 142
142 -
 143
143 -
 144
144 -
 145
145 -
 146
146 -
147
-
148
-
149
-
150
-
151
-
152
-
153
-
154
-
155
 |
 |