Netgear AC2300 User Manual - Page 84
Check the Internet Connection Status, View and Manage Logs of Router Activity
 |
View all Netgear AC2300 manuals
Add to My Manuals
Save this manual to your list of manuals |
Page 84 highlights
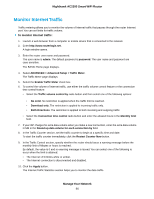
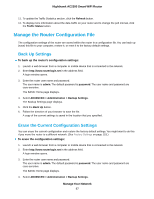
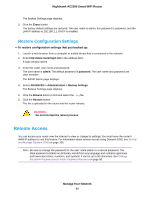
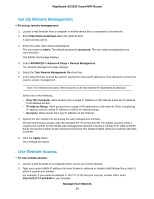
Nighthawk AC2300 Smart WiFi Router Check the Internet Connection Status To check the Internet connection status if the router is connected to a WAN Ethernet connection: 1. Launch a web browser from a computer or mobile device that is connected to the network. 2. Enter http://www.routerlogin.net in the address field. A login window opens. 3. Enter the router user name and password. The user name is admin. The default password is password. The user name and password are case-sensitive. The BASIC Home page displays. 4. Click the ADVANCED tab. The ADVANCED Home page displays. 5. In the Internet Port pane, click the Connection Status button. The Connection Status window opens and the following information displays: • IP Address. The IP address that is assigned to the router. • Subnet Mask. The subnet mask that is assigned to the router. • Default Gateway. The IP address for the default gateway that the router communicates with. • DHCP Server. The IP address for the Dynamic Host Configuration Protocol server that provides the TCP/IP configuration for all the computers that are connected to the router. • DNS Server.The IP address of the Domain Name Service server that provides translation of network names to IP addresses. • Lease Obtained. The date and time when the lease was obtained. • Lease Expires. The date and time that the lease expires. 6. To return the status of all items to 0, click the Release button. 7. To refresh the screen, click the Renew button. 8. To exit the screen, click the Close Window button. View and Manage Logs of Router Activity The log is a detailed record of the websites you accessed or attempted to access and other router actions. Up to 256 entries are stored in the log. To view and manage logs: 1. Launch a web browser from a computer or mobile device that is connected to the network. 2. Enter http://www.routerlogin.net in the address field. A login window opens. Manage Your Network 84
-
 1
1 -
2
-
3
-
4
-
5
-
6
-
7
-
8
-
9
-
10
-
11
-
12
-
13
-
14
-
15
-
16
-
17
-
18
-
19
-
20
-
21
-
22
-
23
-
24
-
25
-
26
-
27
-
28
-
29
-
30
-
31
-
32
-
33
-
34
-
35
-
36
-
37
-
38
-
39
-
40
-
41
-
42
-
43
-
44
-
45
-
46
-
47
-
48
-
49
-
50
-
51
-
52
-
53
-
54
-
55
-
56
-
57
-
58
-
59
-
60
-
61
-
62
-
63
-
64
-
65
-
66
-
67
-
68
-
69
-
70
-
71
-
72
-
73
-
74
-
75
-
76
-
77
-
78
-
 79
79 -
 80
80 -
 81
81 -
 82
82 -
 83
83 -
 84
84 -
 85
85 -
 86
86 -
 87
87 -
 88
88 -
 89
89 -
90
-
91
-
92
-
93
-
94
-
95
-
96
-
97
-
98
-
99
-
100
-
101
-
102
-
103
-
104
-
105
-
106
-
107
-
108
-
109
-
110
-
111
-
112
-
113
-
114
-
115
-
116
-
117
-
118
-
119
-
120
-
121
-
122
-
123
-
124
-
125
-
126
-
127
-
128
-
129
-
130
-
131
-
132
-
133
-
134
-
135
-
136
-
137
-
138
-
139
-
140
-
141
-
142
-
143
-
144
-
145
-
146
-
147
-
148
-
149
-
150
-
151
-
152
-
153
-
154
-
155
 |
 |
