Panasonic AW-UE100 Operating Instructions - Page 150
Generating a Certificate Signing Request CSR, CA Certificate ‑ Generate Certificate Signing
 |
View all Panasonic AW-UE100 manuals
Add to My Manuals
Save this manual to your list of manuals |
Page 150 highlights
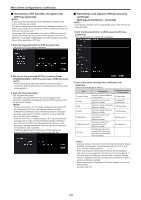
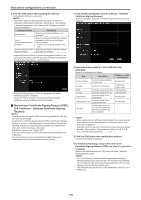
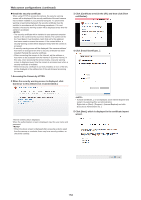
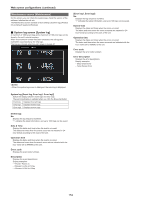
Web screen configurations (continued) 3. Click the [OK] button after inputting the address. A self-signed certificate is generated. • Information relating to the generated self-signed certificate is displayed in [Self-signed Certificate] - [Information]. The following is displayed depending on the status of the self-signed certificate (security certificate). Displayed content Description Not generated When the self-signed certificate is not generated Invalid (Reason: CA Certificate installed) When the self-signed certificate is already generated and the server certificate is already installed • The server certificate is enabled in this case. [Common Name] of self- When the self-signed certificate is already signed certificate generated and enabled • When the [Confirm] button is clicked, the registered content of the generated self-signed certificate (security certificate) is displayed in the [Self-signed Certificate - Confirm] dialog. 1. Click the [Execute] button in [CA Certificate - Generate Certificate Signing Request]. The [CA Certificate - Generate Certificate Signing Request] dialog is displayed. • Click the [Delete] button to delete the generated self-signed certificate (security certificate). • When [HTTPS] is selected in [Connection], the self-signed certificate (security certificate) cannot be deleted. „„Generating a Certificate Signing Request (CSR) [CA Certificate - Generate Certificate Signing Request] • A certificate signing request (CSR) cannot be generated if a CRT key has not been generated. • To generate a certificate signing request (CSR), perform the following settings in advance in the web browser Internet options. Perform the following settings in the [Security] tab (accessed from [Tools] in the menu bar - [Internet Options] - [Security]). • Register the camera as a "Trusted Site". • In [Level Customize], go to [File Download] from [Download] and set to [Enable]. • In [Level Customize], go to [Automatically Display Dialog when Downloading File] from [Download] and set to [Enable]. 2. Input information relating to the certificate to be generated. Items to be entered are as follows. Item Description Maximum number of characters Common Name Inputs the camera address or host name. 64 characters Country Inputs the country code. 2 characters: country code State Inputs the name of the state. 128 characters Locality Inputs the name of the city. 128 characters Organization Inputs the name of the organization. 64 characters Organizational Unit Inputs the name of the organizational unit. 64 characters CRT key Displays the size of the current CRT key and the date and time generation was completed. • When using a server certificate, the information to be input must be in accordance with the demands of the Certificate Authority (CA), which will be applied to. • Characters that can be input for [Common Name], [Country], [State], [Locality], [Organization], [Organizational Unit] are 0 to 9, A to Z, a to z, and the following symbols 3. Click the [OK] button after inputting the address. The [Save As] dialog is displayed. 4. In the [Save As] dialog, assign a file name to the Certificate Signing Request (CSR) and save it in personal computer. Apply to the Certificate Authority (CA) using the saved Certificate Signing Request (CSR). • A server certificate is issued for both the generated Certificate Signing Request (CSR) and CRT key. The issued server certificate can no longer be used when generating/updating the CRT key after applying to the Certificate Authority (CA). • The Certificate Signing Request (CSR) generated by this unit is in a PEM format. 150
-
 1
1 -
2
-
3
-
4
-
5
-
6
-
7
-
8
-
9
-
10
-
11
-
12
-
13
-
14
-
15
-
16
-
17
-
18
-
19
-
20
-
21
-
22
-
23
-
24
-
25
-
26
-
27
-
28
-
29
-
30
-
31
-
32
-
33
-
34
-
35
-
36
-
37
-
38
-
39
-
40
-
41
-
42
-
43
-
44
-
45
-
46
-
47
-
48
-
49
-
50
-
51
-
52
-
53
-
54
-
55
-
56
-
57
-
58
-
59
-
60
-
61
-
62
-
63
-
64
-
65
-
66
-
67
-
68
-
69
-
70
-
71
-
72
-
73
-
74
-
75
-
76
-
77
-
78
-
79
-
80
-
81
-
82
-
83
-
84
-
85
-
86
-
87
-
88
-
89
-
90
-
91
-
92
-
93
-
94
-
95
-
96
-
97
-
98
-
99
-
100
-
101
-
102
-
103
-
104
-
105
-
106
-
107
-
108
-
109
-
110
-
111
-
112
-
113
-
114
-
115
-
116
-
117
-
118
-
119
-
120
-
121
-
122
-
123
-
124
-
125
-
126
-
127
-
128
-
129
-
130
-
131
-
132
-
133
-
134
-
135
-
136
-
137
-
138
-
139
-
140
-
141
-
142
-
143
-
144
-
 145
145 -
 146
146 -
 147
147 -
 148
148 -
 149
149 -
 150
150 -
 151
151 -
 152
152 -
 153
153 -
 154
154 -
 155
155 -
156
-
157
-
158
-
159
-
160
-
161
-
162
-
163
-
164
-
165
-
166
-
167
-
168
-
169
-
170
-
171
-
172
-
173
-
174
-
175
-
176
-
177
-
178
-
179
-
180
 |
 |
