Panasonic AW-UE100 Operating Instructions - Page 151
Accessing the Camera by HTTPS, CA Certificate ‑ CA Certificate install]
 |
View all Panasonic AW-UE100 manuals
Add to My Manuals
Save this manual to your list of manuals |
Page 151 highlights
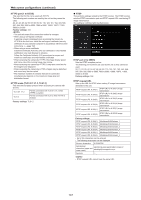
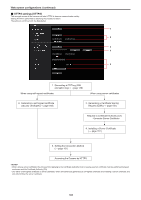
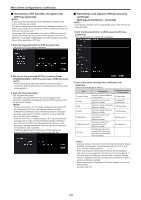
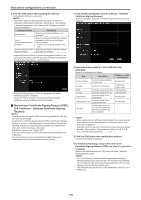
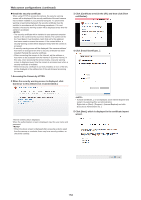
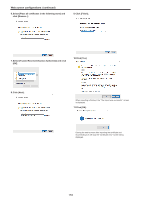
Web screen configurations (continued) „„Installing a Server Certificate [CA Certificate - CA Certificate install] • A server certificate (security certificate) cannot be installed if a Certificate Signing Request (CSR) has not been generated. • The server certificate must have been issued by the Certificate Authority (CA) in order to install it. 1. Click the [Select] button in [CA Certificate - CA Certificate install]. The [Open File] dialog is displayed. 2. Select the server certificate file and click [Open]. Then click the [Execute] button. The server certificate is installed. • The name of the host registered to the installed server certificate is displayed in [CA Certificate] - [Information]. The following is also displayed depending on the status of the server certificate. Displayed content Description Invalid When the server certificate is not installed [Common Name] of server certificate When the server certificate is already installed and enabled Expired When the effective period of the server certificate has expired • When the [Confirm] button is clicked, the content of the installed server certificate (security certificate) is displayed in the [CA Certificate - Confirm] dialog. (An asterisk is displayed in the [Organizational Unit] field only.) • Click the [Delete] button to delete the installed server certificate (security certificate). • When [HTTPS] is selected in [Connection], the server certificate (security certificate) cannot be deleted. • Perform STEP 1 to STEP 2 to update a server certificate. • To delete an enabled server certificate (security certificate), confirm that there is a backup to the said certificate in your personal computer or recording media. A server certificate (security certificate) will be needed to reinstall it. • The HTTPS function can no longer be used when the effective period of the server certificate has expired. In such a case, the connection method is changed to HTTP when the unit is restarted. Update the server certificate before its effective period expires. • The effective period of the server certificate can be confirmed by double-clicking the server certificate file issued by the Certificate Authority (CA). „„Setting the Connection Method [Connection] 1. Set the method to access the camera in [Connection]. HTTP: Only HTTP connection is possible. HTTPS: Only HTTPS connection is possible. • When using an HTTPS connection, network connection with the AW-RP120, AW-RP50, and AK-HRP200 will be disabled. 2. Set the Port No. to be used with HTTPS in [HTTPS port]. Port No. that can be selected: 1 to 65535 The following port numbers are used by the unit so they cannot be used. 20, 21, 23, 25, 42, 53, 67, 68, 69, 80, 110, 123, 161, 162, 443, 546, 547, 554, 995, 5960 to 5985, 7960 to 8060, 10669, 10670, 11900, 59000 to 61000 Factory settings: 443 3. Set the encryption protocol used with HTTPS in [HTTPS mode]. TLS1.0/1.1/1.2: Connection with TLS1.0/1.1/1.2 is possible. TLS1.2: Connection with TLS1.2 is possible. 4. Click the [Set] button. The camera restarts and access to the camera via HTTPS is enabled. • This unit will restart if the connection method is changed. • Using a self-signed certificate A warning screen is displayed when accessing the camera by HTTPS for the first time. Install the self-signed certificate (security certificate) in your personal computer in accordance with the screen instructions. (→ page 152) • Using a server certificate Install the Certificate Authority (CA) root certificate or intermediate certificate in your web browser in advance. Follow the Certificate Authority (CA) procedures to acquire and install root certificates and intermediate certificates. • When accessing the camera by HTTPS, the image display speed and frame rate of the moving image may reduce. • When accessing the camera by HTTPS, it may take some time for the images to be displayed. • When accessing the camera by HTTPS, images may be disturbed and sound may be interrupted. • The maximum number of cameras that can be connected simultaneously depends on the maximum image size and distribution format. „„Accessing the Camera by HTTPS 1. Launch the web browser in your personal computer. 2. Input the camera's IP address in the address bar of the web browser. Input address: https://192.168.0.10/ • When the HTTPS port No. is changed from "443", input "https:// camera IP address: Port No." in the address bar. E.g. https://192.168.0.11:61443 • When this unit is in a local network, set a proxy server from the web browser (menu bar: [Tools] - [Internet Options]) to ensure that a proxy server is not used for a local address. 3. Press the [Enter] key. The live screen [Live] is displayed. The security certificate is installed when the security warning screen is displayed. (→ page 152) When [User auth.] is set to [On], the user name and password input screen is displayed before the live screen [Live] appears. • When HTTPS is used, screen and image display may slow down and image update interval (frame rate) may also slow down. 151
-
 1
1 -
2
-
3
-
4
-
5
-
6
-
7
-
8
-
9
-
10
-
11
-
12
-
13
-
14
-
15
-
16
-
17
-
18
-
19
-
20
-
21
-
22
-
23
-
24
-
25
-
26
-
27
-
28
-
29
-
30
-
31
-
32
-
33
-
34
-
35
-
36
-
37
-
38
-
39
-
40
-
41
-
42
-
43
-
44
-
45
-
46
-
47
-
48
-
49
-
50
-
51
-
52
-
53
-
54
-
55
-
56
-
57
-
58
-
59
-
60
-
61
-
62
-
63
-
64
-
65
-
66
-
67
-
68
-
69
-
70
-
71
-
72
-
73
-
74
-
75
-
76
-
77
-
78
-
79
-
80
-
81
-
82
-
83
-
84
-
85
-
86
-
87
-
88
-
89
-
90
-
91
-
92
-
93
-
94
-
95
-
96
-
97
-
98
-
99
-
100
-
101
-
102
-
103
-
104
-
105
-
106
-
107
-
108
-
109
-
110
-
111
-
112
-
113
-
114
-
115
-
116
-
117
-
118
-
119
-
120
-
121
-
122
-
123
-
124
-
125
-
126
-
127
-
128
-
129
-
130
-
131
-
132
-
133
-
134
-
135
-
136
-
137
-
138
-
139
-
140
-
141
-
142
-
143
-
144
-
145
-
 146
146 -
 147
147 -
 148
148 -
 149
149 -
 150
150 -
 151
151 -
 152
152 -
 153
153 -
 154
154 -
 155
155 -
 156
156 -
157
-
158
-
159
-
160
-
161
-
162
-
163
-
164
-
165
-
166
-
167
-
168
-
169
-
170
-
171
-
172
-
173
-
174
-
175
-
176
-
177
-
178
-
179
-
180
 |
 |