Sony LF-X1 Operating Instructions - Page 109
Using the Drawing Palette, Pen panel
 |
View all Sony LF-X1 manuals
Add to My Manuals
Save this manual to your list of manuals |
Page 109 highlights
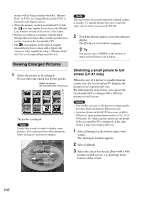
Album Drawing on the Screen Using the Drawing Palette Pen panel The display examples shown below are for the LF-X1. For the LF-X5, the actual screens will differ. To draw pictures or text 1 Select the type of pen. 2 For [Width], select the width of the pen tip. 3 Select the color you want to use from the color palette and it appears in the [Color] box. 4 Draw pictures or text on the screen. Note If you select the black frame of the color palette, the [Color] box turns black. To apply effects You can apply effects to the entire image. [Brighter]: Brightens the image. [Darker]: Darkens the image. [Neg./Pos.]: Reverses the colors of the image. [Sepia]: Applies a sepia tone to the image. [Mosaic]: Applies a mosaic filter to the image. With each press (up to 10 times), the mosaic becomes more intense. Pressing here 11 times restores the original image. To undo an operation Select [Undo]. The last operation you performed on the image is undone. To blur an image Select [Blur], then use the stylus to select the area you want to blur. To erase pictures or text 1 Select [Eraser]. 2 For [Width], select the width of the eraser. 3 Use the stylus to select the area you want to erase. To pick a color from an image 1 Select [Pick]. 2 On the image, touch the color you want to use. The [Color] box turns the color you touched, and you can draw with that color. To paint an entire area You can paint in the entire area enclosed by a shape, such as a circle or polygon. 1 Using the pen, draw the shape you want to paint in. 2 Select [Paint]. 3 Select the inside of the shape. The entire shape is painted the color in the [Color] box. Note The entire screen (not just the shape) is painted when: • You have not closed the shape. • You have changed the paint color after drawing a closed shape. • You have used Stamp or Pastel to draw a shape. Continued 109
-
 1
1 -
2
-
3
-
4
-
5
-
6
-
7
-
8
-
9
-
10
-
11
-
12
-
13
-
14
-
15
-
16
-
17
-
18
-
19
-
20
-
21
-
22
-
23
-
24
-
25
-
26
-
27
-
28
-
29
-
30
-
31
-
32
-
33
-
34
-
35
-
36
-
37
-
38
-
39
-
40
-
41
-
42
-
43
-
44
-
45
-
46
-
47
-
48
-
49
-
50
-
51
-
52
-
53
-
54
-
55
-
56
-
57
-
58
-
59
-
60
-
61
-
62
-
63
-
64
-
65
-
66
-
67
-
68
-
69
-
70
-
71
-
72
-
73
-
74
-
75
-
76
-
77
-
78
-
79
-
80
-
81
-
82
-
83
-
84
-
85
-
86
-
87
-
88
-
89
-
90
-
91
-
92
-
93
-
94
-
95
-
96
-
97
-
98
-
99
-
100
-
101
-
102
-
103
-
 104
104 -
 105
105 -
 106
106 -
 107
107 -
 108
108 -
 109
109 -
 110
110 -
 111
111 -
 112
112 -
 113
113 -
 114
114 -
115
-
116
-
117
-
118
-
119
-
120
-
121
-
122
-
123
-
124
-
125
-
126
-
127
-
128
-
129
-
130
-
131
-
132
-
133
-
134
-
135
-
136
-
137
-
138
-
139
-
140
-
141
-
142
-
143
-
144
-
145
-
146
-
147
-
148
-
149
-
150
-
151
-
152
-
153
-
154
-
155
-
156
-
157
-
158
-
159
-
160
 |
 |
