Sony LF-X1 Operating Instructions - Page 56
Setting Up NetAV, Making the base station accessible, by NetAV, Start up the NetAV server on
 |
View all Sony LF-X1 manuals
Add to My Manuals
Save this manual to your list of manuals |
Page 56 highlights
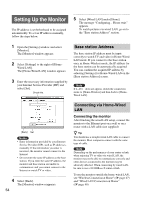
Setting Up NetAV You need to select [Home-Wireless] mode on the [Monitor] window to prepare for the base station settings over the wireless connection. Making the base station accessible by NetAV The NetAV function allows you to enjoy movies and other media while away from home by accessing your base station via the Internet. It is necessary, therefore, to set your base station so it is accessible over the Internet. Start up the NetAV server on the base station To use NetAV function, enable the NetAV port on the base station, and set up so the base station is accessible by NetAV while away from home. 1 Open the [Settings] window and select [Base station]. The [Base station] window appears. 2 Select [NetAV Settings]. The [NetAV Settings] window appears. Note [NetAV Settings] can only be selected when the monitor is set to Wireless Home mode. If you cannot select [NetAV Settings], check your monitor settings. 3 Select [Enable/Disable NetAV]. The [Enable/Disable NetAV] window appears. 4 Configure the necessary settings for each item and select [OK]. 1 Select [Enable]. 2 If necessary, change the port number of the NetAV server. 3 Select [OK]. z Tip For [Port number for the NetAV], enter a number between 5021 and 5999. Note Configure the following items while the base station and monitor are connected in HomeWireless mode. The [NetAV Settings] window reappears. 5 Select [Back]. The [Base Station] window reappears. 6 Select [Settings], then select [Exit]. z Tip When the base station is connected to the Internet through a router, the router must be set to port forwarding*. Refer to the "Port number for the NetAV" in the [Enable/Disable NetAV] window, and set access to the NetAV port to forward to the IP address of the base station (1 This page). * Some makers call it by different names such as port transfer or static IP masquerade. 56
-
 1
1 -
2
-
3
-
4
-
5
-
6
-
7
-
8
-
9
-
10
-
11
-
12
-
13
-
14
-
15
-
16
-
17
-
18
-
19
-
20
-
21
-
22
-
23
-
24
-
25
-
26
-
27
-
28
-
29
-
30
-
31
-
32
-
33
-
34
-
35
-
36
-
37
-
38
-
39
-
40
-
41
-
42
-
43
-
44
-
45
-
46
-
47
-
48
-
49
-
50
-
 51
51 -
 52
52 -
 53
53 -
 54
54 -
 55
55 -
 56
56 -
 57
57 -
 58
58 -
 59
59 -
 60
60 -
 61
61 -
62
-
63
-
64
-
65
-
66
-
67
-
68
-
69
-
70
-
71
-
72
-
73
-
74
-
75
-
76
-
77
-
78
-
79
-
80
-
81
-
82
-
83
-
84
-
85
-
86
-
87
-
88
-
89
-
90
-
91
-
92
-
93
-
94
-
95
-
96
-
97
-
98
-
99
-
100
-
101
-
102
-
103
-
104
-
105
-
106
-
107
-
108
-
109
-
110
-
111
-
112
-
113
-
114
-
115
-
116
-
117
-
118
-
119
-
120
-
121
-
122
-
123
-
124
-
125
-
126
-
127
-
128
-
129
-
130
-
131
-
132
-
133
-
134
-
135
-
136
-
137
-
138
-
139
-
140
-
141
-
142
-
143
-
144
-
145
-
146
-
147
-
148
-
149
-
150
-
151
-
152
-
153
-
154
-
155
-
156
-
157
-
158
-
159
-
160
 |
 |
