Sony LF-X1 Operating Instructions - Page 40
Configuring Network Settings, Connecting via LAN (DHCP), Settings
 |
View all Sony LF-X1 manuals
Add to My Manuals
Save this manual to your list of manuals |
Page 40 highlights
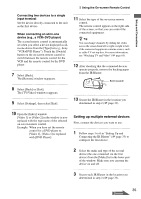
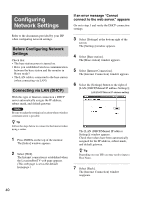
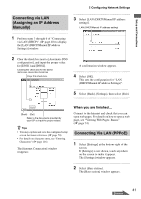
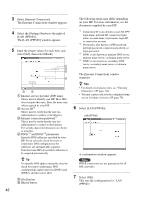
Configuring Network Settings Refer to the documents provided by your ISP when configuring network settings. Before Configuring Network Settings Check that: • The base station power is turned on. • Have you established wireless communication between the base station and the monitor in Home mode? • The LAN cable is connected to the base station (when connecting via LAN). Connecting via LAN (DHCP) With this type of Internet connection a DHCP server automatically assigns the IP address, subnet mask, and default gateway. Note Be sure to make the setting in a location where wireless communication is possible. z Tip Follow the steps below to connect to the Internet when using a router. 1 Press INDEX on the top of the monitor. The [Index] window appears. 2 Select [Web]. The Internet connection is established when the LocationFreeTV web page appears. (This web page is set as the default homepage.) If an error message "Cannot connect to the web server." appears Go on to step 3 and verify the DHCP connection settings. 3 Select [Settings] at the bottom right of the screen. The [Settings] window appears. 4 Select [Base station]. The [Base station] window appears. 5 Select [Internet Connection]. The [Internet Connection] window appears. 6 Select the [Settings] button to the right of [LAN (DHCP/Manual IP address Settings)]. LAN (DHCP/Manual IP address setting) The [LAN (DHCP/Manual IP address Settings)] window appears. Check that values have been automatically assigned for the IP address, subnet mask, and default gateway. z Tip Depending on your ISP, you may need to input a Host Name. 7 Select [Back]. The [Internet Connection] window reappears. 40
-
 1
1 -
2
-
3
-
4
-
5
-
6
-
7
-
8
-
9
-
10
-
11
-
12
-
13
-
14
-
15
-
16
-
17
-
18
-
19
-
20
-
21
-
22
-
23
-
24
-
25
-
26
-
27
-
28
-
29
-
30
-
31
-
32
-
33
-
34
-
 35
35 -
 36
36 -
 37
37 -
 38
38 -
 39
39 -
 40
40 -
 41
41 -
 42
42 -
 43
43 -
 44
44 -
 45
45 -
46
-
47
-
48
-
49
-
50
-
51
-
52
-
53
-
54
-
55
-
56
-
57
-
58
-
59
-
60
-
61
-
62
-
63
-
64
-
65
-
66
-
67
-
68
-
69
-
70
-
71
-
72
-
73
-
74
-
75
-
76
-
77
-
78
-
79
-
80
-
81
-
82
-
83
-
84
-
85
-
86
-
87
-
88
-
89
-
90
-
91
-
92
-
93
-
94
-
95
-
96
-
97
-
98
-
99
-
100
-
101
-
102
-
103
-
104
-
105
-
106
-
107
-
108
-
109
-
110
-
111
-
112
-
113
-
114
-
115
-
116
-
117
-
118
-
119
-
120
-
121
-
122
-
123
-
124
-
125
-
126
-
127
-
128
-
129
-
130
-
131
-
132
-
133
-
134
-
135
-
136
-
137
-
138
-
139
-
140
-
141
-
142
-
143
-
144
-
145
-
146
-
147
-
148
-
149
-
150
-
151
-
152
-
153
-
154
-
155
-
156
-
157
-
158
-
159
-
160
 |
 |
