Sony LF-X1 Operating Instructions - Page 13
Notes, The holes on parts of the monitor are not for attaching
 |
View all Sony LF-X1 manuals
Add to My Manuals
Save this manual to your list of manuals |
Page 13 highlights
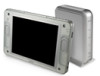
Top 89 0 Rear qg qa qs Identifying Parts and Controls qd qf 8 CAPTURE button (1 page 70) Saves the currently displayed image in the album. 9 POWER switch (1 page 26) Turns the monitor power on and off. 0 VOLUME +/- buttons (1 page 65) Adjusts the speaker volume. qa CompactFlash card indicator (1 page 124) Orange lit: A CompactFlash card is being accessed. qs CompactFlash card slot (1 page 124) Inserts a CompactFlash card. qd Stylus/stylus compartment (1 page 30) qf INDEX button (1 page 65) Displays the [Index] window. qg Ventilation hole Do not block with cloth or other objects. qh Battery (1 page 24) qj Monitor stand (1 page 28) Note that metal objects may cling to the stand because there is a powerful magnet inside. qk LAN connector Connect a LAN cable. qh qj qk Notes • The holes on parts of the monitor are not for attaching a carrying strap. Do not pass a string or other cord through them by which to hang the monitor. • Don't cover the rear vent for a prolonged time while using the monitor. Doing so may cause the surface of the product to increase in temperature. • Avoid touching hot areas of the surface of the product for long periods, especially if you have sensitive skin. Doing so may cause swellings or blisters as symptoms of moderate temperature burn. 13 Continued
-
 1
1 -
2
-
3
-
4
-
5
-
6
-
7
-
 8
8 -
 9
9 -
 10
10 -
 11
11 -
 12
12 -
 13
13 -
 14
14 -
 15
15 -
 16
16 -
 17
17 -
 18
18 -
19
-
20
-
21
-
22
-
23
-
24
-
25
-
26
-
27
-
28
-
29
-
30
-
31
-
32
-
33
-
34
-
35
-
36
-
37
-
38
-
39
-
40
-
41
-
42
-
43
-
44
-
45
-
46
-
47
-
48
-
49
-
50
-
51
-
52
-
53
-
54
-
55
-
56
-
57
-
58
-
59
-
60
-
61
-
62
-
63
-
64
-
65
-
66
-
67
-
68
-
69
-
70
-
71
-
72
-
73
-
74
-
75
-
76
-
77
-
78
-
79
-
80
-
81
-
82
-
83
-
84
-
85
-
86
-
87
-
88
-
89
-
90
-
91
-
92
-
93
-
94
-
95
-
96
-
97
-
98
-
99
-
100
-
101
-
102
-
103
-
104
-
105
-
106
-
107
-
108
-
109
-
110
-
111
-
112
-
113
-
114
-
115
-
116
-
117
-
118
-
119
-
120
-
121
-
122
-
123
-
124
-
125
-
126
-
127
-
128
-
129
-
130
-
131
-
132
-
133
-
134
-
135
-
136
-
137
-
138
-
139
-
140
-
141
-
142
-
143
-
144
-
145
-
146
-
147
-
148
-
149
-
150
-
151
-
152
-
153
-
154
-
155
-
156
-
157
-
158
-
159
-
160
 |
 |
