Sony LF-X1 Operating Instructions - Page 34
The [TV/Video] window appears., The [Remote Settings] window appears.
 |
View all Sony LF-X1 manuals
Add to My Manuals
Save this manual to your list of manuals |
Page 34 highlights
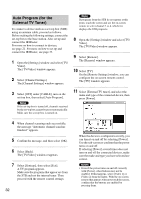
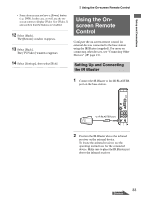
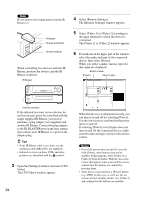
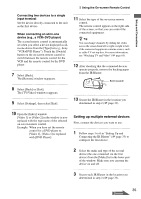
Note Do not remove the backing paper from the IR Blaster yet. IR Blaster Infrared transmitter Infrared receiver When controlling two devices with the IR Blaster, position the devices and the IR Blaster as shown. IR Blaster 4 Select [Remote Settings]. The [Remote Settings] window appears. 5 Select [Video 1] or [Video 2] according to the input terminal to which the device is connected. The [Video 1] or [Video 2] window appears. 6 From the list in the upper part of the window, select the make and type of the connected device, then select [Power]. When you select a make, various types for that make are displayed. Select a make. [Power] Select a type. Infrared receivers If the infrared receivers on two devices do not line up and cannot be controlled with the single supplied IR Blaster, you need to purchase a plug adapter (not supplied) and another IR Blaster. Connect the plug adapter to the IR BLASTER port on the base station and connect each IR Blaster to a port on the adapter plug. z Tips • If the IR Blaster cable is too short, use the extension cable (RK-G138, not supplied). • Infrared receivers on Sony VCRs and other products are identified with the symbol. 3 Open the [Settings] window and select [TV/ Video]. The [TV/Video] window appears. 34 When the device is configured correctly, you can turn it on and off by selecting [Power]. Use the sub-screen to confirm that the power turns on and off. If selecting [Power] several times does not turn on and off the connected device, make sure the make and type you have selected are correct. Notes • Even if the power turns on and off correctly with [Power], other buttons may not be enabled. If this happens, select [Video 1] or [Video 2] from the Index. With the on-screen remote that appears when you touch the screen, confirm that the buttons are enabled by pressing them. • Some devices may not have a [Power] button (e.g. DVR). In this case, as well, use the onscreen remote to display [Video 1] or [Video 2] and confirm that the buttons are enabled.
-
 1
1 -
2
-
3
-
4
-
5
-
6
-
7
-
8
-
9
-
10
-
11
-
12
-
13
-
14
-
15
-
16
-
17
-
18
-
19
-
20
-
21
-
22
-
23
-
24
-
25
-
26
-
27
-
28
-
 29
29 -
 30
30 -
 31
31 -
 32
32 -
 33
33 -
 34
34 -
 35
35 -
 36
36 -
 37
37 -
 38
38 -
 39
39 -
40
-
41
-
42
-
43
-
44
-
45
-
46
-
47
-
48
-
49
-
50
-
51
-
52
-
53
-
54
-
55
-
56
-
57
-
58
-
59
-
60
-
61
-
62
-
63
-
64
-
65
-
66
-
67
-
68
-
69
-
70
-
71
-
72
-
73
-
74
-
75
-
76
-
77
-
78
-
79
-
80
-
81
-
82
-
83
-
84
-
85
-
86
-
87
-
88
-
89
-
90
-
91
-
92
-
93
-
94
-
95
-
96
-
97
-
98
-
99
-
100
-
101
-
102
-
103
-
104
-
105
-
106
-
107
-
108
-
109
-
110
-
111
-
112
-
113
-
114
-
115
-
116
-
117
-
118
-
119
-
120
-
121
-
122
-
123
-
124
-
125
-
126
-
127
-
128
-
129
-
130
-
131
-
132
-
133
-
134
-
135
-
136
-
137
-
138
-
139
-
140
-
141
-
142
-
143
-
144
-
145
-
146
-
147
-
148
-
149
-
150
-
151
-
152
-
153
-
154
-
155
-
156
-
157
-
158
-
159
-
160
 |
 |
