Sony LF-X1 Operating Instructions - Page 83
Configuring Other Settings, Select [Settings], then select [Back].
 |
View all Sony LF-X1 manuals
Add to My Manuals
Save this manual to your list of manuals |
Page 83 highlights
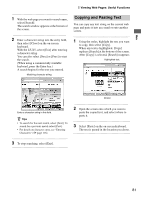
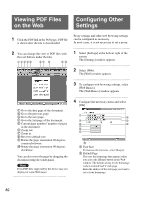
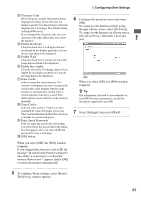
Web Configuring Other Settings 3 Character Code Most web pages include information about language encoding. If not, text may not display correctly. Use this setting to select the language for a web page. The default setting is [English/Western]. If you changed the character code, the new character code takes effect after you restart the monitor. 4 Enable JavaScript Clear the check box if web pages that use JavaScript do not display properly or if you do not want them to be displayed. 5 Enable Flash Clear the check box if you do not want web pages that use Flash to be displayed. 6 Enable Java Applet Clear the check box if web pages that use Java Applet do not display properly or if you do not want them to be displayed. 7 Erase Cache Select to erase the cache memory. The content of web pages you view is temporarily saved in the cache memory, but the cache memory is automatically cleared when a certain amount of memory is used. This button allows you to clear the cache memory manually. 8 Erase Cookie Select to erase cookies. Cookies are files generated by some web pages you access. They contain information about the selections you made on certain web pages. 9 Erase Saved Passwords Select to erase any passwords saved when you select [Save this password] in the dialog box that appears after you enter an ID and password to view a web page. 0 [OK] button When you select [OK], the [Web] window reappears. If you changed the character code in 3, the message "In order for the browser settings to take effect, it is necessary to reboot the monitor. Reboot now?" appears. Select [OK] to restart the monitor automatically. 6 Configure the necessary items and select [OK]. To connect to the Internet without going through a Proxy server, select [No Proxy]. To connect to the Internet via a Proxy server, select [Use Proxy], then enter a host and port. [OK] When you select [OK], the [Web] window reappears. z Tip The information you need to enter depends on your ISP. For more information, consult the documents supplied by your ISP. 7 Select [Settings], then select [Back]. 5 To configure Proxy settings, select [Proxy]. The [Proxy] window appears. 83
-
 1
1 -
2
-
3
-
4
-
5
-
6
-
7
-
8
-
9
-
10
-
11
-
12
-
13
-
14
-
15
-
16
-
17
-
18
-
19
-
20
-
21
-
22
-
23
-
24
-
25
-
26
-
27
-
28
-
29
-
30
-
31
-
32
-
33
-
34
-
35
-
36
-
37
-
38
-
39
-
40
-
41
-
42
-
43
-
44
-
45
-
46
-
47
-
48
-
49
-
50
-
51
-
52
-
53
-
54
-
55
-
56
-
57
-
58
-
59
-
60
-
61
-
62
-
63
-
64
-
65
-
66
-
67
-
68
-
69
-
70
-
71
-
72
-
73
-
74
-
75
-
76
-
77
-
 78
78 -
 79
79 -
 80
80 -
 81
81 -
 82
82 -
 83
83 -
 84
84 -
 85
85 -
 86
86 -
 87
87 -
 88
88 -
89
-
90
-
91
-
92
-
93
-
94
-
95
-
96
-
97
-
98
-
99
-
100
-
101
-
102
-
103
-
104
-
105
-
106
-
107
-
108
-
109
-
110
-
111
-
112
-
113
-
114
-
115
-
116
-
117
-
118
-
119
-
120
-
121
-
122
-
123
-
124
-
125
-
126
-
127
-
128
-
129
-
130
-
131
-
132
-
133
-
134
-
135
-
136
-
137
-
138
-
139
-
140
-
141
-
142
-
143
-
144
-
145
-
146
-
147
-
148
-
149
-
150
-
151
-
152
-
153
-
154
-
155
-
156
-
157
-
158
-
159
-
160
 |
 |
