Sony LF-X1 Operating Instructions - Page 57
Registering Other Monitors, Configuring the monitor to connect, using NetAV - locationfree
 |
View all Sony LF-X1 manuals
Add to My Manuals
Save this manual to your list of manuals |
Page 57 highlights
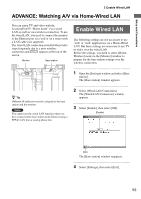
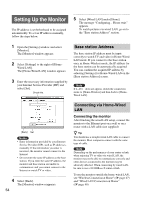
Setup and Connections Configuring the monitor to connect using NetAV What's NetAV 6 Select [Settings], then select [Exit]. 1 Open the [Settings] window and select [Monitor]. The [Monitor] window appears. 2 Select [NetAV Settings]. The [NetAV Settings] window appears. 3 Select [NetAV Connection]. The [NetAV Connection] window appears. 4 Set the following items and select [OK]. * For more on domain name, refer to the LocationFreeTV FAQ. (http://www.sony.com/locationfree/faq/). Setting the Dynamic DNS client on the base station For more on how to configure settings, refer to the LocationFreeTV FAQ (http://www.sony.com/locationfree/faq/). Registering Other Monitors You can register other monitors to a single base station. When registered, either monitor (B or C) can connect to the base station A in On the go-Wireless or Wired LAN mode and enjoy NetAV. B A 1 IP address or base station domain name* when connecting with NetAV. If you input an IP address, enter the IP address you wrote down in the section "Setting Up the Monitor" (1 page 54) or, input the domain name you acquired. 2 Port number for the NetAV Enter the port number for the NetAV server. (Set the port number between 5021 and 5999.) 3 [OK] button The [NetAV Settings] window reappears. 5 Select [Back]. The [Monitor] window appears. C A Notes • You cannot use Registering Other Monitors for purposes other than individual use. • To use Registering Other Monitors, the base station A must have the necessary environment and settings to connect with NetAV. For more on NetAV, see page 55. • The registered other monitors (B and C) cannot connect to the base station A in Home-Wireless or Wired LAN mode. • Up to 4 monitors can be registered with a single base station, but multiple monitors cannot view video and TV content at the same time. 57 Continued
-
 1
1 -
2
-
3
-
4
-
5
-
6
-
7
-
8
-
9
-
10
-
11
-
12
-
13
-
14
-
15
-
16
-
17
-
18
-
19
-
20
-
21
-
22
-
23
-
24
-
25
-
26
-
27
-
28
-
29
-
30
-
31
-
32
-
33
-
34
-
35
-
36
-
37
-
38
-
39
-
40
-
41
-
42
-
43
-
44
-
45
-
46
-
47
-
48
-
49
-
50
-
51
-
 52
52 -
 53
53 -
 54
54 -
 55
55 -
 56
56 -
 57
57 -
 58
58 -
 59
59 -
 60
60 -
 61
61 -
 62
62 -
63
-
64
-
65
-
66
-
67
-
68
-
69
-
70
-
71
-
72
-
73
-
74
-
75
-
76
-
77
-
78
-
79
-
80
-
81
-
82
-
83
-
84
-
85
-
86
-
87
-
88
-
89
-
90
-
91
-
92
-
93
-
94
-
95
-
96
-
97
-
98
-
99
-
100
-
101
-
102
-
103
-
104
-
105
-
106
-
107
-
108
-
109
-
110
-
111
-
112
-
113
-
114
-
115
-
116
-
117
-
118
-
119
-
120
-
121
-
122
-
123
-
124
-
125
-
126
-
127
-
128
-
129
-
130
-
131
-
132
-
133
-
134
-
135
-
136
-
137
-
138
-
139
-
140
-
141
-
142
-
143
-
144
-
145
-
146
-
147
-
148
-
149
-
150
-
151
-
152
-
153
-
154
-
155
-
156
-
157
-
158
-
159
-
160
 |
 |
