Sony PDWHD1500 User Manual (PDW-HD1500 / PDW-F1600 Operation Manual for Firmwa - Page 129
To change the settings of menu items, To return menu settings to their factory, default settings
 |
View all Sony PDWHD1500 manuals
Add to My Manuals
Save this manual to your list of manuals |
Page 129 highlights
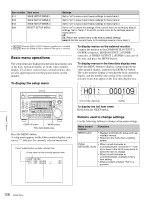
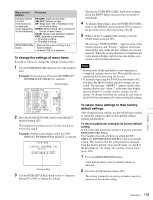
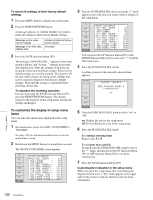
Menu control buttons Functions Function buttons F1 to F6 (The function to be displayed varies depending on the situations.) RETURN: Goes up one level. SELECT: Selects an item. UP: Skips back 100 or 50 items in the list of menu items. DOWN: Skips forward 100 or 50 items in the list of menu items. SAVE: Saves a new setting to memory. EXIT: Exits the current menu. -: Changes a setting. +: Changes a setting. RESET/RETURN • Returns the current setting to the button factory default. • Answers "No" to a question. To change the settings of menu items Proceed as follows to change the settings of menu items. 1 Use the PUSH SET(S.SEL) knob to select the required item. Example: Screen display when item 005 DISPLAY INFORMATION SELECT is selected Current setting KEY PARAMETER 0O1:P-ROLL TIME - 5 s 002:CHARA H-POS - 0A 003:CHARA V-POS - 2E *005:DISPLAY SEL - T&CNT 006:LOCAL ENA - st&ej 007:DISC TIMER - +-12H 009:CHARA TYPE - white 011:CHARA SIZE - x1 012:COND DISPLY - dis 013:SYSTEM FREQ - off 016:ALARM - on 2 Press the PUSH SET(S.SEL) knob or the SELECT function button (F2). This displays the setting screen 2 for the menu item selected in step 1. Example: Setting screen display when item 005 DISPLAY INFORMATION SELECT is selected ITEM-005 DISPLAY INFORMATION SELECT time data & CNT Current setting 3 Use the PUSH SET(S.SEL) knob or the +/- function button (F3 or F4) to change the setting. Turning the PUSH SET(S.SEL) knob while holding down the SHIFT button increases the increment of adjustment. 4 To change other settings, press the PUSH SET(S.SEL) knob or the SELECT function button (F2) to return to the previous screen, then repeat steps 1 to 3. 5 When you have completed the settings, press the SAVE function button (F5). The message "NOW SAVING..." appears on the video monitor display, and "Saving..." appears in the time data display area, while the new settings are saved in memory. When the saving operation is completed, the video monitor display and the time data display area return to their normal indications. Notes • If you power off the unit before a save operation is completed, settings may be lost. Wait until the save is completed before powering off the unit. • If, instead of pressing the SAVE function button (F5), you press the MENU button, the new settings are not saved. The message "ABORT !" appears on the video monitor display and "Abort !" in the time data display area for about 0.5 seconds, and the system exits the menus. To change more than one setting, be sure to press the SAVE function button (F5) after making the settings. To return menu settings to their factory default settings After changing menu settings, use the following procedure to return the settings to their factory default settings (setting initialization). To return a particular setting to its factory default setting In the screen that selects the setting of that item, press the RESET/RETURN button. For example, proceed as follows to return the 005 DISPLAY INFORMATION SELECT item to its default setting. This assumes that the setting has been changed from the factory default "time data & status" in step 3 of the procedure in "To change the settings of menu items" (page 129). 1 Press the RESET/RETURN button. "time data & status" (factory default setting) is selected. 2 Press the SAVE function button (F5). The setting returned to its factory default is saved in memory as the current setting. Chapter 7 Menus Setup Menu 129
-
 1
1 -
2
-
3
-
4
-
5
-
6
-
7
-
8
-
9
-
10
-
11
-
12
-
13
-
14
-
15
-
16
-
17
-
18
-
19
-
20
-
21
-
22
-
23
-
24
-
25
-
26
-
27
-
28
-
29
-
30
-
31
-
32
-
33
-
34
-
35
-
36
-
37
-
38
-
39
-
40
-
41
-
42
-
43
-
44
-
45
-
46
-
47
-
48
-
49
-
50
-
51
-
52
-
53
-
54
-
55
-
56
-
57
-
58
-
59
-
60
-
61
-
62
-
63
-
64
-
65
-
66
-
67
-
68
-
69
-
70
-
71
-
72
-
73
-
74
-
75
-
76
-
77
-
78
-
79
-
80
-
81
-
82
-
83
-
84
-
85
-
86
-
87
-
88
-
89
-
90
-
91
-
92
-
93
-
94
-
95
-
96
-
97
-
98
-
99
-
100
-
101
-
102
-
103
-
104
-
105
-
106
-
107
-
108
-
109
-
110
-
111
-
112
-
113
-
114
-
115
-
116
-
117
-
118
-
119
-
120
-
121
-
122
-
123
-
 124
124 -
 125
125 -
 126
126 -
 127
127 -
 128
128 -
 129
129 -
 130
130 -
 131
131 -
 132
132 -
 133
133 -
 134
134 -
135
-
136
-
137
-
138
-
139
-
140
-
141
-
142
-
143
-
144
-
145
-
146
-
147
-
148
-
149
-
150
-
151
-
152
-
153
-
154
-
155
-
156
-
157
-
158
-
159
-
160
-
161
-
162
-
163
-
164
-
165
-
166
-
167
-
168
-
169
-
170
-
171
-
172
-
173
-
174
-
175
-
176
-
177
-
178
-
179
-
180
-
181
-
182
-
183
-
184
-
185
-
186
-
187
-
188
-
189
-
190
-
191
-
192
-
193
-
194
-
195
-
196
-
197
-
198
 |
 |
