Sony PDWHD1500 User Manual (PDW-HD1500 / PDW-F1600 Operation Manual for Firmwa - Page 86
Select Lock or Delete All Clips, and then select Delete, Select OK, and then press the PUSH SETS.SEL
 |
View all Sony PDWHD1500 manuals
Add to My Manuals
Save this manual to your list of manuals |
Page 86 highlights
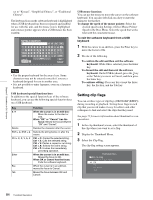
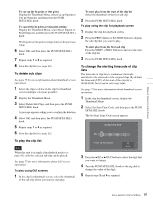
Notes • Clips cannot be deleted when the write inhibit tab of the disc is set to the recording disabled position, or when REC INH in HOME page of the function menu is set to ON. • Locked clips cannot be deleted. • If a deletion target clips is referenced by clip lists on the disc, all of those clip lists are deleted as well. • If a deletion target clip is referenced in the current clip list, only those referencing sub clips are deleted at the same time as the deletion target clip. See page 75 for more information about thumbnail screen operations. 1 In the clip thumbnail screen, select the thumbnail of the clip that you want to delete. 2 Display the Thumbnail Menu. 3 Select Delete Clip. A window appears asking you to confirm the deletion. The window displays thumbnails of four frames from the target clip (the first frame, two intermediate frames, and the last frame), along with the name, title1, date of creation, and duration of the clip. One of the following messages also appears, depending on whether the clip is referenced in a clip list. • When the clip is not referenced in a clip list: "Delete Clip" • When the clip is referenced in a clip list: "Delete Clip & Clip List" (All clip lists that reference the target clip are deleted along with the clip.) To delete all clips 1 Display the Disc Menu. 2 Select Lock or Delete All Clips, and then select Delete All Clips. A message appears asking you to confirm that you want to delete all clips. 3 Select OK to execute the deletion, or Cancel to cancel it, and then press the PUSH SET(S.SEL) knob. Note Locked clips cannot be deleted. Chapter 5 Operations in GUI Screens 4 Select OK, and then press the PUSH SET(S.SEL) knob. The selected clip is deleted, and you return to the clip thumbnail screen. In step 1, you can also perform a shortcut operation by pressing the RESET/RETURN button with the SHIFT button held down. 86 Thumbnail Operations
-
 1
1 -
2
-
3
-
4
-
5
-
6
-
7
-
8
-
9
-
10
-
11
-
12
-
13
-
14
-
15
-
16
-
17
-
18
-
19
-
20
-
21
-
22
-
23
-
24
-
25
-
26
-
27
-
28
-
29
-
30
-
31
-
32
-
33
-
34
-
35
-
36
-
37
-
38
-
39
-
40
-
41
-
42
-
43
-
44
-
45
-
46
-
47
-
48
-
49
-
50
-
51
-
52
-
53
-
54
-
55
-
56
-
57
-
58
-
59
-
60
-
61
-
62
-
63
-
64
-
65
-
66
-
67
-
68
-
69
-
70
-
71
-
72
-
73
-
74
-
75
-
76
-
77
-
78
-
79
-
80
-
 81
81 -
 82
82 -
 83
83 -
 84
84 -
 85
85 -
 86
86 -
 87
87 -
 88
88 -
 89
89 -
 90
90 -
 91
91 -
92
-
93
-
94
-
95
-
96
-
97
-
98
-
99
-
100
-
101
-
102
-
103
-
104
-
105
-
106
-
107
-
108
-
109
-
110
-
111
-
112
-
113
-
114
-
115
-
116
-
117
-
118
-
119
-
120
-
121
-
122
-
123
-
124
-
125
-
126
-
127
-
128
-
129
-
130
-
131
-
132
-
133
-
134
-
135
-
136
-
137
-
138
-
139
-
140
-
141
-
142
-
143
-
144
-
145
-
146
-
147
-
148
-
149
-
150
-
151
-
152
-
153
-
154
-
155
-
156
-
157
-
158
-
159
-
160
-
161
-
162
-
163
-
164
-
165
-
166
-
167
-
168
-
169
-
170
-
171
-
172
-
173
-
174
-
175
-
176
-
177
-
178
-
179
-
180
-
181
-
182
-
183
-
184
-
185
-
186
-
187
-
188
-
189
-
190
-
191
-
192
-
193
-
194
-
195
-
196
-
197
-
198
 |
 |