Sony PDWHD1500 User Manual (PDW-HD1500 / PDW-F1600 Operation Manual for Firmwa - Page 130
To customize the display of setup menu, items, To return all settings to their factory default
 |
View all Sony PDWHD1500 manuals
Add to My Manuals
Save this manual to your list of manuals |
Page 130 highlights
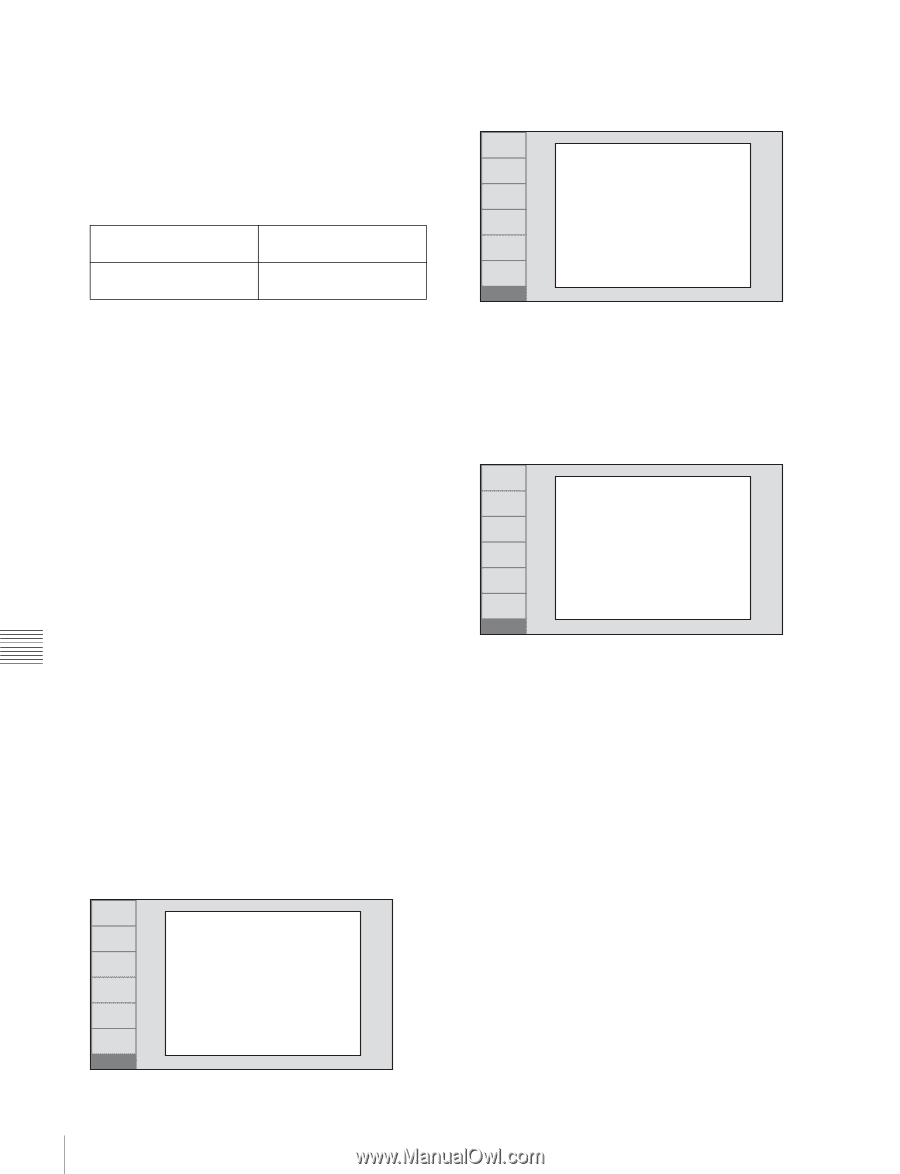
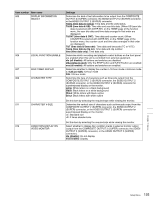
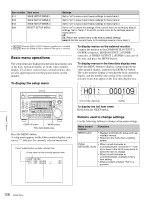
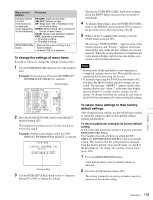
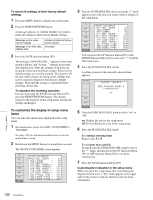
To return all settings to their factory default settings 1 Press the MENU button to display the setup menu. 2 Press the RESET/RETURN button. A message appears, to confirm whether you wish to return all settings to their factory default settings. Message on the video monitor display Message in the time data display area Initialize all items to factory preset values? Init setup? 3 Press the SAVE function button (F5). The message "NOW SAVING..." appears on the video monitor display, and "Saving..." appears in the time data display area, while the settings of all items are returned to their factory default settings. These factory default settings are saved in memory. If you power off the unit while settings are being saved, settings may not be correctly returned to their factory default settings. Wait until the saving is completed before powering off the unit. To abandon the resetting operation Instead of pressing the SAVE function button (F5), press the RESET/RETURN button. The display returns to the top level of the setup menu, leaving the settings unchanged. To customize the display of setup menu items You can select the menu items displayed in the setup menu. 1 Set maintenance menu item M41: CUSTOMIZE to "ENABLE". See page 152 for information about how to use the maintenance menu. 2 Hold down the MENU button for about three seconds. The SETUP CUSTOMIZE screen appears. ON OFF UP DOWN SAVE EXIT SETUP SETUP CUSTOMIZE *H01:OPE HOURS - on H02:LASER0 - on H03:LASER1 - on H11:OPE HOURS r- on H13:SEEK HOURS0r- off H14:SPDL HOURS r- off H15:LOAD COUNT r- off H17:SEEK HOURS1r- off 001:P-ROLL TIME - off 002:CHARA H-POS - off 003:CHARA V-POS - off 3 Turn the PUSH SET(S.SEL) knob so that the "*" mark appears next to the item you want to hide or display in the setup menu. ON OFF UP DOWN SAVE EXIT SETUP SETUP CUSTOMIZE H01:OPE HOURS - on H02:LASER0 - on H03:LASER1 - on H11:OPE HOURS r- on *H13:SEEK HOURS0r- off H14:SPDL HOURS r- off H15:LOAD COUNT r- off H17:SEEK HOURS1r- off 001:P-ROLL TIME - off 002:CHARA H-POS - off 003:CHARA V-POS - off You can press the UP function button (F3) or the DOWN function button (F4) to move the "*" mark by 100 menu items. 4 Press the PUSH SET(S.SEL) knob. A setting screen for the currently selected item appears. RETURN + CUSTOM ITEM-H13 SEEK RUNNING HOURS 0 (resettable) on SAVE EXIT SETUP 5 Turn the PUSH SET(S.SEL) knob to select "on" or "off". on: Display the item in the setup menu. off: Do not display the item in the setup menu. 6 Press the PUSH SET(S.SEL) knob. To continue selecting items Repeat steps 3 to 6. To set items more quickly In step 3, turn the PUSH SET(S.SEL) knob to move the "*" mark, and then press the ON function button (F1) or OFF function button (F2) to set items continuously. 7 Press the SAVE function button (F5). Customization indication in the setup menu When you open the setup menu after customizing the displayed menu item, a "[C]" mark appears at the upper right of the screen to indicate that the menu has been customized. Chapter 7 Menus 130 Setup Menu
-
 1
1 -
2
-
3
-
4
-
5
-
6
-
7
-
8
-
9
-
10
-
11
-
12
-
13
-
14
-
15
-
16
-
17
-
18
-
19
-
20
-
21
-
22
-
23
-
24
-
25
-
26
-
27
-
28
-
29
-
30
-
31
-
32
-
33
-
34
-
35
-
36
-
37
-
38
-
39
-
40
-
41
-
42
-
43
-
44
-
45
-
46
-
47
-
48
-
49
-
50
-
51
-
52
-
53
-
54
-
55
-
56
-
57
-
58
-
59
-
60
-
61
-
62
-
63
-
64
-
65
-
66
-
67
-
68
-
69
-
70
-
71
-
72
-
73
-
74
-
75
-
76
-
77
-
78
-
79
-
80
-
81
-
82
-
83
-
84
-
85
-
86
-
87
-
88
-
89
-
90
-
91
-
92
-
93
-
94
-
95
-
96
-
97
-
98
-
99
-
100
-
101
-
102
-
103
-
104
-
105
-
106
-
107
-
108
-
109
-
110
-
111
-
112
-
113
-
114
-
115
-
116
-
117
-
118
-
119
-
120
-
121
-
122
-
123
-
124
-
 125
125 -
 126
126 -
 127
127 -
 128
128 -
 129
129 -
 130
130 -
 131
131 -
 132
132 -
 133
133 -
 134
134 -
 135
135 -
136
-
137
-
138
-
139
-
140
-
141
-
142
-
143
-
144
-
145
-
146
-
147
-
148
-
149
-
150
-
151
-
152
-
153
-
154
-
155
-
156
-
157
-
158
-
159
-
160
-
161
-
162
-
163
-
164
-
165
-
166
-
167
-
168
-
169
-
170
-
171
-
172
-
173
-
174
-
175
-
176
-
177
-
178
-
179
-
180
-
181
-
182
-
183
-
184
-
185
-
186
-
187
-
188
-
189
-
190
-
191
-
192
-
193
-
194
-
195
-
196
-
197
-
198
 |
 |