Sony PDWHD1500 User Manual (PDW-HD1500 / PDW-F1600 Operation Manual for Firmwa - Page 85
Locking (write-protecting) clips, Deleting clips, To lock clips, To unlock a specific clip
 |
View all Sony PDWHD1500 manuals
Add to My Manuals
Save this manual to your list of manuals |
Page 85 highlights
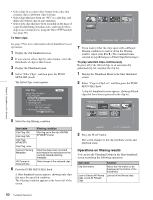
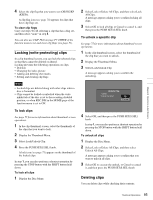
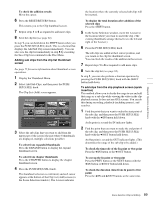
Chapter 5 Operations in GUI Screens 4 Select the clip flag that you want to set (OK/NG/KP (KEEP)). A clip flag icon (see page 70) appears for clips that have clip flags set. To clear clip flags Carry out steps 1 to 3, selecting a clip that has a flag set, and then select "none" in step 4. You can also use CLIP FLG on page P7 OTHER of the function menu to set and clear clip flags (see page 51). Locking (write-protecting) clips In a clip thumbnail screen, you can lock the selected clips so that they cannot be deleted or altered. Locking prevents the following operations on clips. • Deletion • Changing the index picture • Adding and deleting shot marks • Setting and clearing clip flags Notes • Locked clips are deleted along with other clips when a disc is formatted. • Clips cannot be locked or unlocked when the write inhibit tab of the disc is set to the recording disabled position, or when REC INH in the HOME page of the function menu is set to ON. To lock clips See page 75 for more information about thumbnail screen operations. 1 In the clip thumbnail screen, select the thumbnails of the clips that you want to lock. 2 Display the Thumbnail Menu. 3 Select Lock/Unlock Clip. 4 Press the PUSH SET(S.SEL) knob. A lock icon (see page 71) appears on the thumbnail of the locked clips. In step 1, you can also perform a shortcut operation by pressing the STOP button with the SHIFT button held down. To lock all clips 1 Display the Disc Menu. 2 Select Lock or Delete All Clips, and then select Lock All Clips. A message appears asking you to confirm locking all clips. 3 Select OK to lock all clips or Cancel to cancel it, and then press the PUSH SET(S.SEL) knob. To unlock a specific clip See page 75 for more information about thumbnail screen operations. 1 In the clip thumbnail screen, select the thumbnail of the clip that you want to unlock. 2 Display the Thumbnail Menu. 3 Select Lock/Unlock Clip. A message appears asking you to confirm the unlocking. Clip List:E0001 002/013 TC 00:00:00:00 TC 00:00:0U4:n14lockTCC0l0i:0p0:12:04 TC 00:00:20:13 C0004 Unlock this Clip? OK Cancel TC 00:00:28:08 TC 00:00:35:15 TC 00:00:46:08 TC 00:00:53:22 TC 00:00:59:16 TC 00:01:06:18 TC 00:01:13:11 TC 00:01:17:27 DATE&TIME 28 JUL 2006 19:55 TOTAL DUR 00:01:31:16 4 Select OK, and then press the PUSH SET(S.SEL) knob. In step 1, you can also perform a shortcut operation by pressing the STOP button with the SHIFT button held down. To unlock all clips 1 Display the Disc Menu. 2 Select Lock or Delete All Clips, and then select Unlock All Clips. A message appears asking you to confirm that you want to unlock all clips. 3 Select OK to execute the unlock, or Cancel to cancel it, and then press the PUSH SET(S.SEL) knob. Deleting clips You can delete clips while checking their contents. 85 Thumbnail Operations
-
 1
1 -
2
-
3
-
4
-
5
-
6
-
7
-
8
-
9
-
10
-
11
-
12
-
13
-
14
-
15
-
16
-
17
-
18
-
19
-
20
-
21
-
22
-
23
-
24
-
25
-
26
-
27
-
28
-
29
-
30
-
31
-
32
-
33
-
34
-
35
-
36
-
37
-
38
-
39
-
40
-
41
-
42
-
43
-
44
-
45
-
46
-
47
-
48
-
49
-
50
-
51
-
52
-
53
-
54
-
55
-
56
-
57
-
58
-
59
-
60
-
61
-
62
-
63
-
64
-
65
-
66
-
67
-
68
-
69
-
70
-
71
-
72
-
73
-
74
-
75
-
76
-
77
-
78
-
79
-
 80
80 -
 81
81 -
 82
82 -
 83
83 -
 84
84 -
 85
85 -
 86
86 -
 87
87 -
 88
88 -
 89
89 -
 90
90 -
91
-
92
-
93
-
94
-
95
-
96
-
97
-
98
-
99
-
100
-
101
-
102
-
103
-
104
-
105
-
106
-
107
-
108
-
109
-
110
-
111
-
112
-
113
-
114
-
115
-
116
-
117
-
118
-
119
-
120
-
121
-
122
-
123
-
124
-
125
-
126
-
127
-
128
-
129
-
130
-
131
-
132
-
133
-
134
-
135
-
136
-
137
-
138
-
139
-
140
-
141
-
142
-
143
-
144
-
145
-
146
-
147
-
148
-
149
-
150
-
151
-
152
-
153
-
154
-
155
-
156
-
157
-
158
-
159
-
160
-
161
-
162
-
163
-
164
-
165
-
166
-
167
-
168
-
169
-
170
-
171
-
172
-
173
-
174
-
175
-
176
-
177
-
178
-
179
-
180
-
181
-
182
-
183
-
184
-
185
-
186
-
187
-
188
-
189
-
190
-
191
-
192
-
193
-
194
-
195
-
196
-
197
-
198
 |
 |