Sony PDWHD1500 User Manual (PDW-HD1500 / PDW-F1600 Operation Manual for Firmwa - Page 89
To check the timecode of the In point or Out point, To cue up the In point or Out point
 |
View all Sony PDWHD1500 manuals
Add to My Manuals
Save this manual to your list of manuals |
Page 89 highlights
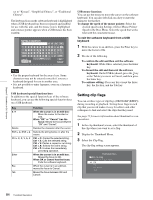
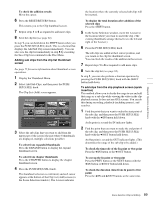
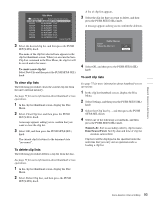
Chapter 5 Operations in GUI Screens To check the addition results Move the cursor. 6 Press the RESET/RETURN button. This returns you to the Clip thumbnail screen. 7 Repeat steps 1 to 6 as required to add more clips. 8 Save the clip list (see page 92). In step 1, you can hold down the SHIFT button when you press the PUSH SET(S.SEL) knob. This is a shortcut that displays the Add Sub Clip screen immediately. You can also save the clip list immediately in step 5 by executing the Save Clip List command in the Disc Menu. Adding sub clips from the clip list thumbnail screen See page 75 for more information about thumbnail screen operations. 1 Display the Thumbnail Menu. 2 Select Add Sub Clips, and then press the PUSH SET(S.SEL) knob. The Clip List (Add) screen appears. Clip List (Add) 002 017/035 TC 00:30:25:11 TC 00:30:40:13 TC 01:01:28:25 TC 00:09:43:14 TC 00:24:24:29 TC 00:24:34:27 Scene Selection TC 00:24:46:22 TC 00:24:56:24 TOTAL 00:13:48:24 3 Select the sub clips that you want to add from the upper part of the screen (the part where 8 thumbnails are displayed, multiple selections possible). To select from expanded thumbnails Press the EXPAND button to display the expand thumbnail screen. To select from chapter thumbnails Press the CHAPTER button to display the chapter thumbnail screen. 4 Press the PUSH SET(S.SEL) knob. The thumbnail selection is confirmed, and an I cursor appears at the bottom of the Clip List (Add) screen (in the Scene Selection window). The I cursor indicates the location where the currently selected sub clips will be inserted. To display the total duration after addition of the selected clips Press the SHIFT button. 5 In the Scene Selection window, move the I cursor to the location where you want to insert the clip. (The existing thumbnails arrange themselves to the left and right of the I cursor.) 6 Press the PUSH SET(S.SEL) knob. The sub clips are added at the I cursor position, and you return to the clip list thumbnail screen. You can check the results of the addition in that screen. 7 Repeat steps 1 to 6 as required to add more clips. 8 Save the clip list (see page 92). In step 1, you can also perform a shortcut operation by pressing the PUSH SET(S.SEL) knob with the SHIFT button held down. To add clips from the clip playback screen (quick insertion) This method allows you to decide the range to use and add that range as a sub clip while viewing the video in the clip playback screen. It does not use GUI screens. You can do this during recording, playback (including pauses), and searches. 1 Find the point that you want to make the start point of the sub clip, and then press the PUSH SET(S.SEL) knob with the B/IN button held down. An In point is set and the IN indicator lights. 2 Find the point that you want to make the end point of the sub clip, and then press the PUSH SET(S.SEL) knob with the b/OUT button held down. An Out point is set and the OUT indicator lights. (This determines the range of the sub clip to be added.) To check the timecode of the In point or Out point Press the B/IN button or the b/OUT button. To cue up the In point or Out point Press the PREV button or the NEXT button with the B/IN button or b/OUT button held down. To check the duration (time from In point to Out point) Press the B/IN and b/OUT buttons at the same time. 89 Scene Selection (Clip List Editing)
-
 1
1 -
2
-
3
-
4
-
5
-
6
-
7
-
8
-
9
-
10
-
11
-
12
-
13
-
14
-
15
-
16
-
17
-
18
-
19
-
20
-
21
-
22
-
23
-
24
-
25
-
26
-
27
-
28
-
29
-
30
-
31
-
32
-
33
-
34
-
35
-
36
-
37
-
38
-
39
-
40
-
41
-
42
-
43
-
44
-
45
-
46
-
47
-
48
-
49
-
50
-
51
-
52
-
53
-
54
-
55
-
56
-
57
-
58
-
59
-
60
-
61
-
62
-
63
-
64
-
65
-
66
-
67
-
68
-
69
-
70
-
71
-
72
-
73
-
74
-
75
-
76
-
77
-
78
-
79
-
80
-
81
-
82
-
83
-
 84
84 -
 85
85 -
 86
86 -
 87
87 -
 88
88 -
 89
89 -
 90
90 -
 91
91 -
 92
92 -
 93
93 -
 94
94 -
95
-
96
-
97
-
98
-
99
-
100
-
101
-
102
-
103
-
104
-
105
-
106
-
107
-
108
-
109
-
110
-
111
-
112
-
113
-
114
-
115
-
116
-
117
-
118
-
119
-
120
-
121
-
122
-
123
-
124
-
125
-
126
-
127
-
128
-
129
-
130
-
131
-
132
-
133
-
134
-
135
-
136
-
137
-
138
-
139
-
140
-
141
-
142
-
143
-
144
-
145
-
146
-
147
-
148
-
149
-
150
-
151
-
152
-
153
-
154
-
155
-
156
-
157
-
158
-
159
-
160
-
161
-
162
-
163
-
164
-
165
-
166
-
167
-
168
-
169
-
170
-
171
-
172
-
173
-
174
-
175
-
176
-
177
-
178
-
179
-
180
-
181
-
182
-
183
-
184
-
185
-
186
-
187
-
188
-
189
-
190
-
191
-
192
-
193
-
194
-
195
-
196
-
197
-
198
 |
 |
