TP-Link T3700G-28TQ T3700G-28TQ V1 UG - Page 161
Dhcp Relay, Dhcpdiscover, Dhcprequest, Dhcpdecline, Dhcprelease, Dhcpinform, Bootreply, Dhcpoffer
 |
View all TP-Link T3700G-28TQ manuals
Add to My Manuals
Save this manual to your list of manuals |
Page 161 highlights
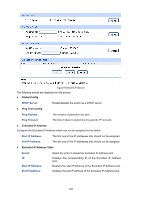
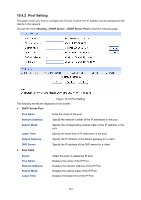
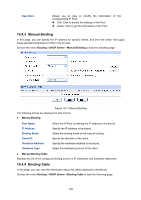
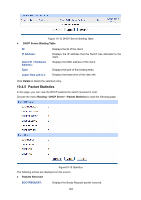
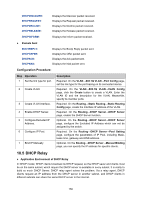
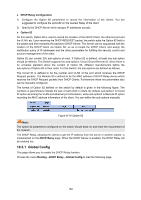
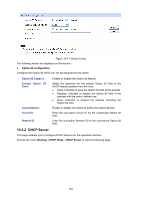
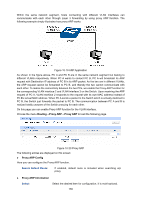
DHCPDISCOVER: DHCPREQUEST: DHCPDECLINE: DHCPRELEASE: Displays the Discover packet received. Displays the Request packet received. Displays the Decline packet received. Displays the Release packet received. DHCPINFORM: Displays the Inform packet received. Packets Sent BOOTREPLY: DHCPOFFER: DHCPACK: DHCPNAK: Displays the Bootp Reply packet sent. Displays the Offer packet sent. Displays the Ack packet sent. Displays the Nak packet sent. Configuration Procedure: Step Operation 1 Set the link type for port. 2 Create VLAN. 3 Create VLAN interface. 4 Enable DHCP Server. 5 Configure Excluded IP Address. 6 Configure IP Pool. 7 Bind IP Manually Description Required. On the VLAN→802.1Q VLAN→Port Config page, set the link type for the port basing on its connected device. Required. On the VLAN→802.1Q VLAN→VLAN Config page, click the Create button to create a VLAN. Enter the VLAN ID and the description for the VLAN. Meanwhile, specify its member ports. Required. On the Routing→Static Routing→Static Routing Config page, create the interface IP address of the VLAN. Required. On the Routing→DHCP Server→DHCP Server page, enable the DHCP Server function. Optional. On the Routing→DHCP Server→DHCP Server page, configure the Excluded IP Address which can not be assigned by the switch. Required. On the Routing→DHCP Server→Pool Setting page, configure the parameters of IP Pool, including Mask, lease time, gateway and DNS address. Optional. On the Routing→DHCP Server→Manual Binding page, you can specify the IP address for specific clients. 10.5 DHCP Relay Application Environment of DHCP Relay In DHCP model, DHCP clients broadcast its DHCP request, so the DHCP sever and clients must be on the same subnet, which require the DHCP server is available in every subnet. It is costly to build so much DHCP Server. DHCP relay agent solves the problem. Via a relay agent, DHCP clients request an IP address from the DHCP server in another subnet, and DHCP clients in different subnets can share the same DHCP server in the internet. 150
-
 1
1 -
2
-
3
-
4
-
5
-
6
-
7
-
8
-
9
-
10
-
11
-
12
-
13
-
14
-
15
-
16
-
17
-
18
-
19
-
20
-
21
-
22
-
23
-
24
-
25
-
26
-
27
-
28
-
29
-
30
-
31
-
32
-
33
-
34
-
35
-
36
-
37
-
38
-
39
-
40
-
41
-
42
-
43
-
44
-
45
-
46
-
47
-
48
-
49
-
50
-
51
-
52
-
53
-
54
-
55
-
56
-
57
-
58
-
59
-
60
-
61
-
62
-
63
-
64
-
65
-
66
-
67
-
68
-
69
-
70
-
71
-
72
-
73
-
74
-
75
-
76
-
77
-
78
-
79
-
80
-
81
-
82
-
83
-
84
-
85
-
86
-
87
-
88
-
89
-
90
-
91
-
92
-
93
-
94
-
95
-
96
-
97
-
98
-
99
-
100
-
101
-
102
-
103
-
104
-
105
-
106
-
107
-
108
-
109
-
110
-
111
-
112
-
113
-
114
-
115
-
116
-
117
-
118
-
119
-
120
-
121
-
122
-
123
-
124
-
125
-
126
-
127
-
128
-
129
-
130
-
131
-
132
-
133
-
134
-
135
-
136
-
137
-
138
-
139
-
140
-
141
-
142
-
143
-
144
-
145
-
146
-
147
-
148
-
149
-
150
-
151
-
152
-
153
-
154
-
155
-
 156
156 -
 157
157 -
 158
158 -
 159
159 -
 160
160 -
 161
161 -
 162
162 -
 163
163 -
 164
164 -
 165
165 -
 166
166 -
167
-
168
-
169
-
170
-
171
-
172
-
173
-
174
-
175
-
176
-
177
-
178
-
179
-
180
-
181
-
182
-
183
-
184
-
185
-
186
-
187
-
188
-
189
-
190
-
191
-
192
-
193
-
194
-
195
-
196
-
197
-
198
-
199
-
200
-
201
-
202
-
203
-
204
-
205
-
206
-
207
-
208
-
209
-
210
-
211
-
212
-
213
-
214
-
215
-
216
-
217
-
218
-
219
-
220
-
221
-
222
-
223
-
224
-
225
-
226
-
227
-
228
-
229
-
230
-
231
-
232
-
233
-
234
-
235
-
236
-
237
-
238
-
239
-
240
-
241
-
242
-
243
-
244
-
245
-
246
-
247
-
248
-
249
-
250
-
251
-
252
-
253
-
254
-
255
-
256
-
257
-
258
-
259
-
260
-
261
-
262
-
263
-
264
-
265
-
266
-
267
-
268
-
269
-
270
-
271
-
272
-
273
-
274
-
275
-
276
-
277
-
278
-
279
-
280
-
281
-
282
-
283
-
284
-
285
-
286
-
287
-
288
-
289
-
290
-
291
-
292
-
293
-
294
-
295
-
296
-
297
-
298
-
299
-
300
-
301
-
302
-
303
-
304
-
305
-
306
-
307
-
308
-
309
-
310
-
311
-
312
-
313
-
314
-
315
-
316
-
317
-
318
-
319
-
320
-
321
-
322
-
323
-
324
-
325
-
326
-
327
-
328
-
329
-
330
-
331
-
332
-
333
-
334
-
335
-
336
-
337
-
338
-
339
-
340
-
341
-
342
-
343
-
344
-
345
-
346
-
347
-
348
-
349
-
350
-
351
-
352
-
353
-
354
-
355
-
356
-
357
-
358
-
359
-
360
-
361
-
362
-
363
-
364
-
365
-
366
-
367
-
368
-
369
-
370
-
371
-
372
-
373
-
374
-
375
-
376
-
377
-
378
-
379
-
380
-
381
-
382
-
383
-
384
-
385
-
386
-
387
-
388
-
389
-
390
-
391
-
392
-
393
-
394
-
395
-
396
 |
 |