Bernina Bernette 12 Instruction Manual - Page 76
Sewing on buttons
 |
View all Bernina Bernette 12 manuals
Add to My Manuals
Save this manual to your list of manuals |
Page 76 highlights
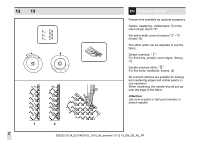
10 12 EN Sewing on buttons Install the darning plate. (1) Change presser foot to button sewing foot. Turn the stitch length dial to "0". Position the work under the foot. Place the button on the marked position and lower the foot. Set the pattern selector knob on " " or " " and sew a few securing stitches. Select the zigzag stitch width according to the distance between the two holes of the button. Turn the handwheel to check if the needle goes into the right and the left hole of the button without any obstruction (adjust the stitch width according to the button). Slowly sew on the button with about 10 stithces. Select pattern " " and sew a few securing stitches. If a shank is required, place a darning needle on top of the button and sew. (3) For buttons with 4 holes, sew through the front two holes first (2), push work forward and then sew through the back two holes as described. (3) Please note: No "S" marking is shown on the stitch length dial by model 10. 502020.75.24_021V4D0101_1010_IM_bernette 10 12 15_EN_DE_NL_FR 72
-
 1
1 -
2
-
3
-
4
-
5
-
6
-
7
-
8
-
9
-
10
-
11
-
12
-
13
-
14
-
15
-
16
-
17
-
18
-
19
-
20
-
21
-
22
-
23
-
24
-
25
-
26
-
27
-
28
-
29
-
30
-
31
-
32
-
33
-
34
-
35
-
36
-
37
-
38
-
39
-
40
-
41
-
42
-
43
-
44
-
45
-
46
-
47
-
48
-
49
-
50
-
51
-
52
-
53
-
54
-
55
-
56
-
57
-
58
-
59
-
60
-
61
-
62
-
63
-
64
-
65
-
66
-
67
-
68
-
69
-
70
-
 71
71 -
 72
72 -
 73
73 -
 74
74 -
 75
75 -
 76
76 -
 77
77 -
 78
78 -
 79
79 -
 80
80 -
 81
81 -
82
-
83
-
84
-
85
-
86
-
87
-
88
-
89
-
90
-
91
-
92
-
93
-
94
-
95
-
96
-
97
-
98
-
99
-
100
-
101
-
102
-
103
-
104
-
105
-
106
-
107
-
108
-
109
-
110
-
111
-
112
-
113
-
114
-
115
-
116
-
117
-
118
-
119
-
120
-
121
-
122
-
123
-
124
-
125
-
126
-
127
-
128
-
129
-
130
-
131
-
132
-
133
-
134
-
135
-
136
 |
 |
