Bernina Bernette 12 Instruction Manual - Page 82
Making a Buttonhole on Stretch Fabrics fig. E
 |
View all Bernina Bernette 12 manuals
Add to My Manuals
Save this manual to your list of manuals |
Page 82 highlights
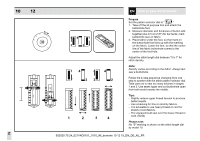
15 EN How to sew buttonholes Buttonhole-making is a simple process that provides reliable results. Making a Buttonhole 1. Using tailor's chalk, mark the position of the buttonhole on the fabric. 2. Attach the buttonhole foot and set the pattern selection dial to " ". 3. Lower the presser foot aligning the marks on foot with the marks on the fabric as shown in fig. (A). (The front bar tack will be sewn first.) 4. Open the button plate and insert the button. (fig. B) 5. Lower the buttonhole lever and push it back fig. (C). 6. While gently holding the upper thread, start the machine. 7. Buttonhole stitching is done in the order shown in fig. (D). 8. Stop the machine when the buttonhole is sewn. Making a Buttonhole on Stretch Fabrics (fig. E) When sewing buttonholes on stretch fabric, place a gimp thread under the buttonhole foot. 1. Mark the position of the buttonhole on the fabric with the tailor`s chalk, attach the buttonhole foot, and set the pattern selection dial to " ". 2. Hook the gimp thread onto the back end of the buttonhole foot, then bring the two gimp thread ends to the front of the foot, insert them into the grooves and temporarily tie them there. 3. Lower the presser foot and start sewing. *Set the stitch width to match the diameter of the gimp thread. 4. Once sewing is completed, gently pull the gimp thread to remove any slack, then trim off the excess. 78 502020.75.24_021V4D0101_1010_IM_bernette 10 12 15_EN_DE_NL_FR
-
 1
1 -
2
-
3
-
4
-
5
-
6
-
7
-
8
-
9
-
10
-
11
-
12
-
13
-
14
-
15
-
16
-
17
-
18
-
19
-
20
-
21
-
22
-
23
-
24
-
25
-
26
-
27
-
28
-
29
-
30
-
31
-
32
-
33
-
34
-
35
-
36
-
37
-
38
-
39
-
40
-
41
-
42
-
43
-
44
-
45
-
46
-
47
-
48
-
49
-
50
-
51
-
52
-
53
-
54
-
55
-
56
-
57
-
58
-
59
-
60
-
61
-
62
-
63
-
64
-
65
-
66
-
67
-
68
-
69
-
70
-
71
-
72
-
73
-
74
-
75
-
76
-
 77
77 -
 78
78 -
 79
79 -
 80
80 -
 81
81 -
 82
82 -
 83
83 -
 84
84 -
 85
85 -
 86
86 -
 87
87 -
88
-
89
-
90
-
91
-
92
-
93
-
94
-
95
-
96
-
97
-
98
-
99
-
100
-
101
-
102
-
103
-
104
-
105
-
106
-
107
-
108
-
109
-
110
-
111
-
112
-
113
-
114
-
115
-
116
-
117
-
118
-
119
-
120
-
121
-
122
-
123
-
124
-
125
-
126
-
127
-
128
-
129
-
130
-
131
-
132
-
133
-
134
-
135
-
136
 |
 |
