Bernina Bernette 12 Instruction Manual - Page 80
How to sew buttonholes
 |
View all Bernina Bernette 12 manuals
Add to My Manuals
Save this manual to your list of manuals |
Page 80 highlights
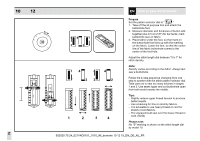
76 10 12 EN How to sew buttonholes Prepare Set the pattern selector dial to " ". 1. Take off the all purpose foot and attach the buttonhole foot. 2. Measure diameter and thickness of button add together plus 0.3 cm (1/8") for bar tacks; mark buttonhole size on fabric. 3. Place fabric under the foot, so that mark on the buttonhole foot lines up with the marking on the fabric. Lower the foot, so that the center line of the fabric buttonhole comes to the center of the foot hole. Adjust the stitch length dial between "0.5-1" for stitch density. Note: Density varies according to the fabric. Always test sew a buttonhole. Follow the 4-step sequence changing from one step to another with the stitch pattern selector dial. Take care not to sew too many stitches in stages 1 and 3. Use seam ripper and cut buttonhole open from both ends towards the middle. Tips: - Slightly reduce upper thread tension to produce better results. - Use a backing for fine or stretchy fabrics. - It is advisable to use heavy thread or cord for stretch or knit fabrics. - The zigzag should sew over the heavy thread or cord. (Simb) Please note: No "S" marking is shown on the stitch length dial by model 10. 502020.75.24_021V4D0101_1010_IM_bernette 10 12 15_EN_DE_NL_FR
-
 1
1 -
2
-
3
-
4
-
5
-
6
-
7
-
8
-
9
-
10
-
11
-
12
-
13
-
14
-
15
-
16
-
17
-
18
-
19
-
20
-
21
-
22
-
23
-
24
-
25
-
26
-
27
-
28
-
29
-
30
-
31
-
32
-
33
-
34
-
35
-
36
-
37
-
38
-
39
-
40
-
41
-
42
-
43
-
44
-
45
-
46
-
47
-
48
-
49
-
50
-
51
-
52
-
53
-
54
-
55
-
56
-
57
-
58
-
59
-
60
-
61
-
62
-
63
-
64
-
65
-
66
-
67
-
68
-
69
-
70
-
71
-
72
-
73
-
74
-
 75
75 -
 76
76 -
 77
77 -
 78
78 -
 79
79 -
 80
80 -
 81
81 -
 82
82 -
 83
83 -
 84
84 -
 85
85 -
86
-
87
-
88
-
89
-
90
-
91
-
92
-
93
-
94
-
95
-
96
-
97
-
98
-
99
-
100
-
101
-
102
-
103
-
104
-
105
-
106
-
107
-
108
-
109
-
110
-
111
-
112
-
113
-
114
-
115
-
116
-
117
-
118
-
119
-
120
-
121
-
122
-
123
-
124
-
125
-
126
-
127
-
128
-
129
-
130
-
131
-
132
-
133
-
134
-
135
-
136
 |
 |
