Brother International DreamWeaver„ VQ3000 Users Manual - English - Page 107
Quilting
 |
View all Brother International DreamWeaver„ VQ3000 manuals
Add to My Manuals
Save this manual to your list of manuals |
Page 107 highlights
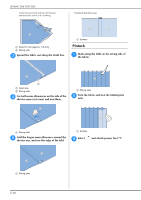
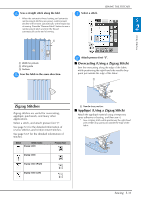
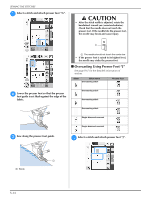
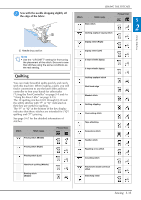
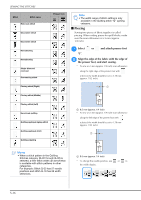
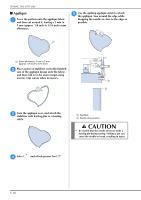
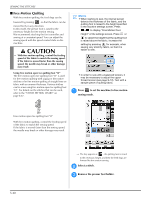
b Sew with the needle dropping the edge of the fabric. slightly off a Needle drop position Note • Use the "L/R SHIFT" setting for fine tuning the placement of the stitch. Be sure to sew trial stitches using the same conditions as the real sewing. Quilting You can make beautiful quilts quickly and easily with this machine. When making a quilt, you will find it convenient to use the knee lifter and foot controller to free your hands for other tasks ("Using the Foot Controller" on page S-4 and /or "Using the Knee Lifter" on page S-15). The 30 quilting stitches Q-01 through Q-30 and the utility stitches with "P" or "Q" indicated on their key are useful for quilting. The "P" or "Q" at the bottom of the key display indicates that these stitches are intended for ("Q") quilting and ("P") piecing. See page S-67 for the detailed information of stitches. Stitch Stitch name Presser foot Piecing stitch (Middle) Piecing stitch (Right) Piecing stitch (Left) Hand-look quilting (Middle) Basting stitch (Middle) SEWING THE STITCHES Stitch Stitch name Stem stitch Presser foot Quilting appliqué zigzag stitch S 2 Utility Stitches Zigzag stitch (Right) Zigzag stitch (Left) 2 steps elastic zigzag 3 steps elastic zigzag Quilting appliqué stitch Shell tuck edge Blanket stitch Quilting stippling Overcasting stitch Tape attaching Serpentine stitch Feather stitch Fagoting cross stitch Couching stitch Patchwork double overlock stitch Smocking stitch Sewing S-35
-
 1
1 -
2
-
3
-
4
-
5
-
6
-
7
-
8
-
9
-
10
-
11
-
12
-
13
-
14
-
15
-
16
-
17
-
18
-
19
-
20
-
21
-
22
-
23
-
24
-
25
-
26
-
27
-
28
-
29
-
30
-
31
-
32
-
33
-
34
-
35
-
36
-
37
-
38
-
39
-
40
-
41
-
42
-
43
-
44
-
45
-
46
-
47
-
48
-
49
-
50
-
51
-
52
-
53
-
54
-
55
-
56
-
57
-
58
-
59
-
60
-
61
-
62
-
63
-
64
-
65
-
66
-
67
-
68
-
69
-
70
-
71
-
72
-
73
-
74
-
75
-
76
-
77
-
78
-
79
-
80
-
81
-
82
-
83
-
84
-
85
-
86
-
87
-
88
-
89
-
90
-
91
-
92
-
93
-
94
-
95
-
96
-
97
-
98
-
99
-
100
-
101
-
 102
102 -
 103
103 -
 104
104 -
 105
105 -
 106
106 -
 107
107 -
 108
108 -
 109
109 -
 110
110 -
 111
111 -
 112
112 -
113
-
114
-
115
-
116
-
117
-
118
-
119
-
120
-
121
-
122
-
123
-
124
-
125
-
126
-
127
-
128
-
129
-
130
-
131
-
132
-
133
-
134
-
135
-
136
-
137
-
138
-
139
-
140
-
141
-
142
-
143
-
144
-
145
-
146
-
147
-
148
-
149
-
150
-
151
-
152
-
153
-
154
-
155
-
156
-
157
-
158
-
159
-
160
-
161
-
162
-
163
-
164
-
165
-
166
-
167
-
168
-
169
-
170
-
171
-
172
-
173
-
174
-
175
-
176
-
177
-
178
-
179
-
180
-
181
-
182
-
183
-
184
-
185
-
186
-
187
-
188
-
189
-
190
-
191
-
192
-
193
-
194
-
195
-
196
-
197
-
198
-
199
-
200
-
201
-
202
-
203
-
204
-
205
-
206
-
207
-
208
-
209
-
210
-
211
-
212
-
213
-
214
-
215
-
216
-
217
-
218
-
219
-
220
-
221
-
222
-
223
-
224
 |
 |
