Brother International DreamWeaver„ VQ3000 Users Manual - English - Page 136
Zipper Insertion
 |
View all Brother International DreamWeaver„ VQ3000 manuals
Add to My Manuals
Save this manual to your list of manuals |
Page 136 highlights
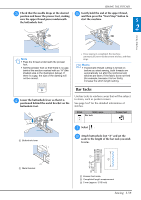
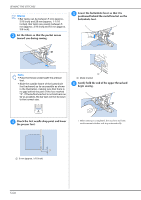
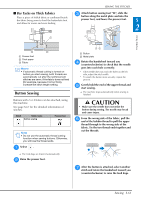
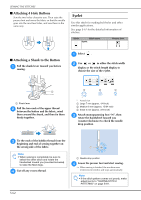
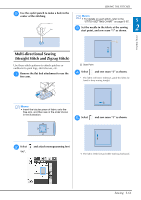
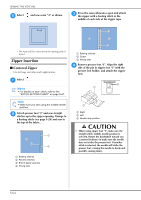
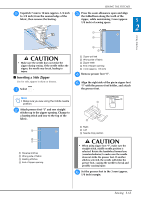
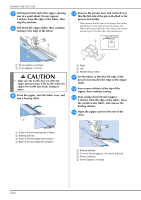
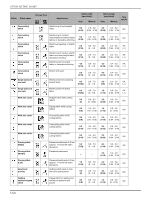
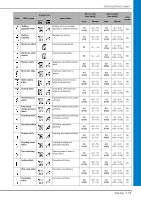
SEWING THE STITCHES f Select and sew seam "4" as shown. c Press the seam allowance open and attach the zipper with a basting stitch in the middle of each side of the zipper tape. → The seam will be connected to the starting point of seam 1. Zipper Insertion ■ Centered Zipper Use for bags and other such applications. a Select . a Basting stitches b Zipper c Wrong side d Remove presser foot "J". Align the right side of the pin in zipper foot "I" with the presser foot holder, and attach the zipper foot. Memo • For details on each stitch, refer to the "STITCH SETTING CHART" on page S-67. Note • Make sure you sew using the middle needle position. b Attach presser foot "J" and sew straight stitches up to the zipper opening. Change to a basting stitch (see page S-28) and sew to the top of the fabric. a Basting stitches b Reverse stitches c End of zipper opening d Wrong side a Right b Left c Needle drop position CAUTION • When using zipper foot "I", make sure the straight stitch, middle needle position is selected. Rotate the handwheel toward you (counterclockwise) to make sure the needle does not strike the presser foot. If another stitch is selected, the needle will strike the presser foot, causing the needle to break and possibly causing injury. S-64
-
 1
1 -
2
-
3
-
4
-
5
-
6
-
7
-
8
-
9
-
10
-
11
-
12
-
13
-
14
-
15
-
16
-
17
-
18
-
19
-
20
-
21
-
22
-
23
-
24
-
25
-
26
-
27
-
28
-
29
-
30
-
31
-
32
-
33
-
34
-
35
-
36
-
37
-
38
-
39
-
40
-
41
-
42
-
43
-
44
-
45
-
46
-
47
-
48
-
49
-
50
-
51
-
52
-
53
-
54
-
55
-
56
-
57
-
58
-
59
-
60
-
61
-
62
-
63
-
64
-
65
-
66
-
67
-
68
-
69
-
70
-
71
-
72
-
73
-
74
-
75
-
76
-
77
-
78
-
79
-
80
-
81
-
82
-
83
-
84
-
85
-
86
-
87
-
88
-
89
-
90
-
91
-
92
-
93
-
94
-
95
-
96
-
97
-
98
-
99
-
100
-
101
-
102
-
103
-
104
-
105
-
106
-
107
-
108
-
109
-
110
-
111
-
112
-
113
-
114
-
115
-
116
-
117
-
118
-
119
-
120
-
121
-
122
-
123
-
124
-
125
-
126
-
127
-
128
-
129
-
130
-
 131
131 -
 132
132 -
 133
133 -
 134
134 -
 135
135 -
 136
136 -
 137
137 -
 138
138 -
 139
139 -
 140
140 -
 141
141 -
142
-
143
-
144
-
145
-
146
-
147
-
148
-
149
-
150
-
151
-
152
-
153
-
154
-
155
-
156
-
157
-
158
-
159
-
160
-
161
-
162
-
163
-
164
-
165
-
166
-
167
-
168
-
169
-
170
-
171
-
172
-
173
-
174
-
175
-
176
-
177
-
178
-
179
-
180
-
181
-
182
-
183
-
184
-
185
-
186
-
187
-
188
-
189
-
190
-
191
-
192
-
193
-
194
-
195
-
196
-
197
-
198
-
199
-
200
-
201
-
202
-
203
-
204
-
205
-
206
-
207
-
208
-
209
-
210
-
211
-
212
-
213
-
214
-
215
-
216
-
217
-
218
-
219
-
220
-
221
-
222
-
223
-
224
 |
 |
