Brother International DreamWeaver„ VQ3000 Users Manual - English - Page 72
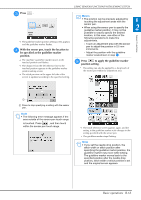
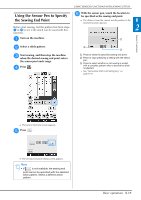
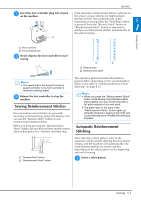
Decorative Stitch End Setting Key, Press, to apply the sewing end point, setting., Start sewing
 |
View all Brother International DreamWeaver„ VQ3000 manuals
Add to My Manuals
Save this manual to your list of manuals |
Page 72 highlights
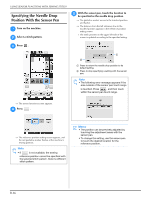
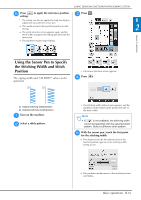
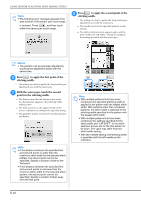
USING SENSOR FUNCTIONS WITH SEWING STITCH Note • The displayed distance is not the length of a straight line connecting the current needle position and the location touched with the sensor pen. It is the length of a perpendicular intersection for the location touched with the sensor pen and the sewing line. Decorative Stitch End Setting Key The end of stitching is not adjusted. When the end point is reached, sewing stops immediately, even if the stitch pattern is not complete. The length of the stitch pattern is adjusted so that sewing will stop at the specified end point with a complete pattern. a Displayed distance • The following error message appears if the area outside of the sensor pen touch range is touched. Press , and then touch within the sensor pen touch range. Note • The decorative stitch end setting key is not available with the following situations. - When selecting the Utility Stitch patterns. - When the decorative stitch end setting key is grayed out. - When specifying the sewing end point at the point that needs adjustment more than 10% of the length of a pattern, to finish a pattern completely. g Press setting. to apply the sewing end point * The setting can also be applied by long touching an adjustment area with the sensor pen. → When a sewing end point setting is specified, appears in the upper-left corner of the screen. • When sewing with this setting, be sure to feed the fabric straight, otherwise the actual end point may be different from the point you set. • When using the sensor pen to specify the sewing end point, the sewing end point may be slightly different than the specified location, depending on where the sewing machine is stopped in order to specify the setting. Note • If a different pattern is selected after the sewing end point has been specified, the end point setting is erased. h Start sewing again. * The machine stops at the specified end point automatically. B-70
-
 1
1 -
2
-
3
-
4
-
5
-
6
-
7
-
8
-
9
-
10
-
11
-
12
-
13
-
14
-
15
-
16
-
17
-
18
-
19
-
20
-
21
-
22
-
23
-
24
-
25
-
26
-
27
-
28
-
29
-
30
-
31
-
32
-
33
-
34
-
35
-
36
-
37
-
38
-
39
-
40
-
41
-
42
-
43
-
44
-
45
-
46
-
47
-
48
-
49
-
50
-
51
-
52
-
53
-
54
-
55
-
56
-
57
-
58
-
59
-
60
-
61
-
62
-
63
-
64
-
65
-
66
-
 67
67 -
 68
68 -
 69
69 -
 70
70 -
 71
71 -
 72
72 -
 73
73 -
 74
74 -
 75
75 -
 76
76 -
 77
77 -
78
-
79
-
80
-
81
-
82
-
83
-
84
-
85
-
86
-
87
-
88
-
89
-
90
-
91
-
92
-
93
-
94
-
95
-
96
-
97
-
98
-
99
-
100
-
101
-
102
-
103
-
104
-
105
-
106
-
107
-
108
-
109
-
110
-
111
-
112
-
113
-
114
-
115
-
116
-
117
-
118
-
119
-
120
-
121
-
122
-
123
-
124
-
125
-
126
-
127
-
128
-
129
-
130
-
131
-
132
-
133
-
134
-
135
-
136
-
137
-
138
-
139
-
140
-
141
-
142
-
143
-
144
-
145
-
146
-
147
-
148
-
149
-
150
-
151
-
152
-
153
-
154
-
155
-
156
-
157
-
158
-
159
-
160
-
161
-
162
-
163
-
164
-
165
-
166
-
167
-
168
-
169
-
170
-
171
-
172
-
173
-
174
-
175
-
176
-
177
-
178
-
179
-
180
-
181
-
182
-
183
-
184
-
185
-
186
-
187
-
188
-
189
-
190
-
191
-
192
-
193
-
194
-
195
-
196
-
197
-
198
-
199
-
200
-
201
-
202
-
203
-
204
-
205
-
206
-
207
-
208
-
209
-
210
-
211
-
212
-
213
-
214
-
215
-
216
-
217
-
218
-
219
-
220
-
221
-
222
-
223
-
224
 |
 |
