Brother International DreamWeaver„ VQ3000 Users Manual - English - Page 189
Preparing the Bobbin Thread
 |
View all Brother International DreamWeaver„ VQ3000 manuals
Add to My Manuals
Save this manual to your list of manuals |
Page 189 highlights
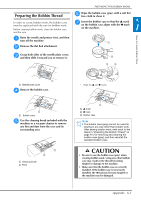
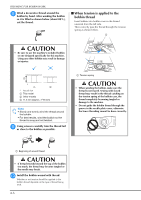
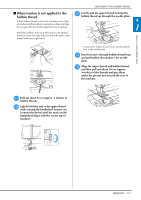
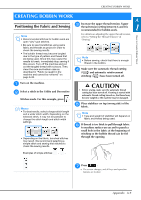
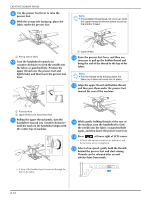
PREPARING FOR BOBBIN WORK Preparing the Bobbin Thread In order to create bobbin work, the bobbin case must be replaced with the one for bobbin work. Before creating bobbin work, clean the bobbin case and the race. a Raise the needle and presser turn off the machine. foot, and then b Remove the flat bed attachment. f Wipe the bobbin case free cloth to clean it. (gray) with a soft lint g Insert the bobbin case so that the S mark on the bobbin case aligns with the ● mark on the machine. A 1 a How to Create Bobbin Work c Grasp both sides of the needle plate cover, and then slide it toward you to remove it. b a b a Needle plate cover d Remove the bobbin case. * Align the S and ● marks. a Bobbin case e Use the cleaning brush included with the machine or a vacuum cleaner to remove any lint and dust from the race and its surrounding area. a Cleaning brush b Race a S mark b ● mark c Bobbin case Note • The bobbin case (gray) cannot be used for sewing in any way other than bobbin work. After sewing bobbin work, refer back to the steps in "Preparing the Bobbin Thread" on page A-5 for removing and cleaning the bobbin case (gray), and then reinstall the standard bobbin case. CAUTION • Be sure to use the bobbin case (gray) when creating bobbin work. Using any other bobbin case may result in the thread becoming tangled or damage to the machine. • Make sure that the bobbin case is correctly installed. If the bobbin case is incorrectly installed, the thread may become tangled or the machine may be damaged. Appendix A-5
-
 1
1 -
2
-
3
-
4
-
5
-
6
-
7
-
8
-
9
-
10
-
11
-
12
-
13
-
14
-
15
-
16
-
17
-
18
-
19
-
20
-
21
-
22
-
23
-
24
-
25
-
26
-
27
-
28
-
29
-
30
-
31
-
32
-
33
-
34
-
35
-
36
-
37
-
38
-
39
-
40
-
41
-
42
-
43
-
44
-
45
-
46
-
47
-
48
-
49
-
50
-
51
-
52
-
53
-
54
-
55
-
56
-
57
-
58
-
59
-
60
-
61
-
62
-
63
-
64
-
65
-
66
-
67
-
68
-
69
-
70
-
71
-
72
-
73
-
74
-
75
-
76
-
77
-
78
-
79
-
80
-
81
-
82
-
83
-
84
-
85
-
86
-
87
-
88
-
89
-
90
-
91
-
92
-
93
-
94
-
95
-
96
-
97
-
98
-
99
-
100
-
101
-
102
-
103
-
104
-
105
-
106
-
107
-
108
-
109
-
110
-
111
-
112
-
113
-
114
-
115
-
116
-
117
-
118
-
119
-
120
-
121
-
122
-
123
-
124
-
125
-
126
-
127
-
128
-
129
-
130
-
131
-
132
-
133
-
134
-
135
-
136
-
137
-
138
-
139
-
140
-
141
-
142
-
143
-
144
-
145
-
146
-
147
-
148
-
149
-
150
-
151
-
152
-
153
-
154
-
155
-
156
-
157
-
158
-
159
-
160
-
161
-
162
-
163
-
164
-
165
-
166
-
167
-
168
-
169
-
170
-
171
-
172
-
173
-
174
-
175
-
176
-
177
-
178
-
179
-
180
-
181
-
182
-
183
-
 184
184 -
 185
185 -
 186
186 -
 187
187 -
 188
188 -
 189
189 -
 190
190 -
 191
191 -
 192
192 -
 193
193 -
 194
194 -
195
-
196
-
197
-
198
-
199
-
200
-
201
-
202
-
203
-
204
-
205
-
206
-
207
-
208
-
209
-
210
-
211
-
212
-
213
-
214
-
215
-
216
-
217
-
218
-
219
-
220
-
221
-
222
-
223
-
224
 |
 |
