Brother International DreamWeaver„ VQ3000 Users Manual - English - Page 98
Aligning the Fabric with a Mark on, the Needle Plate or Bobbin Cover, with Mark, Using the Straight
 |
View all Brother International DreamWeaver„ VQ3000 manuals
Add to My Manuals
Save this manual to your list of manuals |
Page 98 highlights
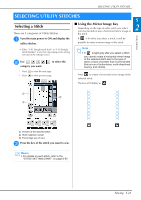
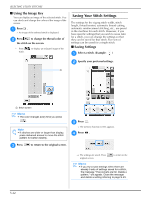
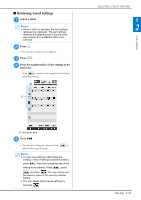
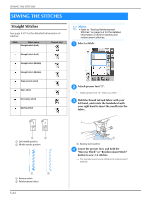
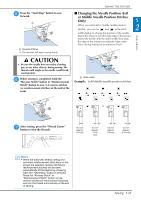
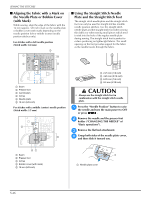
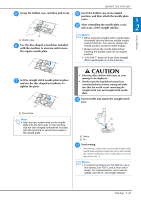
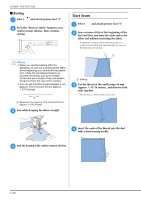
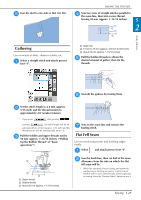
SEWING THE STITCHES ■ Aligning the Fabric with a Mark on the Needle Plate or Bobbin Cover (with Mark) While sewing, align the edge of the fabric with the 16 mm (approx. 5/8 inch) mark on the needle plate or bobbin cover (with mark) depending on the needle position (left or middle (center) needle position stitches only). For stitches with a left needle position (Stitch width: 0.0 mm) ■ Using the Straight Stitch Needle Plate and the Straight Stitch Foot The straight stitch needle plate and the straight stitch foot can only be used for straight stitches (middle needle position stitches). Use the straight stitch needle plate and the straight stitch foot when sewing thin fabrics or when sewing small pieces which tend to sink into the hole of the regular needle plate during sewing. The straight stitch foot is perfect to reduce puckering on lightweight fabrics. The small opening on the foot provides support for the fabric as the needle travels through the fabric. a Seam b Presser foot c Centimeters d Inches e Needle plate f 16 mm (5/8 inch) For stitches with a middle (center) needle position (Stitch width: 3.5 mm) a 2.25 mm (1/8 inch) b 4.25 mm (3/16 inch) c 6.25 mm (1/4 inch) d 8.5 mm (5/16 inch) CAUTION • Always use the straight stitch foot in combination with the straight stitch needle plate. a Press the "Needle Position" button to raise the needle and turn the main power to OFF or press . b Remove the needle and the presser foot holder ("CHANGING THE NEEDLE" of "Basic operations"). c Remove the flat bed attachment. d Grasp both sides of the needle and then slide it toward you. plate cover, a Seam b Presser foot c Inches d Bobbin cover (with mark) e 16 mm (5/8 inch) a Needle plate cover S-26
-
 1
1 -
2
-
3
-
4
-
5
-
6
-
7
-
8
-
9
-
10
-
11
-
12
-
13
-
14
-
15
-
16
-
17
-
18
-
19
-
20
-
21
-
22
-
23
-
24
-
25
-
26
-
27
-
28
-
29
-
30
-
31
-
32
-
33
-
34
-
35
-
36
-
37
-
38
-
39
-
40
-
41
-
42
-
43
-
44
-
45
-
46
-
47
-
48
-
49
-
50
-
51
-
52
-
53
-
54
-
55
-
56
-
57
-
58
-
59
-
60
-
61
-
62
-
63
-
64
-
65
-
66
-
67
-
68
-
69
-
70
-
71
-
72
-
73
-
74
-
75
-
76
-
77
-
78
-
79
-
80
-
81
-
82
-
83
-
84
-
85
-
86
-
87
-
88
-
89
-
90
-
91
-
92
-
 93
93 -
 94
94 -
 95
95 -
 96
96 -
 97
97 -
 98
98 -
 99
99 -
 100
100 -
 101
101 -
 102
102 -
 103
103 -
104
-
105
-
106
-
107
-
108
-
109
-
110
-
111
-
112
-
113
-
114
-
115
-
116
-
117
-
118
-
119
-
120
-
121
-
122
-
123
-
124
-
125
-
126
-
127
-
128
-
129
-
130
-
131
-
132
-
133
-
134
-
135
-
136
-
137
-
138
-
139
-
140
-
141
-
142
-
143
-
144
-
145
-
146
-
147
-
148
-
149
-
150
-
151
-
152
-
153
-
154
-
155
-
156
-
157
-
158
-
159
-
160
-
161
-
162
-
163
-
164
-
165
-
166
-
167
-
168
-
169
-
170
-
171
-
172
-
173
-
174
-
175
-
176
-
177
-
178
-
179
-
180
-
181
-
182
-
183
-
184
-
185
-
186
-
187
-
188
-
189
-
190
-
191
-
192
-
193
-
194
-
195
-
196
-
197
-
198
-
199
-
200
-
201
-
202
-
203
-
204
-
205
-
206
-
207
-
208
-
209
-
210
-
211
-
212
-
213
-
214
-
215
-
216
-
217
-
218
-
219
-
220
-
221
-
222
-
223
-
224
 |
 |
