Brother International DreamWeaver„ VQ3000 Users Manual - English - Page 197
Correcting bobbin work tension
 |
View all Brother International DreamWeaver„ VQ3000 manuals
Add to My Manuals
Save this manual to your list of manuals |
Page 197 highlights
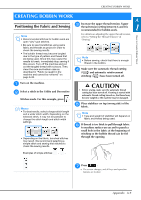
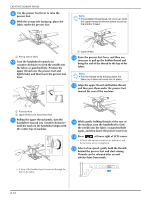
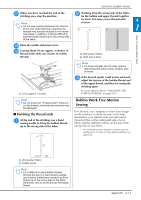
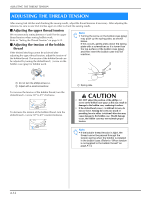
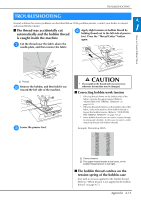
TROUBLESHOOTING TROUBLESHOOTING A Several solutions for minor problems are described below. If the problem persists, contact your dealer or nearest authorized Brother dealer. 1 ■ The thread was accidentally cut automatically and the bobbin thread d Apply slight tension on bobbin thread by holding thread out to the left side of presser is caught inside the machine foot. Press the "Thread Cutter" button again. a Cut the thread near the fabric above the needle plate, and then remove the fabric. How to Create Bobbin Work a Thread b Remove the bobbin, and then hold it toward the left side of the machine. out c Lower the presser foot. CAUTION • Do not pull on the thread with excessive force, otherwise the machine may be damaged. ■ Correcting bobbin work tension * If the top thread shows on the bobbin side of the fabric, increase the upper tension (Refer to "ADJUSTING THE THREAD TENSION" on page A-12). * If the top thread still shows on the bobbin side of the fabric, reduce the tension of the bobbin thread or bypass the bobbin tension. (Refer to "ADJUSTING THE THREAD TENSION" on page A-12.) * Some bobbin threads are too coarse to pass through to wrong side of fabric. In this case, be sure to color match top thread with bobbin threads. Example: Decorative Stitch a Correct tension b The upper thread tension is too loose, or the bobbin thread tension is too tight. ■ The bobbin thread catches on the tension spring of the bobbin case Sew with no tension applied to the bobbin thread. (Refer to "When tension is not applied to the bobbin thread" on page A-7.) Appendix A-13
-
 1
1 -
2
-
3
-
4
-
5
-
6
-
7
-
8
-
9
-
10
-
11
-
12
-
13
-
14
-
15
-
16
-
17
-
18
-
19
-
20
-
21
-
22
-
23
-
24
-
25
-
26
-
27
-
28
-
29
-
30
-
31
-
32
-
33
-
34
-
35
-
36
-
37
-
38
-
39
-
40
-
41
-
42
-
43
-
44
-
45
-
46
-
47
-
48
-
49
-
50
-
51
-
52
-
53
-
54
-
55
-
56
-
57
-
58
-
59
-
60
-
61
-
62
-
63
-
64
-
65
-
66
-
67
-
68
-
69
-
70
-
71
-
72
-
73
-
74
-
75
-
76
-
77
-
78
-
79
-
80
-
81
-
82
-
83
-
84
-
85
-
86
-
87
-
88
-
89
-
90
-
91
-
92
-
93
-
94
-
95
-
96
-
97
-
98
-
99
-
100
-
101
-
102
-
103
-
104
-
105
-
106
-
107
-
108
-
109
-
110
-
111
-
112
-
113
-
114
-
115
-
116
-
117
-
118
-
119
-
120
-
121
-
122
-
123
-
124
-
125
-
126
-
127
-
128
-
129
-
130
-
131
-
132
-
133
-
134
-
135
-
136
-
137
-
138
-
139
-
140
-
141
-
142
-
143
-
144
-
145
-
146
-
147
-
148
-
149
-
150
-
151
-
152
-
153
-
154
-
155
-
156
-
157
-
158
-
159
-
160
-
161
-
162
-
163
-
164
-
165
-
166
-
167
-
168
-
169
-
170
-
171
-
172
-
173
-
174
-
175
-
176
-
177
-
178
-
179
-
180
-
181
-
182
-
183
-
184
-
185
-
186
-
187
-
188
-
189
-
190
-
191
-
 192
192 -
 193
193 -
 194
194 -
 195
195 -
 196
196 -
 197
197 -
 198
198 -
 199
199 -
 200
200 -
 201
201 -
 202
202 -
203
-
204
-
205
-
206
-
207
-
208
-
209
-
210
-
211
-
212
-
213
-
214
-
215
-
216
-
217
-
218
-
219
-
220
-
221
-
222
-
223
-
224
 |
 |
