Brother International DreamWeaver„ VQ3000 Users Manual - English - Page 88
to select the pivot setting.
 |
View all Brother International DreamWeaver„ VQ3000 manuals
Add to My Manuals
Save this manual to your list of manuals |
Page 88 highlights
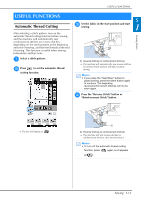
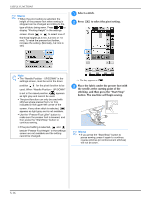
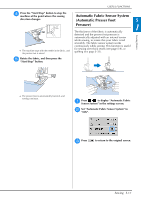
USEFUL FUNCTIONS Memo • When the pivot setting is selected, the height of the presser foot when sewing is stopped can be changed according to the type of fabric being sewn. Press to display "Pivoting Height" in the settings screen. Press or to select one of the three heights (3.2 mm, 5.0 mm or 7.5 mm). To raise the presser foot further, increase the setting. (Normally, 3.2 mm is set.) a Select a stitch. b Press to select the pivot setting. Note • The "Needle Position - UP/DOWN" in the settings screen, must be set in the down position for the pivot function to be used. When "Needle Position - UP/DOWN" is set in the raised position, appears as light gray and cannot be used. • The pivot function can only be used with stitches where presser foot J or N is indicated in the upper-left corner of the screen. If any other stitch is selected, appears as light gray and is not available. • Use the "Presser Foot Lifter" button to make sure the presser foot is lowered, and then press the "Start/Stop" button to continue sewing. • If the pivot setting is selected, and beside "Presser Foot Height" in the settings screen are not available and the setting cannot be changed. → The key appears as . c Place the fabric under the presser foot the needle at the starting point of the with stitching, and then press the "Start/Stop" button. The machine will begin sewing. Memo • If you press the "Start/Stop" button to pause sewing, press it again to continue, reverse stitches (or reinforcement stitches) will not be sewn. S-16
-
 1
1 -
2
-
3
-
4
-
5
-
6
-
7
-
8
-
9
-
10
-
11
-
12
-
13
-
14
-
15
-
16
-
17
-
18
-
19
-
20
-
21
-
22
-
23
-
24
-
25
-
26
-
27
-
28
-
29
-
30
-
31
-
32
-
33
-
34
-
35
-
36
-
37
-
38
-
39
-
40
-
41
-
42
-
43
-
44
-
45
-
46
-
47
-
48
-
49
-
50
-
51
-
52
-
53
-
54
-
55
-
56
-
57
-
58
-
59
-
60
-
61
-
62
-
63
-
64
-
65
-
66
-
67
-
68
-
69
-
70
-
71
-
72
-
73
-
74
-
75
-
76
-
77
-
78
-
79
-
80
-
81
-
82
-
 83
83 -
 84
84 -
 85
85 -
 86
86 -
 87
87 -
 88
88 -
 89
89 -
 90
90 -
 91
91 -
 92
92 -
 93
93 -
94
-
95
-
96
-
97
-
98
-
99
-
100
-
101
-
102
-
103
-
104
-
105
-
106
-
107
-
108
-
109
-
110
-
111
-
112
-
113
-
114
-
115
-
116
-
117
-
118
-
119
-
120
-
121
-
122
-
123
-
124
-
125
-
126
-
127
-
128
-
129
-
130
-
131
-
132
-
133
-
134
-
135
-
136
-
137
-
138
-
139
-
140
-
141
-
142
-
143
-
144
-
145
-
146
-
147
-
148
-
149
-
150
-
151
-
152
-
153
-
154
-
155
-
156
-
157
-
158
-
159
-
160
-
161
-
162
-
163
-
164
-
165
-
166
-
167
-
168
-
169
-
170
-
171
-
172
-
173
-
174
-
175
-
176
-
177
-
178
-
179
-
180
-
181
-
182
-
183
-
184
-
185
-
186
-
187
-
188
-
189
-
190
-
191
-
192
-
193
-
194
-
195
-
196
-
197
-
198
-
199
-
200
-
201
-
202
-
203
-
204
-
205
-
206
-
207
-
208
-
209
-
210
-
211
-
212
-
213
-
214
-
215
-
216
-
217
-
218
-
219
-
220
-
221
-
222
-
223
-
224
 |
 |
