Brother International DreamWeaver„ VQ3000 Users Manual - English - Page 61
By using the sensor pen, you have the option of, four separate functions
 |
View all Brother International DreamWeaver„ VQ3000 manuals
Add to My Manuals
Save this manual to your list of manuals |
Page 61 highlights
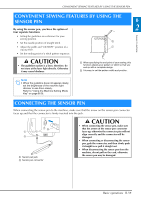
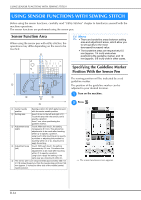
CONVENIENT SEWING FEATURES BY USING THE SENSOR PEN CONVENIENT SEWING FEATURES BY USING THE SENSOR PEN By using the sensor pen, you have the option of B 2 four separate functions Sensor Functions • Setting the guideline as a reference for your sewing position. • Set the needle position of straight stitch. • Adjust the width and "L/R SHIFT" position of a zigzag stitch. • Set the ending point of a stitch pattern sequence. CAUTION • The guideline marker is a laser; therefore, do not stare at the laser light directly. Otherwise it may cause blindness. a When specifying the end point of your sewing, this function adjusts your pattern or stitch so that you end up with a complete design. b It is easy to set the pattern width and position. Note • When the guideline does not appear clearly, set the brightness of the machine light dimmer to see them clearly. Refer to "Using the Machine Setting Mode Key" on page B-25. CONNECTING THE SENSOR PEN When connecting the sensor pen to the machine, make sure that the arrow on the sensor pen connector faces up and that the connector is firmly inserted into the jack. a Sensor pen jack b Sensor pen connector CAUTION • When connecting the sensor pen, make sure that the arrow on the sensor pen connector faces up, otherwise the connector pins will not align correctly and the connector will be damaged. • When connecting or disconnecting the sensor pen, grab the connector, and then slowly push it straight in or pull it straight out. • When disconnecting the sensor pen from the machine, do not pull on the cord, otherwise the sensor pen may be damaged. Basic operations B-59
-
 1
1 -
2
-
3
-
4
-
5
-
6
-
7
-
8
-
9
-
10
-
11
-
12
-
13
-
14
-
15
-
16
-
17
-
18
-
19
-
20
-
21
-
22
-
23
-
24
-
25
-
26
-
27
-
28
-
29
-
30
-
31
-
32
-
33
-
34
-
35
-
36
-
37
-
38
-
39
-
40
-
41
-
42
-
43
-
44
-
45
-
46
-
47
-
48
-
49
-
50
-
51
-
52
-
53
-
54
-
55
-
 56
56 -
 57
57 -
 58
58 -
 59
59 -
 60
60 -
 61
61 -
 62
62 -
 63
63 -
 64
64 -
 65
65 -
 66
66 -
67
-
68
-
69
-
70
-
71
-
72
-
73
-
74
-
75
-
76
-
77
-
78
-
79
-
80
-
81
-
82
-
83
-
84
-
85
-
86
-
87
-
88
-
89
-
90
-
91
-
92
-
93
-
94
-
95
-
96
-
97
-
98
-
99
-
100
-
101
-
102
-
103
-
104
-
105
-
106
-
107
-
108
-
109
-
110
-
111
-
112
-
113
-
114
-
115
-
116
-
117
-
118
-
119
-
120
-
121
-
122
-
123
-
124
-
125
-
126
-
127
-
128
-
129
-
130
-
131
-
132
-
133
-
134
-
135
-
136
-
137
-
138
-
139
-
140
-
141
-
142
-
143
-
144
-
145
-
146
-
147
-
148
-
149
-
150
-
151
-
152
-
153
-
154
-
155
-
156
-
157
-
158
-
159
-
160
-
161
-
162
-
163
-
164
-
165
-
166
-
167
-
168
-
169
-
170
-
171
-
172
-
173
-
174
-
175
-
176
-
177
-
178
-
179
-
180
-
181
-
182
-
183
-
184
-
185
-
186
-
187
-
188
-
189
-
190
-
191
-
192
-
193
-
194
-
195
-
196
-
197
-
198
-
199
-
200
-
201
-
202
-
203
-
204
-
205
-
206
-
207
-
208
-
209
-
210
-
211
-
212
-
213
-
214
-
215
-
216
-
217
-
218
-
219
-
220
-
221
-
222
-
223
-
224
 |
 |
