Brother International DreamWeaver„ VQ3000 Users Manual - English - Page 90
Needle Position - Stitch, Placement, Locking the Screen
 |
View all Brother International DreamWeaver„ VQ3000 manuals
Add to My Manuals
Save this manual to your list of manuals |
Page 90 highlights
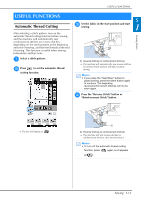
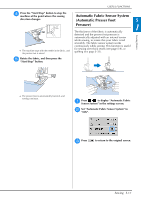
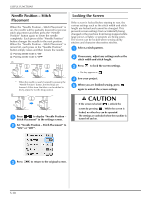
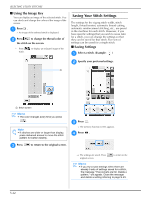
USEFUL FUNCTIONS Needle Position - Stitch Placement When the "Needle Position - Stitch Placement" is on, the needle will be partially lowered for precise stitch placement and then press the "Needle Position" button again to lower the needle completely. Each press of the "Needle Position" button changes the needle to the next position. When the "Needle Position - Stitch Placement" is turned off, each press of the "Needle Position" button simply raises and then lowers the needle. a Pointing needle mode is "ON" b Pointing needle mode is "OFF" * When the needle is nearly lowered by pressing the "Needle Position" button, the feed dogs are lowered. At this time, the fabric can be shifted to finely adjust the needle drop position. Locking the Screen If the screen is locked before starting to sew, the various settings such as the stitch width and stitch length are locked and cannot be changed. This prevents screen settings from accidentally being changed or the machine from being stopped while large pieces of fabric or projects are being sewn. The screen can be locked when sewing utility stitches and character decorative stitches. a Select a stitch pattern. b If necessary, adjust any settings stitch width and stitch length. such as the c Press to lock the screen settings. → The key appears as . d Sew your project. e When you are finished sewing, press again to unlock the screen settings. a Press Stitch to display "Needle Position Placement" in the settings screen. - b Set "Needle Position "ON" or "OFF". - Stitch Placement" to CAUTION • If the screen is locked ( ), unlock the screen by pressing . While the screen is locked, no other key can be operated. • The settings are unlocked when the machine is turned off and on. c Press to return to the original screen. S-18
-
 1
1 -
2
-
3
-
4
-
5
-
6
-
7
-
8
-
9
-
10
-
11
-
12
-
13
-
14
-
15
-
16
-
17
-
18
-
19
-
20
-
21
-
22
-
23
-
24
-
25
-
26
-
27
-
28
-
29
-
30
-
31
-
32
-
33
-
34
-
35
-
36
-
37
-
38
-
39
-
40
-
41
-
42
-
43
-
44
-
45
-
46
-
47
-
48
-
49
-
50
-
51
-
52
-
53
-
54
-
55
-
56
-
57
-
58
-
59
-
60
-
61
-
62
-
63
-
64
-
65
-
66
-
67
-
68
-
69
-
70
-
71
-
72
-
73
-
74
-
75
-
76
-
77
-
78
-
79
-
80
-
81
-
82
-
83
-
84
-
 85
85 -
 86
86 -
 87
87 -
 88
88 -
 89
89 -
 90
90 -
 91
91 -
 92
92 -
 93
93 -
 94
94 -
 95
95 -
96
-
97
-
98
-
99
-
100
-
101
-
102
-
103
-
104
-
105
-
106
-
107
-
108
-
109
-
110
-
111
-
112
-
113
-
114
-
115
-
116
-
117
-
118
-
119
-
120
-
121
-
122
-
123
-
124
-
125
-
126
-
127
-
128
-
129
-
130
-
131
-
132
-
133
-
134
-
135
-
136
-
137
-
138
-
139
-
140
-
141
-
142
-
143
-
144
-
145
-
146
-
147
-
148
-
149
-
150
-
151
-
152
-
153
-
154
-
155
-
156
-
157
-
158
-
159
-
160
-
161
-
162
-
163
-
164
-
165
-
166
-
167
-
168
-
169
-
170
-
171
-
172
-
173
-
174
-
175
-
176
-
177
-
178
-
179
-
180
-
181
-
182
-
183
-
184
-
185
-
186
-
187
-
188
-
189
-
190
-
191
-
192
-
193
-
194
-
195
-
196
-
197
-
198
-
199
-
200
-
201
-
202
-
203
-
204
-
205
-
206
-
207
-
208
-
209
-
210
-
211
-
212
-
213
-
214
-
215
-
216
-
217
-
218
-
219
-
220
-
221
-
222
-
223
-
224
 |
 |
