Brother International DreamWeaver„ VQ3000 Users Manual - English - Page 209
Checking machine operations
 |
View all Brother International DreamWeaver„ VQ3000 manuals
Add to My Manuals
Save this manual to your list of manuals |
Page 209 highlights
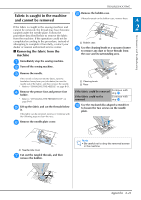
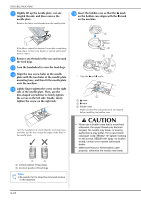
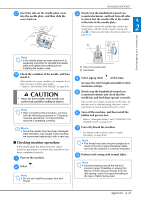
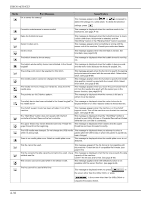
q Insert the tabs on the into the needle plate, needle plate cover and then slide the cover back on. TROUBLESHOOTING c Slowly turn the handwheel toward (counterclockwise), and look from you all sides to check that the needle falls at the center of the hole in the needle plate. If the needle contacts the needle plate, remove the needle plate, and then install it again, starting with A 2 step m in "Removing the fabric from the machine" on page A-24. Maintenance and Troubleshooting Note • If the needle plate has been removed it is especially important to reinstall the needle plate and tighten the screws prior to installing the bobbin case. r Check the install it. condition of the needle, and then If the needle is in a poor condition, for example, if it is bent, be sure to install a new needle. * Refer to "CHANGING THE NEEDLE" on page B-51. CAUTION • Never use bent needles. Bent needles can easily break, possibly resulting in injuries. Note • After completing this procedure, continue with the following procedure in "Checking machine operations" to check that the machine is operating correctly. Memo • Since the needle may have been damaged when the fabric was caught in the machine, we recommend replacing it with a new one. ■ Checking machine operations If the needle plate has been removed, check machine operations to confirm that installation has been completed correctly. a Turn on the machine. b Select . Note • Do not yet install the presser foot and thread. a Hole in the needle plate b Handwheel d Select zigzag stitch . At this time, increase the stitch length and width to their maximum settings. e Slowly turn the handwheel toward you (counterclockwise) and check that the needle bar and feed dogs operate correctly. If the needle or feed dogs contact the needle plate, the machine may be malfunctioning; therefore, contact your dealer or nearest authorized service center. f Turn off the machine, and bobbin and presser foot. then install the * Refer to "Setting the Bobbin" and "CHANGING THE PRESSER FOOT" on page B-49. g Correctly thread the machine. * For details on the machine, refer to "Upper Threading" on page B-42. Note • The thread may have become tangled as a result of incorrect upper threading. Make sure that the machine is correctly threaded. h Perform trial sewing with normal fabric. Note • Incorrect sewing may be the result of incorrect upper threading or sewing thin fabrics. If there are poor results from the trial sewing, check the upper threading or the type of fabric being used. Appendix A-25
-
 1
1 -
2
-
3
-
4
-
5
-
6
-
7
-
8
-
9
-
10
-
11
-
12
-
13
-
14
-
15
-
16
-
17
-
18
-
19
-
20
-
21
-
22
-
23
-
24
-
25
-
26
-
27
-
28
-
29
-
30
-
31
-
32
-
33
-
34
-
35
-
36
-
37
-
38
-
39
-
40
-
41
-
42
-
43
-
44
-
45
-
46
-
47
-
48
-
49
-
50
-
51
-
52
-
53
-
54
-
55
-
56
-
57
-
58
-
59
-
60
-
61
-
62
-
63
-
64
-
65
-
66
-
67
-
68
-
69
-
70
-
71
-
72
-
73
-
74
-
75
-
76
-
77
-
78
-
79
-
80
-
81
-
82
-
83
-
84
-
85
-
86
-
87
-
88
-
89
-
90
-
91
-
92
-
93
-
94
-
95
-
96
-
97
-
98
-
99
-
100
-
101
-
102
-
103
-
104
-
105
-
106
-
107
-
108
-
109
-
110
-
111
-
112
-
113
-
114
-
115
-
116
-
117
-
118
-
119
-
120
-
121
-
122
-
123
-
124
-
125
-
126
-
127
-
128
-
129
-
130
-
131
-
132
-
133
-
134
-
135
-
136
-
137
-
138
-
139
-
140
-
141
-
142
-
143
-
144
-
145
-
146
-
147
-
148
-
149
-
150
-
151
-
152
-
153
-
154
-
155
-
156
-
157
-
158
-
159
-
160
-
161
-
162
-
163
-
164
-
165
-
166
-
167
-
168
-
169
-
170
-
171
-
172
-
173
-
174
-
175
-
176
-
177
-
178
-
179
-
180
-
181
-
182
-
183
-
184
-
185
-
186
-
187
-
188
-
189
-
190
-
191
-
192
-
193
-
194
-
195
-
196
-
197
-
198
-
199
-
200
-
201
-
202
-
203
-
 204
204 -
 205
205 -
 206
206 -
 207
207 -
 208
208 -
 209
209 -
 210
210 -
 211
211 -
 212
212 -
 213
213 -
 214
214 -
215
-
216
-
217
-
218
-
219
-
220
-
221
-
222
-
223
-
224
 |
 |
