Brother International DreamWeaver„ VQ3000 Users Manual - English - Page 125
Heirloom
 |
View all Brother International DreamWeaver„ VQ3000 manuals
Add to My Manuals
Save this manual to your list of manuals |
Page 125 highlights
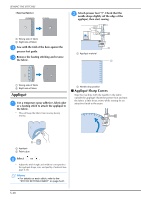
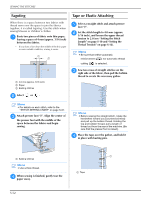
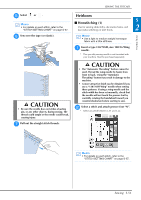
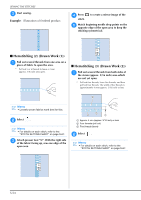
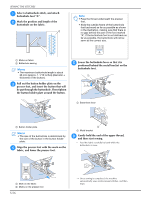
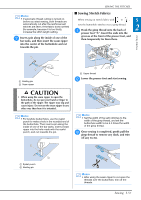
SEWING THE STITCHES e Select or . Memo • For details on each stitch, refer to the "STITCH SETTING CHART" on page S-67. f Sew over the tape (or elastic). CAUTION • Be sure the needle does not strike a basting pin, or any other objects, during sewing. The thread could tangle or the needle could break, causing injury. g Pull out the straight stitch threads. Heirloom ■ Hemstitching (1) Use for sewing tablecloths, decorative hems, and S 2 decorative stitching on shirt fronts. Utility Stitches Memo • Use a light to medium weight homespun fabric with a little stiffness. a Insert a needle. type 130/705H, size 100/16 Wing * This specialty sewing needle is not furnished with your machine. Must be purchased separately. CAUTION • The "Automatic Threading" button cannot be used. Thread the wing needle by hand, from front to back. Using the "Automatic Threading" button may result in damage to the machine. • A more attractive finish can be obtained if you use a "130/705H Wing" needle when sewing these patterns. If using a wing needle and the stitch width has been set manually, check that the needle will not touch the presser foot by carefully rotating the handwheel toward you (counterclockwise) before starting to sew. b Select a stitch and attach presser foot "N". * Select any stitch between 3-01 and 3-22. Memo • For details on each stitch, refer to the "STITCH SETTING CHART" on page S-67. Sewing S-53
-
 1
1 -
2
-
3
-
4
-
5
-
6
-
7
-
8
-
9
-
10
-
11
-
12
-
13
-
14
-
15
-
16
-
17
-
18
-
19
-
20
-
21
-
22
-
23
-
24
-
25
-
26
-
27
-
28
-
29
-
30
-
31
-
32
-
33
-
34
-
35
-
36
-
37
-
38
-
39
-
40
-
41
-
42
-
43
-
44
-
45
-
46
-
47
-
48
-
49
-
50
-
51
-
52
-
53
-
54
-
55
-
56
-
57
-
58
-
59
-
60
-
61
-
62
-
63
-
64
-
65
-
66
-
67
-
68
-
69
-
70
-
71
-
72
-
73
-
74
-
75
-
76
-
77
-
78
-
79
-
80
-
81
-
82
-
83
-
84
-
85
-
86
-
87
-
88
-
89
-
90
-
91
-
92
-
93
-
94
-
95
-
96
-
97
-
98
-
99
-
100
-
101
-
102
-
103
-
104
-
105
-
106
-
107
-
108
-
109
-
110
-
111
-
112
-
113
-
114
-
115
-
116
-
117
-
118
-
119
-
 120
120 -
 121
121 -
 122
122 -
 123
123 -
 124
124 -
 125
125 -
 126
126 -
 127
127 -
 128
128 -
 129
129 -
 130
130 -
131
-
132
-
133
-
134
-
135
-
136
-
137
-
138
-
139
-
140
-
141
-
142
-
143
-
144
-
145
-
146
-
147
-
148
-
149
-
150
-
151
-
152
-
153
-
154
-
155
-
156
-
157
-
158
-
159
-
160
-
161
-
162
-
163
-
164
-
165
-
166
-
167
-
168
-
169
-
170
-
171
-
172
-
173
-
174
-
175
-
176
-
177
-
178
-
179
-
180
-
181
-
182
-
183
-
184
-
185
-
186
-
187
-
188
-
189
-
190
-
191
-
192
-
193
-
194
-
195
-
196
-
197
-
198
-
199
-
200
-
201
-
202
-
203
-
204
-
205
-
206
-
207
-
208
-
209
-
210
-
211
-
212
-
213
-
214
-
215
-
216
-
217
-
218
-
219
-
220
-
221
-
222
-
223
-
224
 |
 |
