Brother International DreamWeaver„ VQ3000 Users Manual - English - Page 138
presser foot holder.
 |
View all Brother International DreamWeaver„ VQ3000 manuals
Add to My Manuals
Save this manual to your list of manuals |
Page 138 highlights
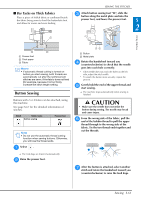
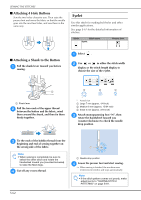
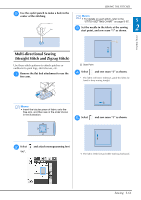
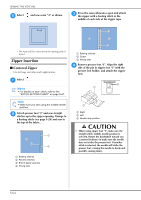
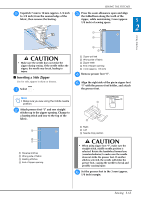
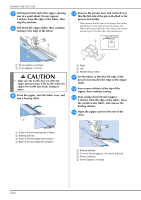
SEWING THE STITCHES g Starting from the end of sew to a point about 50 the zipper opening, mm (approx. 2 inches) from the edge of the fabric, then stop the machine. h Pull down the zipper slider, then sewing to the edge of the fabric. continue j Remove the presser foot, and reattach it so that the left side of the pin is attached to the presser foot holder. * When sewing the left side of the zipper, the needle should drop on the right side of the presser foot. When sewing the right side of the zipper, the needle should drop on the left side of the presser foot. a 50 mm (approx. 2 inches) b 3 mm (approx. 1/8 inch) CAUTION • Make sure the needle does not strike the zipper during sewing. If the needle strikes the zipper, the needle may break, leading to injury. i Close the zipper, turn sew a basting stitch. the fabric over, and a Right b Left c Needle drop position k Set the fabric so that the left edge of the presser foot touches the edge of the zipper teeth. l Sew reverse zipper, then stitches at the top continue sewing. of the m Stop sewing about 2 inches) from the 50 mm (approx. edge of the fabric, leave the needle in the fabric, and remove the basting stitches. n Open seam. the zipper and sew the rest of the a Front of the skirt (wrong side of fabric) b Basting stitches c Front of the skirt (right side of fabric) d Back of the skirt (right side of fabric) a Basting stitches b 7 mm to 10 mm (approx. 1/4 inch to 3/8 inch) c Reverse stitches d 50 mm (approx. 2 inches) S-66
-
 1
1 -
2
-
3
-
4
-
5
-
6
-
7
-
8
-
9
-
10
-
11
-
12
-
13
-
14
-
15
-
16
-
17
-
18
-
19
-
20
-
21
-
22
-
23
-
24
-
25
-
26
-
27
-
28
-
29
-
30
-
31
-
32
-
33
-
34
-
35
-
36
-
37
-
38
-
39
-
40
-
41
-
42
-
43
-
44
-
45
-
46
-
47
-
48
-
49
-
50
-
51
-
52
-
53
-
54
-
55
-
56
-
57
-
58
-
59
-
60
-
61
-
62
-
63
-
64
-
65
-
66
-
67
-
68
-
69
-
70
-
71
-
72
-
73
-
74
-
75
-
76
-
77
-
78
-
79
-
80
-
81
-
82
-
83
-
84
-
85
-
86
-
87
-
88
-
89
-
90
-
91
-
92
-
93
-
94
-
95
-
96
-
97
-
98
-
99
-
100
-
101
-
102
-
103
-
104
-
105
-
106
-
107
-
108
-
109
-
110
-
111
-
112
-
113
-
114
-
115
-
116
-
117
-
118
-
119
-
120
-
121
-
122
-
123
-
124
-
125
-
126
-
127
-
128
-
129
-
130
-
131
-
132
-
 133
133 -
 134
134 -
 135
135 -
 136
136 -
 137
137 -
 138
138 -
 139
139 -
 140
140 -
 141
141 -
 142
142 -
 143
143 -
144
-
145
-
146
-
147
-
148
-
149
-
150
-
151
-
152
-
153
-
154
-
155
-
156
-
157
-
158
-
159
-
160
-
161
-
162
-
163
-
164
-
165
-
166
-
167
-
168
-
169
-
170
-
171
-
172
-
173
-
174
-
175
-
176
-
177
-
178
-
179
-
180
-
181
-
182
-
183
-
184
-
185
-
186
-
187
-
188
-
189
-
190
-
191
-
192
-
193
-
194
-
195
-
196
-
197
-
198
-
199
-
200
-
201
-
202
-
203
-
204
-
205
-
206
-
207
-
208
-
209
-
210
-
211
-
212
-
213
-
214
-
215
-
216
-
217
-
218
-
219
-
220
-
221
-
222
-
223
-
224
 |
 |
