Brother International DreamWeaver„ VQ3000 Users Manual - English - Page 132
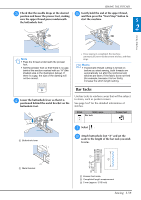
the presser foot.
 |
View all Brother International DreamWeaver„ VQ3000 manuals
Add to My Manuals
Save this manual to your list of manuals |
Page 132 highlights
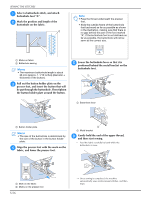
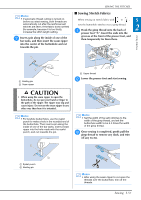
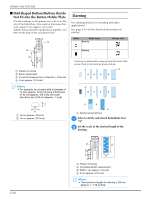
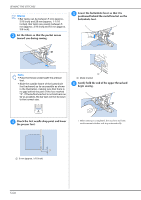
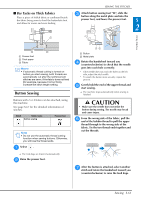
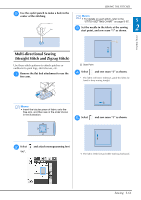
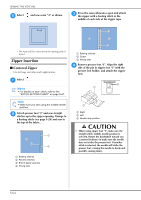
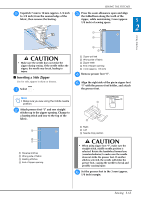
SEWING THE STITCHES Memo • Bar tacks can be between 5 mm (approx. 3/16 inch) and 28 mm (approx. 1-1/16 inches). Bar tacks are usually between 5 mm (approx. 3/16 inch) and 10 mm (approx. 3/8 inch). c Set the fabric so that the pocket toward you during sewing. moves e Lower the buttonhole lever so that it is positioned behind the metal bracket on the buttonhole foot. Note • Pass the thread underneath the presser foot. • Slide the outside frame of the buttonhole foot backward as far as possible as shown in the illustration, making sure that there is no gap behind the part of the foot marked "A". If the buttonhole foot is not slid back as far as possible, the bar tack will not be sewn to the correct size. a Metal bracket f Gently hold the begin sewing. end of the upper thread and d Check the first needle the presser foot. drop point and lower → When sewing is completed, the machine will sew reinforcement stitches and stop automatically. a 2 mm (approx. 1/16 inch) S-60
-
 1
1 -
2
-
3
-
4
-
5
-
6
-
7
-
8
-
9
-
10
-
11
-
12
-
13
-
14
-
15
-
16
-
17
-
18
-
19
-
20
-
21
-
22
-
23
-
24
-
25
-
26
-
27
-
28
-
29
-
30
-
31
-
32
-
33
-
34
-
35
-
36
-
37
-
38
-
39
-
40
-
41
-
42
-
43
-
44
-
45
-
46
-
47
-
48
-
49
-
50
-
51
-
52
-
53
-
54
-
55
-
56
-
57
-
58
-
59
-
60
-
61
-
62
-
63
-
64
-
65
-
66
-
67
-
68
-
69
-
70
-
71
-
72
-
73
-
74
-
75
-
76
-
77
-
78
-
79
-
80
-
81
-
82
-
83
-
84
-
85
-
86
-
87
-
88
-
89
-
90
-
91
-
92
-
93
-
94
-
95
-
96
-
97
-
98
-
99
-
100
-
101
-
102
-
103
-
104
-
105
-
106
-
107
-
108
-
109
-
110
-
111
-
112
-
113
-
114
-
115
-
116
-
117
-
118
-
119
-
120
-
121
-
122
-
123
-
124
-
125
-
126
-
 127
127 -
 128
128 -
 129
129 -
 130
130 -
 131
131 -
 132
132 -
 133
133 -
 134
134 -
 135
135 -
 136
136 -
 137
137 -
138
-
139
-
140
-
141
-
142
-
143
-
144
-
145
-
146
-
147
-
148
-
149
-
150
-
151
-
152
-
153
-
154
-
155
-
156
-
157
-
158
-
159
-
160
-
161
-
162
-
163
-
164
-
165
-
166
-
167
-
168
-
169
-
170
-
171
-
172
-
173
-
174
-
175
-
176
-
177
-
178
-
179
-
180
-
181
-
182
-
183
-
184
-
185
-
186
-
187
-
188
-
189
-
190
-
191
-
192
-
193
-
194
-
195
-
196
-
197
-
198
-
199
-
200
-
201
-
202
-
203
-
204
-
205
-
206
-
207
-
208
-
209
-
210
-
211
-
212
-
213
-
214
-
215
-
216
-
217
-
218
-
219
-
220
-
221
-
222
-
223
-
224
 |
 |
