Brother International DreamWeaver„ VQ3000 Users Manual - English - Page 14
Needle and Presser Foot
 |
View all Brother International DreamWeaver„ VQ3000 manuals
Add to My Manuals
Save this manual to your list of manuals |
Page 14 highlights
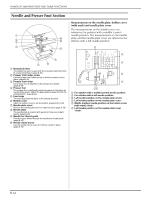
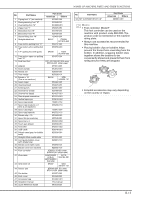
NAMES OF MACHINE PARTS AND THEIR FUNCTIONS Needle and Presser Foot Section Measurements on the needle plate, bobbin cover (with mark) and needle plate cover The measurements on the bobbin cover are references for patterns with a middle (center) needle position. The measurements on the needle plate and the needle plate cover are references for stitches with a left needle position. a Buttonhole lever The buttonhole lever is used with the one-step buttonhole foot to create buttonholes. (page S-55) b Presser foot holder screw Use the presser foot holder screw to hold the presser foot in place. (page B-49) c Presser foot holder The presser foot is attached to the presser foot holder. (page B-49) d Presser foot The presser foot consistently applies pressure to the fabric as sewing takes place. Attach the appropriate presser foot for the selected stitch. (page B-49) e Feed dogs The feed dogs feed the fabric in the sewing direction. f Bobbin cover Open the bobbin cover to set the bobbin. (page B-39, S-32) g Needle plate cover Remove the needle plate cover to clean the race. (page S-26) h Needle plate The needle plate is marked with guides to help sew straight seams. (page S-26) i Needle bar thread guide Pass the upper thread through the needle bar thread guide. (page B-42) j Needle clamp screw Use the needle clamp screw to hold the needle in place. (page B-49) a For stitches with a middle (center) needle position b For stitches with a left needle position c Left needle position on the needle plate d Left needle position on the needle plate e Middle (center) needle position on the bobbin cover (with mark) f Left needle position on the needle plate cover B-12
-
 1
1 -
2
-
3
-
4
-
5
-
6
-
7
-
8
-
 9
9 -
 10
10 -
 11
11 -
 12
12 -
 13
13 -
 14
14 -
 15
15 -
 16
16 -
 17
17 -
 18
18 -
 19
19 -
20
-
21
-
22
-
23
-
24
-
25
-
26
-
27
-
28
-
29
-
30
-
31
-
32
-
33
-
34
-
35
-
36
-
37
-
38
-
39
-
40
-
41
-
42
-
43
-
44
-
45
-
46
-
47
-
48
-
49
-
50
-
51
-
52
-
53
-
54
-
55
-
56
-
57
-
58
-
59
-
60
-
61
-
62
-
63
-
64
-
65
-
66
-
67
-
68
-
69
-
70
-
71
-
72
-
73
-
74
-
75
-
76
-
77
-
78
-
79
-
80
-
81
-
82
-
83
-
84
-
85
-
86
-
87
-
88
-
89
-
90
-
91
-
92
-
93
-
94
-
95
-
96
-
97
-
98
-
99
-
100
-
101
-
102
-
103
-
104
-
105
-
106
-
107
-
108
-
109
-
110
-
111
-
112
-
113
-
114
-
115
-
116
-
117
-
118
-
119
-
120
-
121
-
122
-
123
-
124
-
125
-
126
-
127
-
128
-
129
-
130
-
131
-
132
-
133
-
134
-
135
-
136
-
137
-
138
-
139
-
140
-
141
-
142
-
143
-
144
-
145
-
146
-
147
-
148
-
149
-
150
-
151
-
152
-
153
-
154
-
155
-
156
-
157
-
158
-
159
-
160
-
161
-
162
-
163
-
164
-
165
-
166
-
167
-
168
-
169
-
170
-
171
-
172
-
173
-
174
-
175
-
176
-
177
-
178
-
179
-
180
-
181
-
182
-
183
-
184
-
185
-
186
-
187
-
188
-
189
-
190
-
191
-
192
-
193
-
194
-
195
-
196
-
197
-
198
-
199
-
200
-
201
-
202
-
203
-
204
-
205
-
206
-
207
-
208
-
209
-
210
-
211
-
212
-
213
-
214
-
215
-
216
-
217
-
218
-
219
-
220
-
221
-
222
-
223
-
224
 |
 |
