Brother International DreamWeaver„ VQ3000 Users Manual - English - Page 22
Setting Your Machine for the First
 |
View all Brother International DreamWeaver„ VQ3000 manuals
Add to My Manuals
Save this manual to your list of manuals |
Page 22 highlights
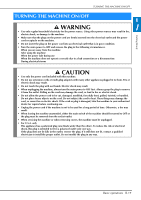
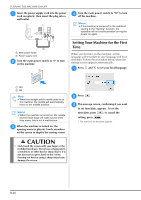
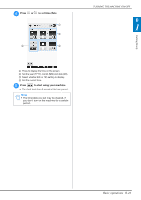
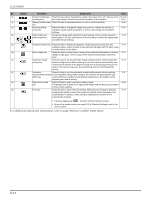
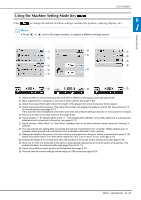
TURNING THE MACHINE ON/OFF a Insert the power supply cord into the power cord receptacle, then insert the plug into a wall outlet. d Turn the main power off the machine. switch to "O" to turn Memo • If the machine is turned off in the middle of sewing in the "Sewing" function, the operation will not continued after turning the power on again. a Main power switch b Power supply cord b Turn the main power on the machine. switch to "I" to turn Setting Your Machine for the First Time When you first turn on the machine, set the language and time/date to your language and local time/date. Follow the procedure below when the settings screen appears automatically. a Press and to set your local language. a OFF b ON Note • When the straight stitch needle plate is on the machine, the needle will automatically move to the middle position. Memo • When the machine is turned on, the needle and the feed dogs will make sound when they move; this is not a malfunction. c When the machine is turned on, the opening movie is played. Touch anywhere on the screen to display the sewing screen. b Press . c The message screen, confirming if you want to set time/date, appears. To set the time/date, press ; to cancel the setting, press . → The screen to set time/date appears. CAUTION • Only touch the screen with your finger or the included touch pen. Do not use a sharp pencil, screwdriver, or other hard or sharp object. It is not necessary to press hard on the screen. Pressing too hard or using a sharp object may damage the screen. B-20
-
 1
1 -
2
-
3
-
4
-
5
-
6
-
7
-
8
-
9
-
10
-
11
-
12
-
13
-
14
-
15
-
16
-
 17
17 -
 18
18 -
 19
19 -
 20
20 -
 21
21 -
 22
22 -
 23
23 -
 24
24 -
 25
25 -
 26
26 -
 27
27 -
28
-
29
-
30
-
31
-
32
-
33
-
34
-
35
-
36
-
37
-
38
-
39
-
40
-
41
-
42
-
43
-
44
-
45
-
46
-
47
-
48
-
49
-
50
-
51
-
52
-
53
-
54
-
55
-
56
-
57
-
58
-
59
-
60
-
61
-
62
-
63
-
64
-
65
-
66
-
67
-
68
-
69
-
70
-
71
-
72
-
73
-
74
-
75
-
76
-
77
-
78
-
79
-
80
-
81
-
82
-
83
-
84
-
85
-
86
-
87
-
88
-
89
-
90
-
91
-
92
-
93
-
94
-
95
-
96
-
97
-
98
-
99
-
100
-
101
-
102
-
103
-
104
-
105
-
106
-
107
-
108
-
109
-
110
-
111
-
112
-
113
-
114
-
115
-
116
-
117
-
118
-
119
-
120
-
121
-
122
-
123
-
124
-
125
-
126
-
127
-
128
-
129
-
130
-
131
-
132
-
133
-
134
-
135
-
136
-
137
-
138
-
139
-
140
-
141
-
142
-
143
-
144
-
145
-
146
-
147
-
148
-
149
-
150
-
151
-
152
-
153
-
154
-
155
-
156
-
157
-
158
-
159
-
160
-
161
-
162
-
163
-
164
-
165
-
166
-
167
-
168
-
169
-
170
-
171
-
172
-
173
-
174
-
175
-
176
-
177
-
178
-
179
-
180
-
181
-
182
-
183
-
184
-
185
-
186
-
187
-
188
-
189
-
190
-
191
-
192
-
193
-
194
-
195
-
196
-
197
-
198
-
199
-
200
-
201
-
202
-
203
-
204
-
205
-
206
-
207
-
208
-
209
-
210
-
211
-
212
-
213
-
214
-
215
-
216
-
217
-
218
-
219
-
220
-
221
-
222
-
223
-
224
 |
 |
