Brother International DreamWeaver„ VQ3000 Users Manual - English - Page 87
Using the Knee Lifter, Pivoting
 |
View all Brother International DreamWeaver„ VQ3000 manuals
Add to My Manuals
Save this manual to your list of manuals |
Page 87 highlights
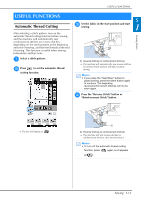
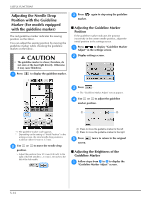
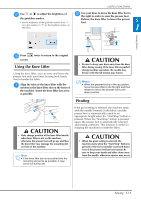
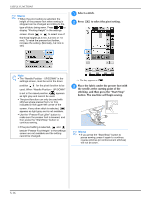
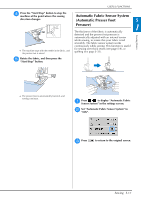
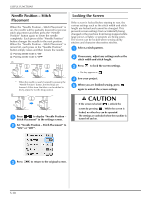
USEFUL FUNCTIONS b Use or to adjust the brightness of the guideline marker. → Set the brightness of the guideline marker from "1" for a dim marker, to "5" for the brightest marker, on the fabric. b Use your knee to move the knee lifter bar to the right in order to raise the presser foot. Release the knee lifter to lower the presser foot. S 1 Sewing Basics c Press screen. twice to return to the original Using the Knee Lifter Using the knee lifter, you can raise and lower the presser foot with your knee, leaving both hands free to handle the fabric. a Align the tabs on the knee lifter with the notches in the knee lifter slot on the front of the machine. Insert the knee lifter bar as far as possible. CAUTION • Be sure to keep your knee away from the knee lifter during sewing. If the knee lifter is pushed during machine operation, the needle may break or the thread tension may loosen. Memo • When the presser foot is in the up position, move the knee lifter to the far right and then release to return the presser foot to the down position. Pivoting CAUTION • Only change position of the knee lifter handle when knee lifter is not on the machine, otherwise the presser foot will go up, and then the knee lifter may damage the mounting slot on front of the machine. Note • If the knee lifter bar is not pushed into the mounting slot as far as possible, it may come out during use. If the pivot setting is selected, the machine stops with the needle lowered (in the fabric) and the presser foot is automatically raised to an appropriate height when the "Start/Stop" button is pressed. When the "Start/Stop" button is pressed again, the presser foot is automatically lowered and sewing continues. This function is useful for stopping the machine to rotate the fabric. CAUTION • When the pivot setting is selected, the machine starts when the "Start/Stop" button is pressed or the foot controller is pressed down even if the presser foot has been raised. Be sure to keep your hands and other items away from the needle, otherwise injuries may occur. Sewing S-15
-
 1
1 -
2
-
3
-
4
-
5
-
6
-
7
-
8
-
9
-
10
-
11
-
12
-
13
-
14
-
15
-
16
-
17
-
18
-
19
-
20
-
21
-
22
-
23
-
24
-
25
-
26
-
27
-
28
-
29
-
30
-
31
-
32
-
33
-
34
-
35
-
36
-
37
-
38
-
39
-
40
-
41
-
42
-
43
-
44
-
45
-
46
-
47
-
48
-
49
-
50
-
51
-
52
-
53
-
54
-
55
-
56
-
57
-
58
-
59
-
60
-
61
-
62
-
63
-
64
-
65
-
66
-
67
-
68
-
69
-
70
-
71
-
72
-
73
-
74
-
75
-
76
-
77
-
78
-
79
-
80
-
81
-
 82
82 -
 83
83 -
 84
84 -
 85
85 -
 86
86 -
 87
87 -
 88
88 -
 89
89 -
 90
90 -
 91
91 -
 92
92 -
93
-
94
-
95
-
96
-
97
-
98
-
99
-
100
-
101
-
102
-
103
-
104
-
105
-
106
-
107
-
108
-
109
-
110
-
111
-
112
-
113
-
114
-
115
-
116
-
117
-
118
-
119
-
120
-
121
-
122
-
123
-
124
-
125
-
126
-
127
-
128
-
129
-
130
-
131
-
132
-
133
-
134
-
135
-
136
-
137
-
138
-
139
-
140
-
141
-
142
-
143
-
144
-
145
-
146
-
147
-
148
-
149
-
150
-
151
-
152
-
153
-
154
-
155
-
156
-
157
-
158
-
159
-
160
-
161
-
162
-
163
-
164
-
165
-
166
-
167
-
168
-
169
-
170
-
171
-
172
-
173
-
174
-
175
-
176
-
177
-
178
-
179
-
180
-
181
-
182
-
183
-
184
-
185
-
186
-
187
-
188
-
189
-
190
-
191
-
192
-
193
-
194
-
195
-
196
-
197
-
198
-
199
-
200
-
201
-
202
-
203
-
204
-
205
-
206
-
207
-
208
-
209
-
210
-
211
-
212
-
213
-
214
-
215
-
216
-
217
-
218
-
219
-
220
-
221
-
222
-
223
-
224
 |
 |
