Brother International DreamWeaver„ VQ3000 Users Manual - English - Page 75
Sewing a Stitch
 |
View all Brother International DreamWeaver„ VQ3000 manuals
Add to My Manuals
Save this manual to your list of manuals |
Page 75 highlights
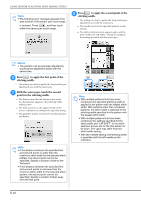
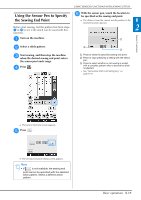
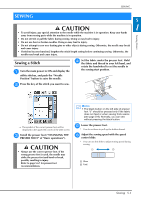
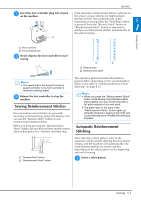
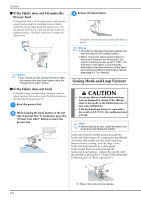
SEWING SEWING S CAUTION 1 • To avoid injury, pay special attention to the needle while the machine is in operation. Keep your hands away from moving parts while the machine is in operation. Sewing Basics • Do not stretch or pull the fabric during sewing. Doing so may lead to injury. • Do not use bent or broken needles. Doing so may lead to injury. • Do not attempt to sew over basting pins or other objects during sewing. Otherwise, the needle may break and cause injury. • If stitches become bunched, lengthen the stitch length setting before continuing sewing. Otherwise, the needle may break and cause injury. Sewing a Stitch a Turn the main power to ON and display the utility stitches, and push the "Needle Position" button to raise the needle. d Set the the fabric under the fabric and thread in presser foot. Hold your left hand, and rotate the handwheel to set the needle in the sewing start position. b Press the key of the stitch you want to sew. Memo • The black button on the left side of presser foot "J" should be pressed only if the fabric does not feed or when sewing thick seams (see page S-8). Normally, you can sew without pressing the black button. → The symbol of the correct presser foot will be displayed in the upper left corner of the LCD screen. c Install the presser foot ("CHANGING THE PRESSER FOOT" of "Basic operations"). CAUTION • Always use the correct presser foot. If the wrong presser foot is used, the needle may strike the presser foot and bend or break, possibly resulting in injury. Refer to page S-67 for presser foot recommendations. e Lower the presser foot. * You do not have to pull up the bobbin thread. f Adjust the sewing control slide. speed with the speed * You can use this slide to adjust sewing speed during sewing. a Slow b Fast Sewing S-3
-
 1
1 -
2
-
3
-
4
-
5
-
6
-
7
-
8
-
9
-
10
-
11
-
12
-
13
-
14
-
15
-
16
-
17
-
18
-
19
-
20
-
21
-
22
-
23
-
24
-
25
-
26
-
27
-
28
-
29
-
30
-
31
-
32
-
33
-
34
-
35
-
36
-
37
-
38
-
39
-
40
-
41
-
42
-
43
-
44
-
45
-
46
-
47
-
48
-
49
-
50
-
51
-
52
-
53
-
54
-
55
-
56
-
57
-
58
-
59
-
60
-
61
-
62
-
63
-
64
-
65
-
66
-
67
-
68
-
69
-
 70
70 -
 71
71 -
 72
72 -
 73
73 -
 74
74 -
 75
75 -
 76
76 -
 77
77 -
 78
78 -
 79
79 -
 80
80 -
81
-
82
-
83
-
84
-
85
-
86
-
87
-
88
-
89
-
90
-
91
-
92
-
93
-
94
-
95
-
96
-
97
-
98
-
99
-
100
-
101
-
102
-
103
-
104
-
105
-
106
-
107
-
108
-
109
-
110
-
111
-
112
-
113
-
114
-
115
-
116
-
117
-
118
-
119
-
120
-
121
-
122
-
123
-
124
-
125
-
126
-
127
-
128
-
129
-
130
-
131
-
132
-
133
-
134
-
135
-
136
-
137
-
138
-
139
-
140
-
141
-
142
-
143
-
144
-
145
-
146
-
147
-
148
-
149
-
150
-
151
-
152
-
153
-
154
-
155
-
156
-
157
-
158
-
159
-
160
-
161
-
162
-
163
-
164
-
165
-
166
-
167
-
168
-
169
-
170
-
171
-
172
-
173
-
174
-
175
-
176
-
177
-
178
-
179
-
180
-
181
-
182
-
183
-
184
-
185
-
186
-
187
-
188
-
189
-
190
-
191
-
192
-
193
-
194
-
195
-
196
-
197
-
198
-
199
-
200
-
201
-
202
-
203
-
204
-
205
-
206
-
207
-
208
-
209
-
210
-
211
-
212
-
213
-
214
-
215
-
216
-
217
-
218
-
219
-
220
-
221
-
222
-
223
-
224
 |
 |
