Brother International DreamWeaver„ VQ3000 Users Manual - English - Page 190
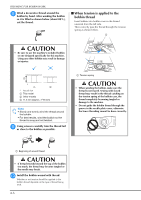
When tension is applied to the, bobbin thread
 |
View all Brother International DreamWeaver„ VQ3000 manuals
Add to My Manuals
Save this manual to your list of manuals |
Page 190 highlights
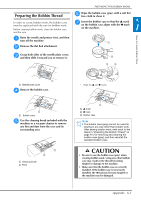
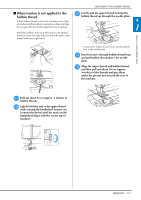
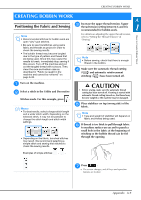
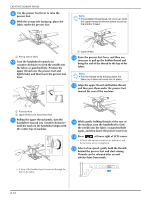
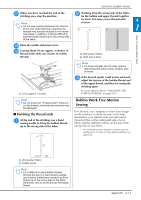
PREPARING FOR BOBBIN WORK h Wind a bobbin decorative thread around the by hand. After winding the bobbin so it is filled as shown below (about 80%), cut the thread. ■ When tension is applied to the bobbin thread Insert bobbin into bobbin case so the thread unwinds from the left side. Then correctly pass the thread through the tension spring as shown below. CAUTION • Be sure to use the machine's included bobbin or one designed specifically for this machine. Using any other bobbin may result in damage or injuries. * Actual size a This model b Other models c 11.5 mm (approx. 7/16 inch) Note • Slowly and evenly wind the thread around the bobbin. • For best results, wind the bobbin so the thread is snug and not twisted. i Using scissors carefully trim the thread as close to the bobbin as possible. tail a Tension spring CAUTION • When winding the bobbin, make sure the thread is not frayed. Sewing with frayed thread may result in the thread catching on the tension spring of the bobbin case, the thread completely becoming tangled or damage to the machine. • Do not guide the bobbin thread through the groove in the needle plate cover, otherwise the lower threading cannot be done correctly. a Beginning of wound thread CAUTION • If thread extends beyond the top of the bobbin too much, the thread may become tangled or the needle may break. j Install the bobbin wound with thread. Whether or not tension should be applied to the bobbin thread depends on the type of thread being used. A-6
-
 1
1 -
2
-
3
-
4
-
5
-
6
-
7
-
8
-
9
-
10
-
11
-
12
-
13
-
14
-
15
-
16
-
17
-
18
-
19
-
20
-
21
-
22
-
23
-
24
-
25
-
26
-
27
-
28
-
29
-
30
-
31
-
32
-
33
-
34
-
35
-
36
-
37
-
38
-
39
-
40
-
41
-
42
-
43
-
44
-
45
-
46
-
47
-
48
-
49
-
50
-
51
-
52
-
53
-
54
-
55
-
56
-
57
-
58
-
59
-
60
-
61
-
62
-
63
-
64
-
65
-
66
-
67
-
68
-
69
-
70
-
71
-
72
-
73
-
74
-
75
-
76
-
77
-
78
-
79
-
80
-
81
-
82
-
83
-
84
-
85
-
86
-
87
-
88
-
89
-
90
-
91
-
92
-
93
-
94
-
95
-
96
-
97
-
98
-
99
-
100
-
101
-
102
-
103
-
104
-
105
-
106
-
107
-
108
-
109
-
110
-
111
-
112
-
113
-
114
-
115
-
116
-
117
-
118
-
119
-
120
-
121
-
122
-
123
-
124
-
125
-
126
-
127
-
128
-
129
-
130
-
131
-
132
-
133
-
134
-
135
-
136
-
137
-
138
-
139
-
140
-
141
-
142
-
143
-
144
-
145
-
146
-
147
-
148
-
149
-
150
-
151
-
152
-
153
-
154
-
155
-
156
-
157
-
158
-
159
-
160
-
161
-
162
-
163
-
164
-
165
-
166
-
167
-
168
-
169
-
170
-
171
-
172
-
173
-
174
-
175
-
176
-
177
-
178
-
179
-
180
-
181
-
182
-
183
-
184
-
 185
185 -
 186
186 -
 187
187 -
 188
188 -
 189
189 -
 190
190 -
 191
191 -
 192
192 -
 193
193 -
 194
194 -
 195
195 -
196
-
197
-
198
-
199
-
200
-
201
-
202
-
203
-
204
-
205
-
206
-
207
-
208
-
209
-
210
-
211
-
212
-
213
-
214
-
215
-
216
-
217
-
218
-
219
-
220
-
221
-
222
-
223
-
224
 |
 |
