Brother International DreamWeaver„ VQ3000 Users Manual - English - Page 205
hand, pass the thread through the thread
 |
View all Brother International DreamWeaver„ VQ3000 manuals
Add to My Manuals
Save this manual to your list of manuals |
Page 205 highlights
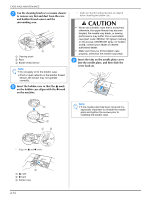
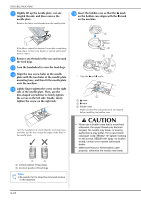
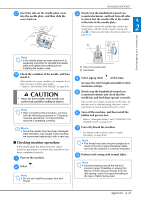
Maintenance and Troubleshooting TROUBLESHOOTING d Raise the lever. presser foot using the presser foot g While holding hand, pass the the thread in your right thread through the thread guide in the direction indicated. A 2 * If the presser foot is not raised, the sewing machine cannot be threaded correctly. e Raise the needle by turning the handwheel toward you (counterclockwise) so that the mark on the wheel points up, or press "Needle Position" button once or twice to raise the needle. h Guide the thread down, up, then down through the groove, as shown in the illustration. or Memo • Look in the upper groove area to check if the thread catches on the take-up lever visible inside the upper groove area. a Mark f While holding the pull the thread up thread with both hands, from under the thread guide plate. a Look in the upper groove area i Pass the thread through the needle bar thread guide (marked "6") by holding the thread with both hands and guiding it as shown in the illustration. a Thread guide plate a Needle bar thread guide j Thread and o the needle according to steps j in "Upper Threading" on page B-42. Appendix A-21
-
 1
1 -
2
-
3
-
4
-
5
-
6
-
7
-
8
-
9
-
10
-
11
-
12
-
13
-
14
-
15
-
16
-
17
-
18
-
19
-
20
-
21
-
22
-
23
-
24
-
25
-
26
-
27
-
28
-
29
-
30
-
31
-
32
-
33
-
34
-
35
-
36
-
37
-
38
-
39
-
40
-
41
-
42
-
43
-
44
-
45
-
46
-
47
-
48
-
49
-
50
-
51
-
52
-
53
-
54
-
55
-
56
-
57
-
58
-
59
-
60
-
61
-
62
-
63
-
64
-
65
-
66
-
67
-
68
-
69
-
70
-
71
-
72
-
73
-
74
-
75
-
76
-
77
-
78
-
79
-
80
-
81
-
82
-
83
-
84
-
85
-
86
-
87
-
88
-
89
-
90
-
91
-
92
-
93
-
94
-
95
-
96
-
97
-
98
-
99
-
100
-
101
-
102
-
103
-
104
-
105
-
106
-
107
-
108
-
109
-
110
-
111
-
112
-
113
-
114
-
115
-
116
-
117
-
118
-
119
-
120
-
121
-
122
-
123
-
124
-
125
-
126
-
127
-
128
-
129
-
130
-
131
-
132
-
133
-
134
-
135
-
136
-
137
-
138
-
139
-
140
-
141
-
142
-
143
-
144
-
145
-
146
-
147
-
148
-
149
-
150
-
151
-
152
-
153
-
154
-
155
-
156
-
157
-
158
-
159
-
160
-
161
-
162
-
163
-
164
-
165
-
166
-
167
-
168
-
169
-
170
-
171
-
172
-
173
-
174
-
175
-
176
-
177
-
178
-
179
-
180
-
181
-
182
-
183
-
184
-
185
-
186
-
187
-
188
-
189
-
190
-
191
-
192
-
193
-
194
-
195
-
196
-
197
-
198
-
199
-
 200
200 -
 201
201 -
 202
202 -
 203
203 -
 204
204 -
 205
205 -
 206
206 -
 207
207 -
 208
208 -
 209
209 -
 210
210 -
211
-
212
-
213
-
214
-
215
-
216
-
217
-
218
-
219
-
220
-
221
-
222
-
223
-
224
 |
 |
